使用 OpenCV 进行圆检测 | Python
圆形检测在生物医学应用中有多种用途,从虹膜检测到白细胞分割。所采用的技术类似于本文所讨论的用于检测线条的技术。
圆检测基础
一个圆可以用以下等式描述:
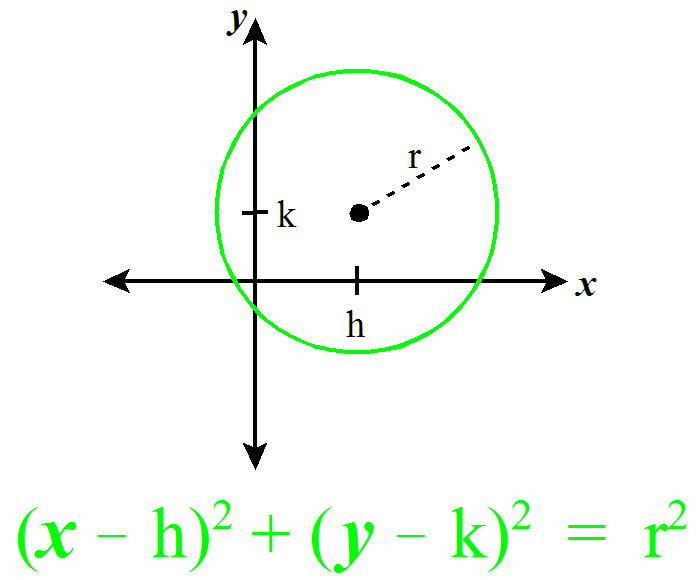
为了检测圆,我们可以固定一个点 (x, y)。现在,我们需要找到 3 个参数:a、b 和 r。因此,问题在于 3 维搜索空间。为了找到可能的圆,该算法使用称为“累加器矩阵”的 3-D 矩阵来存储潜在的 a、b 和 r 值。 a(中心的 x 坐标)的值范围可以从 1 到 rows,b(中心的 y 坐标)的范围可以从 1 到 cols,r 的范围可以从 1 到 maxRadius =  .
.
下面是算法的步骤。
- 初始化累加器矩阵:用零初始化维度 rows * cols * maxRadius 的矩阵。
- 预处理图像:在图像上应用模糊、灰度和边缘检测器。这样做是为了确保圆圈显示为变暗的图像边缘。
- 循环遍历点:选择一个点
 在图像上。
在图像上。 - 固定 r 并通过 a 和 b 循环:使用双嵌套循环找到 r 的值,在给定范围内改变 a 和 b。
for a in range(rows): for b in range(cols): r = math.sqrt((xi - a)**2 + (yi - b)**2) accum_matrix[a][b][r] += 1 - 投票:选择累加器矩阵中具有最大值的点。这些是表明存在具有 a、b 和 r 参数的圆的优点。这给了我们圆的霍夫空间。
- 寻找圈子:最后将以上圈子作为候选圈子,根据图片进行投票。累加器矩阵中的最大投票圆为我们提供了圆。
OpenCV 中的HoughCircles函数具有以下参数,可以根据图像进行更改。
Detection Method: OpenCV has an advanced implementation, HOUGH_GRADIENT, which uses gradient of the edges instead of filling up the entire 3D accumulator matrix, thereby speeding up the process.
dp: This is the ratio of the resolution of original image to the accumulator matrix.
minDist: This parameter controls the minimum distance between detected circles.
Param1: Canny edge detection requires two parameters — minVal and maxVal. Param1 is the higher threshold of the two. The second one is set as Param1/2.
Param2: This is the accumulator threshold for the candidate detected circles. By increasing this threshold value, we can ensure that only the best circles, corresponding to larger accumulator values, are returned.
minRadius: Minimum circle radius.
maxRadius: Maximum circle radius.
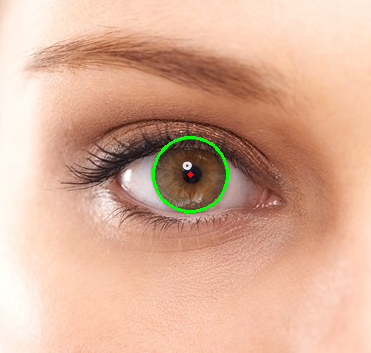
下面是在上述输入图像上使用 OpenCV 查找圆圈的代码。
import cv2
import numpy as np

# Read image.
img = cv2.imread('eyes.jpg', cv2.IMREAD_COLOR)

# Convert to grayscale.
gray = cv2.cvtColor(img, cv2.COLOR_BGR2GRAY)

# Blur using 3 * 3 kernel.
gray_blurred = cv2.blur(gray, (3, 3))

# Apply Hough transform on the blurred image.
detected_circles = cv2.HoughCircles(gray_blurred,
                   cv2.HOUGH_GRADIENT, 1, 20, param1 = 50,
               param2 = 30, minRadius = 1, maxRadius = 40)

# Draw circles that are detected.
if detected_circles is not None:

    # Convert the circle parameters a, b and r to integers.
    detected_circles = np.uint16(np.around(detected_circles))

    for pt in detected_circles[0, :]:
        a, b, r = pt[0], pt[1], pt[2]

        # Draw the circumference of the circle.
        cv2.circle(img, (a, b), r, (0, 255, 0), 2)

        # Draw a small circle (of radius 1) to show the center.
        cv2.circle(img, (a, b), 1, (0, 0, 255), 3)
        cv2.imshow("Detected Circle", img)
        cv2.waitKey(0)
输出: