使用 OpenCV-Python 检测对象
OpenCV 是用于计算机视觉、机器学习和图像处理的庞大开源库,现在它在实时操作中发挥着重要作用,这在当今的系统中非常重要。通过使用它,人们可以处理图像和视频以识别物体、面部,甚至是人类的笔迹。本文重点介绍检测对象。
注意:有关详细信息,请参阅 OpenCV 简介。
物体检测
对象检测是一种与计算机视觉、图像处理和深度学习相关的计算机技术,用于检测图像和视频中的对象实例。我们将在本文中使用称为haar cascades的东西进行对象检测。
哈尔瀑布
Haar Cascade 分类器是一种有效的目标检测方法。这种方法是由 Paul Viola 和 Michael Jones 在他们的论文 Rapid Object Detection using a Boosted Cascade of Simple Features 中提出的。 Haar Cascade 是一种基于机器学习的方法,其中使用大量正面和负面图像来训练分类器。
- 正面图像——这些图像包含我们希望分类器识别的图像。
- 负图像 -其他所有图像,不包含我们想要检测的对象。
要求。
下载要求的步骤如下:
- 在终端运行以下命令安装opencv。
pip install opencv-python - 运行以下命令在终端中安装 matplotlib。
pip install matplotlib - 要将以下代码中使用的 haar 级联文件和图像下载为 zip 文件,请单击此处。
注意:将 XML 文件和 PNG 图像放在与Python脚本相同的文件夹中。
执行
使用的图像:

打开图像
import cv2
from matplotlib import pyplot as plt


# Opening image
img = cv2.imread("image.jpg")

# OpenCV opens images as BRG
# but we want it as RGB and
# we also need a grayscale
# version
img_gray = cv2.cvtColor(img, cv2.COLOR_BGR2GRAY)
img_rgb = cv2.cvtColor(img, cv2.COLOR_BGR2RGB)

# Creates the environment
# of the picture and shows it
plt.subplot(1, 1, 1)
plt.imshow(img_rgb)
plt.show()
输出:

认出
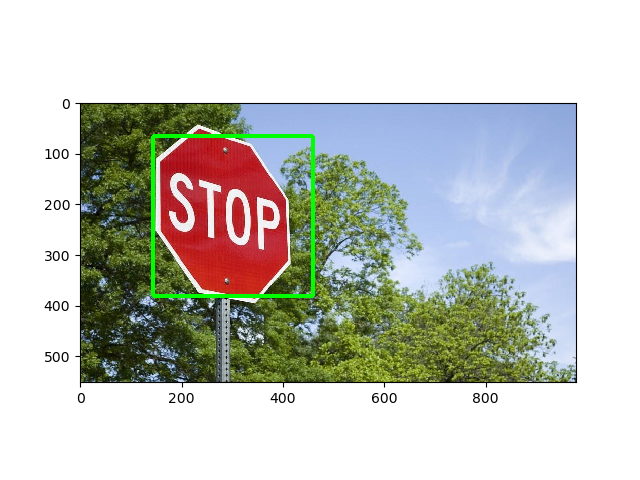
我们将使用 OpenCV 的detectMultiScale()函数来识别大符号和小符号:
# Use minSize because for not
# bothering with extra-small
# dots that would look like STOP signs
found = stop_data.detectMultiScale(img_gray,
                                   minSize =(20, 20))

# Don't do anything if there's
# no sign
amount_found = len(found)


if amount_found != 0:

    # There may be more than one
    # sign in the image
    for (x, y, width, height) in found:

        # We draw a green rectangle around
        # every recognized sign
        cv2.rectangle(img_rgb, (x, y),
                      (x + height, y + width),
                      (0, 255, 0), 5)
这是懒惰的开发者的完整脚本:
import cv2
from matplotlib import pyplot as plt

# Opening image
img = cv2.imread("image.jpg")

# OpenCV opens images as BRG
# but we want it as RGB We'll
# also need a grayscale version
img_gray = cv2.cvtColor(img, cv2.COLOR_BGR2GRAY)
img_rgb = cv2.cvtColor(img, cv2.COLOR_BGR2RGB)


# Use minSize because for not
# bothering with extra-small
# dots that would look like STOP signs
stop_data = cv2.CascadeClassifier('stop_data.xml')

found = stop_data.detectMultiScale(img_gray,
                                   minSize =(20, 20))

# Don't do anything if there's
# no sign
amount_found = len(found)

if amount_found != 0:

    # There may be more than one
    # sign in the image
    for (x, y, width, height) in found:

        # We draw a green rectangle around
        # every recognized sign
        cv2.rectangle(img_rgb, (x, y),
                      (x + height, y + width),
                      (0, 255, 0), 5)

# Creates the environment of
# the picture and shows it
plt.subplot(1, 1, 1)
plt.imshow(img_rgb)
plt.show()
输出 :