Python|使用 OpenCV 进行微笑检测
情绪检测器用于许多行业,其中之一是媒体行业,公司确定公众对其产品的反应非常重要。在本文中,我们将使用 OpenCV 构建一个微笑检测器,该检测器从网络摄像头获取实时信息。我们将要实现的微笑/幸福检测器将是一个原始的,存在许多更好的方法来实现它。
第 1 步:首先,我们需要导入 OpenCV 库。
import cv2第 2 步:包括所需的 haar 级联。
Haar-cascades 是分类器,用于通过将预定义的模式叠加在人脸片段上来检测特征(在这种情况下为人脸),并用作 XML 文件。在我们的模型中,我们将使用面部、眼睛和微笑的 haar-cascades,下载后需要将其放在工作目录中。
所有需要的 Haar 级联都可以在这里找到。
Python3
face_cascade = cv2.CascadeClassifier(cv2.data.haarcascades +'haarcascade_frontalface_default.xml')
eye_cascade = cv2.CascadeClassifier(cv2.data.haarcascades +'haarcascade_eye.xml')
smile_cascade = cv2.CascadeClassifier(cv2.data.haarcascades +'haarcascade_smile.xml')
Python3
faces = face_cascade.detectMultiScale(gray, 1.3, 5)Python3
def detect(gray, frame):
    faces = face_cascade.detectMultiScale(gray, 1.3, 5)
    for (x, y, w, h) in faces:
        cv2.rectangle(frame, (x, y), ((x + w), (y + h)), (255, 0, 0), 2)
        roi_gray = gray[y:y + h, x:x + w]
        roi_color = frame[y:y + h, x:x + w]
        smiles = smile_cascade.detectMultiScale(roi_gray, 1.8, 20)

        for (sx, sy, sw, sh) in smiles:
            cv2.rectangle(roi_color, (sx, sy), ((sx + sw), (sy + sh)), (0, 0, 255), 2)
    return frame
Python3
video_capture = cv2.VideoCapture(0)
while video_capture.isOpened():
   # Captures video_capture frame by frame
    _, frame = video_capture.read()

    # To capture image in monochrome
    gray = cv2.cvtColor(frame, cv2.COLOR_BGR2GRAY)

    # calls the detect() function
    canvas = detect(gray, frame)

    # Displays the result on camera feed
    cv2.imshow('Video', canvas)

    # The control breaks once q key is pressed
    if cv2.waitKey(1) & 0xff == ord('q'):
        break

# Release the capture once all the processing is done.
video_capture.release()
cv2.destroyAllWindows()
第 3 步:
在这一步中,我们将构建执行微笑检测的主要函数。
- 来自网络摄像头/视频设备的实时信息被逐帧处理。我们处理灰度图像,因为 haar-cascades 在它们上工作得更好。
- 为了检测人脸,我们使用:
Python3
faces = face_cascade.detectMultiScale(gray, 1.3, 5)
- 其中 1.3 是比例因子,5 是最近邻的数量。我们可以根据我们的方便/结果调整这些因素以改进我们的检测器。
- 现在对于检测到的每个后续面部,我们需要检查微笑。
Python3
def detect(gray, frame):
    faces = face_cascade.detectMultiScale(gray, 1.3, 5)
    for (x, y, w, h) in faces:
        cv2.rectangle(frame, (x, y), ((x + w), (y + h)), (255, 0, 0), 2)
        roi_gray = gray[y:y + h, x:x + w]
        roi_color = frame[y:y + h, x:x + w]
        smiles = smile_cascade.detectMultiScale(roi_gray, 1.8, 20)

        for (sx, sy, sw, sh) in smiles:
            cv2.rectangle(roi_color, (sx, sy), ((sx + sw), (sy + sh)), (0, 0, 255), 2)
    return frame
解释——
- 面部数据存储为坐标元组。这里,x 和 y 定义了面部框架的左上角坐标,w 和 h 定义了框架的宽度和高度。
- cv2.rectangle函数接受参数框架、人脸的左上角坐标、右下角坐标、矩形的 RGB 代码(其中包含检测到的人脸)和矩形的厚度。
- roi_gray 定义了面部的感兴趣区域, roi_color 对原始帧执行相同的操作。
- 在第 7 行,我们使用级联应用微笑检测。
第4步:
我们在这一步定义主函数。执行后,按“q”键可终止该函数。
Python3
video_capture = cv2.VideoCapture(0)
while video_capture.isOpened():
   # Captures video_capture frame by frame
    _, frame = video_capture.read()

    # To capture image in monochrome
    gray = cv2.cvtColor(frame, cv2.COLOR_BGR2GRAY)

    # calls the detect() function
    canvas = detect(gray, frame)

    # Displays the result on camera feed
    cv2.imshow('Video', canvas)

    # The control breaks once q key is pressed
    if cv2.waitKey(1) & 0xff == ord('q'):
        break

# Release the capture once all the processing is done.
video_capture.release()
cv2.destroyAllWindows()
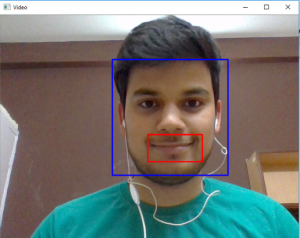
输出: