使用 FER 的面部表情识别器——使用深度神经网络
在我们的日常生活中,我们有意或无意地进行不同类型的面部表情。这些动作传达了人类的情绪状态。
我们可以通过他的面部表情来判断下一个人的情绪和精神状态。二十世纪初,埃克曼和弗里森定义了“六种”基本情绪。
这种表达不会随着文化而改变,它们是普遍的。六个面部表情是:-
- 幸福
- 悲伤
- 害怕
- 愤怒
- 惊喜
- 厌恶
在本文中,我将分享如何使用Python的`FER` 库构建面部表情识别器。
FER 库:
面部表情识别库由 Justin Shenk 开发。该库需要在系统中安装OpenCV>=3.2和Tensorflow>=1.7.0依赖项。使用 OpenCV 的 Haar Cascade 分类器检测人脸。有关更多信息和 FER 库的源代码,您可以在此处访问 FER 的 GitHub 页面。
设置我们的代码!
对于本文,您可以使用名为 Repl.it 的在线代码编辑器,也可以使用您喜欢的代码编辑器。它可以通过安装
pip:`$ pip install fer`1. 使用以下代码编辑新的 `main.py` 文件:
Python3
import cv2

from fer import FER

import matplotlib.pyplot as plt

import matplotlib.image as mpimg
Python3
# Input Image
input_image = cv2.imread("smile.jpg")
emotion_detector = FER()
# Output image's information
print(emotion_detector.detect_emotions(input_image))
Python3
[{'box': [277, 90, 48, 63], 'emotions': {
  'angry': 0.02, 'disgust': 0.0, 'fear': 0.05,
  'happy': 0.16, 'neutral': 0.09, 'sad': 0.27, 'surprise': 0.41}]
Python3
import cv2
from fer import FER
import matplotlib.pyplot as plt
import matplotlib.image as mpimg
input_image = cv2.imread("smile.jpg")
emotion_detector = FER(mtcnn=True)
Python3
# Save output in result variable
result = emotion_detector.detect_emotions(input_image)
Python3
bounding_box = result[0]["box"]
emotions = result[0]["emotions"]
cv2.rectangle(input_image,(
  bounding_box[0], bounding_box[1]),(
  bounding_box[0] + bounding_box[2], bounding_box[1] + bounding_box[3]),
              (0, 155, 255), 2,)
Python3
emotion_name, score = emotion_detector.top_emotion(image )
for index, (emotion_name, score) in enumerate(emotions.items()):
   color = (211, 211,211) if score < 0.01 else (255, 0, 0)
   emotion_score = "{}: {}".format(emotion_name, "{:.2f}".format(score))

   cv2.putText(input_image,emotion_score,
               (bounding_box[0], bounding_box[1] + bounding_box[3] + 30 + index * 15),
               cv2.FONT_HERSHEY_SIMPLEX,0.5,color,1,cv2.LINE_AA,)

#Save the result in new image file
cv2.imwrite("emotion.jpg", input_image)
Python3
# Read image file using matplotlib's image module
result_image = mpimg.imread('emotion.jpg')
imgplot = plt.imshow(result_image)
# Display Output Image
plt.show()
上面的代码说:
- 导入完整的` cv2`俗称Open CV库。它为我们提供了各种计算机视觉解决方案。我们将主要使用这个库来读取和操作图像。您可以在 OpenCV Docs 上阅读有关“Open Cv library”的更多信息
- 导入``从`FER库FER`函数。这是我们将在本次研讨会中使用的主要库。
- 将 ` matplotlib.pyplot`模块添加为 ` plt` 。它将帮助我们绘制图形
- 将 `matplotlib.image` 模块包含为 ` mpimg` 。 matplotlib 库的 matplotlib.image 用于在带有 `x` 和 `y` 轴的图形上绘制图像。
2. 接下来,我们将通过给定输入图像来预测静止图像的情绪:
蟒蛇3
# Input Image
input_image = cv2.imread("smile.jpg")
emotion_detector = FER()
# Output image's information
print(emotion_detector.detect_emotions(input_image))

输入图像
尝试理解上面的代码想要表达的意思。下面是对上面代码的解释:
- 在我们的例子中,我们的 ` image ` 变量通过使用 ` cv2.imread(“abc.jpg”) `方法从指定的文件中加载图像 ` abc.jpg` 。
- 接下来,我们将之前导入的 ` FER() ` 分配给 **检测器** 变量。
- 以 ` detector.detect_emotions(image) ` 作为参数的打印语法将返回边界框符号的字典。
以下是示例输出:
蟒蛇3
[{'box': [277, 90, 48, 63], 'emotions': {
  'angry': 0.02, 'disgust': 0.0, 'fear': 0.05,
  'happy': 0.16, 'neutral': 0.09, 'sad': 0.27, 'surprise': 0.41}]
引擎盖下发生了什么???
`detector` 是我们代码的主要部分。让我们看看检测器做了什么:
检测器是为存储“ FER() ”而创建的对象。 Detector 返回边界框符号的有序字典。它观察并检测人脸所在的位置,并将其分类为从“0”到“1”的十进制值,分别具有所有 6 种情绪的概率。 FER 展示了用 CNN 构建的 Keras 模型或众所周知的卷积神经网络。它将值存储在“HDF5”模型中。 FER 默认使用 OpenCV 的 Haar Cascade Classifier 检测人脸。或者,我们可以使用更高级的多级联卷积网络,简称为“MTCNN”。它将在后端使用 Peltarion API 代替 Keras 模型。默认情况下,FER 使用 CNN,但如果我们想使用高级MTCNN ,只需在 FER 括号中传递 ` mtcnn=True` ,就像 ` detector = FER(mtcnn=True) `。为了进一步使用,我们将使用 MTCNN 模型来获得更准确的结果。
数据:
数据被称为二十一世纪的新石油。我们可以用上面生成的数据做不同的事情,我们将在最后在“黑客部分”中讨论,敬请期待。我们将存储情绪和检测到的人脸。然后在检测到的面部周围显示边界黄色框并在其下方显示分数。下面让我们看看我们如何做到这一点。
蟒蛇3
import cv2
from fer import FER
import matplotlib.pyplot as plt
import matplotlib.image as mpimg
input_image = cv2.imread("smile.jpg")
emotion_detector = FER(mtcnn=True)
到目前为止,我们已经到达这里。
接下来,我们将声明新变量 result 并将我们的输出存储在一个单独的数组中。
蟒蛇3
# Save output in result variable
result = emotion_detector.detect_emotions(input_image)
现在是时候突出显示面部周围的黄色边界框了:
蟒蛇3
bounding_box = result[0]["box"]
emotions = result[0]["emotions"]
cv2.rectangle(input_image,(
  bounding_box[0], bounding_box[1]),(
  bounding_box[0] + bounding_box[2], bounding_box[1] + bounding_box[3]),
              (0, 155, 255), 2,)
对上述代码的解释是:
- `bounding_box` 变量将存储生成并存储在 `result` 变量中的边界框坐标。它将访问并从其“box”键的“0th”元素(或公共语言中的第一个元素)开始存储。如果你打印这个变量,你会得到类似这样的输出“(298, 361, 825, 825)”。
- 与 `emotions` 变量相同,它将访问 `result` 并从它的 `"emotions"` 键的 `0th` 元素开始存储。如果你打印,你会得到输出为 `{'angry': 0.08, 'disgust': 0.03, 'fear': 0.05, 'happy': 0.09, 'sad': 0.35, 'surprise': 0.0, 'neutral' :0.38}`
- `cv2.rectangle()` 方法用于在检测到的人脸周围绘制一个矩形。它有 `input_image, start_point, end_point, color, depth` 作为其参数。
- 在我们的例子中,我们使用 `image` 作为 `image` 的参数来指定我们将要使用的图像。 `start_point` 为 `(bounding_box[0], bounding_box[1])`,其中 `bounding_box[0]` 是 X 坐标,`bounding_box[1]` 是起点的 Y 坐标。
- 接下来`end_point`为`(bounding_box[0] + bounding_box[2], bounding_box[1] + bounding_box[3])`,其中`bounding_box[0] + bounding_box[2]`是X坐标,`bounding_box[1] + bounding_box[3]` 是终点的 Y 坐标。
- * `(0, 155, 255)` 是我们将要用作框颜色的黄色。
- * `thickness` 表示为 `2`。定义 2px 到 box 的厚度。
将分数添加到边界框
现在我们将使用以下代码将 Score 添加到 Bounding Box:
蟒蛇3
emotion_name, score = emotion_detector.top_emotion(image )
for index, (emotion_name, score) in enumerate(emotions.items()):
   color = (211, 211,211) if score < 0.01 else (255, 0, 0)
   emotion_score = "{}: {}".format(emotion_name, "{:.2f}".format(score))

   cv2.putText(input_image,emotion_score,
               (bounding_box[0], bounding_box[1] + bounding_box[3] + 30 + index * 15),
               cv2.FONT_HERSHEY_SIMPLEX,0.5,color,1,cv2.LINE_AA,)

#Save the result in new image file
cv2.imwrite("emotion.jpg", input_image)
上面的代码说:
- 使用 ` detector.top_emotion(img) ` 方法将最高情绪值存储在 `emotion_name,score` 变量中。
- 我们将使用基本的 `for` 循环和 `enumerate` 方法迭代列表中项目的索引和值。所以现在在给定时间迭代 1 个情绪。这个过程发生了 6 次,因为我们有 6 种情绪要测试。你可以阅读文档。
- 根据分数将颜色分配给“颜色”变量。 IF & Else语句的简写用于更好地理解代码。
- * `emotion_score` 变量存储情绪分数并将用于打印它。
- * `cv2.putText()` 方法用于在任何图像上绘制文本字符串。
- 在for循环之外`cv2.imwrite()`方法将创建并保存名为`”emotion.jpg”`的新的最终输出图像。
显示输出图像
蟒蛇3
# Read image file using matplotlib's image module
result_image = mpimg.imread('emotion.jpg')
imgplot = plt.imshow(result_image)
# Display Output Image
plt.show()
我们进入了文章的最后一步。我们使用 matplotlib 库函数显示输出图像的地方` mpimg.imread('emotion.jpg') ` 方法读取括号中提供的图像。使用 ` plt.imshow(img) ` 将图像图像存储在 ` imgplot` 中。最后` plt.show() ` 将显示我们的输出图像。
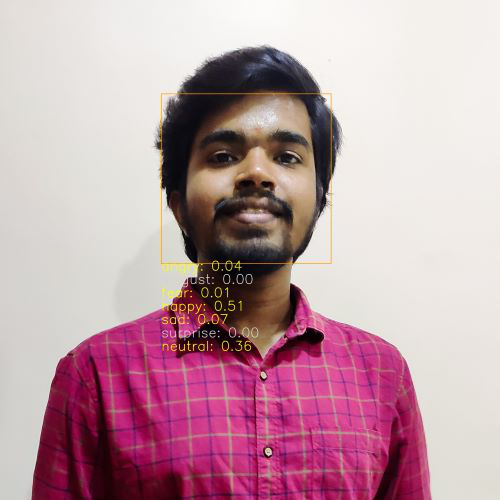
输出图像
我们的面部表情识别器只是新的创新 FER 系统的起点。现在是您可以根据迄今为止所学的知识构建新事物的时候了。以下是我的一些想法,您可以尝试:
- 我们已经为静止图像构建了 FER。您可以尝试 FER 对视频中出现的面部表情进行视频分析。
- 使用实时摄像头创建实时面部表情识别器将是一件非常令人兴奋的尝试。
- 您可以通过从“result”变量中提取和操作数据,根据人类的情感创建不同的推荐系统。比如向情绪低落的人推荐有趣的书籍、视频、GIF 等,或者向处于恐惧或愤怒中的人推荐励志书籍、视频。