在Python使用 Deepface 模块进行面部表情检测
在本文中,我们将使用Python的OpenCV、Deepface 和 matplotlib 模块检测现有图像的面部表情。
需要的模块
- OpenCV: OpenCV 是Python的一个开源库,用于计算机视觉、机器学习和图像处理。
- Matplotlib: Matplotlib 是一个综合性的库,用于在Python创建静态、动画和交互式可视化。
- Deepface: Deepface 是由 Facebook 的一个人工智能研究小组构建的。它是Python用于面部识别和属性分析的框架。 Deepface 的核心库组件用于 Keras 和 TensorFlow。
pip install deepface这是最基本的表情检测技术,我们可以通过多种方式检测面部表情。
分步实施
第一步:导入需要的模块。
Python3
#import the required modules
import cv2
import matplotlib.pyplot as plt
from deepface import DeepFace
Python3
# read image
img = cv2.imread('img1.jpg')

# call imshow() using plt object
plt.imshow(img[:, :, : : -1])

# display that image
plt.show()
Python3
# storing the result
result = DeepFace.analyze(img,
                          actions = ['emotion'])

# print result
print(result)
Python3
# import the required modules
import cv2
import matplotlib.pyplot as plt
from deepface import DeepFace

# read image
img = cv2.imread('img.jpg')

# call imshow() using plt object
plt.imshow(img[:,:,::-1])

# display that image
plt.show()

# storing the result
result = DeepFace.analyze(img,actions=['emotion'])

# print result
print(result)第二步:复制要进行表情检测的图片的路径,使用cv2中的“imread()”方法读取图片,提供括号内的路径。 imread() 从文件中读取图像并将其存储在数组中。然后使用 matplotlib 的 imshow() 方法。 imshow() 方法将数据转换为图像。现在使用 show 方法绘制图像以确保图像已正确导入。
蟒蛇3
# read image
img = cv2.imread('img1.jpg')

# call imshow() using plt object
plt.imshow(img[:, :, : : -1])

# display that image
plt.show()
输出:
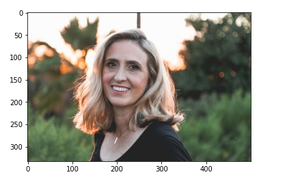
输出图像
第 3 步:创建一个结果变量来存储结果。使用 Deepface analysis() 方法,Deepface analysis() 方法包含强大的面部属性分析特征,如年龄、性别、面部表情等。面部表情包括愤怒、恐惧、中立、悲伤、厌恶、高兴和惊讶。打印结果。结果显示了人的面部表情百分比。
蟒蛇3
# storing the result
result = DeepFace.analyze(img,
                          actions = ['emotion'])

# print result
print(result)
输出:

结果显示该人的幸福度为 96%。
下面是完整的实现:
蟒蛇3
# import the required modules
import cv2
import matplotlib.pyplot as plt
from deepface import DeepFace

# read image
img = cv2.imread('img.jpg')

# call imshow() using plt object
plt.imshow(img[:,:,::-1])

# display that image
plt.show()

# storing the result
result = DeepFace.analyze(img,actions=['emotion'])

# print result
print(result)
输出:
