Python – 使用 Tkinter 的复利 GUI 计算器
先决条件: tkinter 简介 |计算复利的程序
Python为开发 GUI(图形用户界面)提供了多种选择。在所有的 GUI 方法中,Tkinter 是最常用的方法。在本文中,我们将学习如何使用 Tkinter 创建一个复利 GUI 计算器应用程序,并提供分步指南。
创建 Tkinter:
- 导入模块 – tkinter
- 创建主窗口(容器)
- 将任意数量的小部件添加到主窗口。
- 在小部件上应用事件触发器。
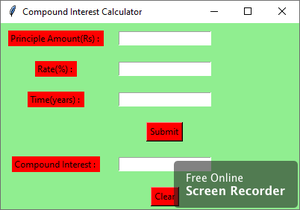
下面是 GUI 的样子:
让我们创建一个基于 GUI 的复利计算器应用程序。
下面是实现:
Python3
# import all classes / functions from the tkinter
from tkinter import *

# Function for clearing the
# contents of all entry boxes
def clear_all() :

    # whole content of entry boxes is deleted
    principle_field.delete(0, END)
    rate_field.delete(0, END)
    time_field.delete(0, END)
    compound_field.delete(0, END)

    # set focus on the principle_field entry box
    principle_field.focus_set()


# Function to find compound interest
def calculate_ci():

    # get a content from entry box
    principle = int(principle_field.get())

    rate = float(rate_field.get())

    time = int(time_field.get())

    # Calculates compound interest
    CI = principle * (pow((1 + rate / 100), time))

    # insert method inserting the
    # value in the text entry box.
    compound_field.insert(10, CI)


# Driver code
if __name__ == "__main__" :

    # Create a GUI window
    root = Tk()

    # Set the background colour of GUI window
    root.configure(background = 'light green')

    # Set the configuration of GUI window
    root.geometry("400x250")

    # set the name of tkinter GUI window
    root.title("Compound Interest Calculator")

    # Create a Principle Amount : label
    label1 = Label(root, text = "Principle Amount(Rs) : ",
                   fg = 'black', bg = 'red')

    # Create a Rate : label
    label2 = Label(root, text = "Rate(%) : ",
                   fg = 'black', bg = 'red')

    # Create a Time : label
    label3 = Label(root, text = "Time(years) : ",
                   fg = 'black', bg = 'red')

    # Create a Compound Interest : label
    label4 = Label(root, text = "Compound Interest : ",
                   fg = 'black', bg = 'red')

    # grid method is used for placing
    # the widgets at respective positions
    # in table like structure .

    # padx keyword argument used to set padding along x-axis .
    # pady keyword argument used to set padding along y-axis .
    label1.grid(row = 1, column = 0, padx = 10, pady = 10)
    label2.grid(row = 2, column = 0, padx = 10, pady = 10)
    label3.grid(row = 3, column = 0, padx = 10, pady = 10)
    label4.grid(row = 5, column = 0, padx = 10, pady = 10)

    # Create a entry box
    # for filling or typing the information.
    principle_field = Entry(root)
    rate_field = Entry(root)
    time_field = Entry(root)
    compound_field = Entry(root)

    # grid method is used for placing
    # the widgets at respective positions
    # in table like structure .

    # padx keyword argument used to set padding along x-axis .
    # pady keyword argument used to set padding along y-axis .
    principle_field.grid(row = 1, column = 1, padx = 10, pady = 10)
    rate_field.grid(row = 2, column = 1, padx = 10, pady = 10)
    time_field.grid(row = 3, column = 1, padx = 10, pady = 10)
    compound_field.grid(row = 5, column = 1, padx = 10, pady = 10)

    # Create a Submit Button and attached
    # to calculate_ci function
    button1 = Button(root, text = "Submit", bg = "red",
                     fg = "black", command = calculate_ci)

    # Create a Clear Button and attached
    # to clear_all function
    button2 = Button(root, text = "Clear", bg = "red",
                     fg = "black", command = clear_all)

    button1.grid(row = 4, column = 1, pady = 10)
    button2.grid(row = 6, column = 1, pady = 10)

    # Start the GUI
    root.mainloop()
输出 :