Python - 向您的手机发送推送通知的 Web 应用程序
在本文中,我们将讨论两个应用程序以及如何使用Python配置它们以发送通知。
推子弹
Pushbullet ,一个著名的Python包,它使用Python代码连接多个设备。在本文中,我们将讨论如何通过它发送消息或通知。使用我们的计算机和Python代码,我们将向安装在移动设备上的 pushbullet 应用程序发送一些消息,该应用程序具有与计算机上相同的登录 ID。首先,我们需要创建一个帐户 Pushbullet.com并从计算机和电话登录到它。
设置:
- 在您的PC和手机上设置 Pushbullet 帐户
- 电脑用
- 去 Pushbullet.com
- 创建一个帐户
- 电脑用

- 手机用
- 在您的手机上安装Pushbullet应用程序。
- 使用您用于登录 PC 的相同电子邮件地址登录。

现在让我们转到Python代码部分并了解如何计划每个需求以实现功能。
- 安装下面列出的以下模块
# Used for sending the Push notifications.
pip install pushbullet.py==0.9.1

# Used for the interface at the output window.
pip install pywebio - 导入所有需要的模块
- 转到Pushbullet并获取访问令牌。

- 获取您的访问令牌并使用PushBullet方法通过在PushBullet函数中提供访问令牌来创建实例。
句法:
PushBullet(access_token)
- 使用push_note函数在函数内部发送数据和文本。 push_note将 取两个参数,即数据和文本。第一个参数将作为通知中的标题,其中第二个参数是文本。
句法:
pb.push_note(data, text)
下面是完整的实现。
Python3
# Import the following modules
from pushbullet import PushBullet
from pywebio.input import *
from pywebio.output import *
from pywebio.session import *
import time

# Get the access token from Pushbullet.com
access_token = "Your Access Token"


# Taking input from the user
data = input('Title')

# Taking large text input from the user
text = textarea(
  "Text", rows=3, placeholder="Write something...",
  required=True)

# Get the instance using access token
pb = PushBullet(access_token)

# Send the data by passing the main title
# and text to be send
push = pb.push_note(data, text)

# Put a success message after sending
# the notification
put_success("Message sent successfully...")

# Sleep for 3 seconds
time.sleep(3)

# Clear the screen
clear()

# Give the pop at last
toast("Thanks for using it :)")

# hold the session until the whole work finishes
hold()
Python3
# Import the following modules
import requests
import json
# Function to send Push Notification
def pushbullet_noti(title, body):
TOKEN = 'Your Access Token' # Pass your Access Token here
# Make a dictionary that includes, title and body
msg = {"type": "note", "title": title, "body": body}
# Sent a posts request
resp = requests.post('https://api.pushbullet.com/v2/pushes',
data=json.dumps(msg),
headers={'Authorization': 'Bearer ' + TOKEN,
'Content-Type': 'application/json'})
if resp.status_code != 200: # Check if fort message send with the help of status code
raise Exception('Error', resp.status_code)
else:
print('Message sent')
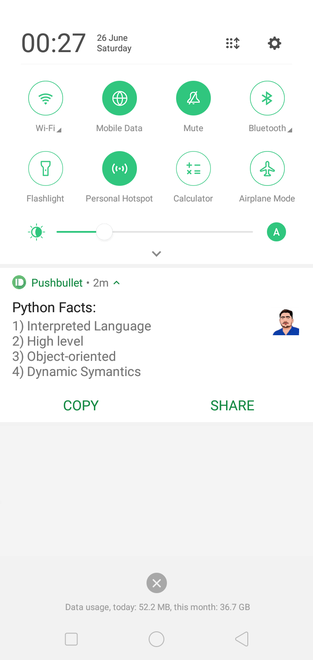
pushbullet_noti("Hey", "How you doing?")Python3
# Import the following modules
import json
import sys
import requests
import base64

if __name__ == '__main__':
    # Webhooks URL
    url = "https://hooks.slack.com/services/xxxyyyzzz"

    # Message you wanna send
    message = (
        "Hi there!, GeeksforGeeks is the Best Learning Platform\
        for Computer Science Students")

    # Title
    title = (f"GeeksforGeeks Bot :satellite:")

    # All slack data
    slack_data = {

        "username": "Testing",
        "attachments": [
            {
                "color": "#FF0000",
                "fields": [
                    {
                        "title": title,
                        "value": message,
                        "short": "false",

                    }
                ]
            }
        ]
    }

    # Size of the slack data
    byte_length = str(sys.getsizeof(slack_data))
    headers = {'Content-Type': "application/json",
               'Content-Length': byte_length}

    # Posting requests after dumping the slack data
    response = requests.post(url, data=json.dumps(slack_data), headers=headers)

    # Post request is valid or not!
    if response.status_code != 200:
        raise Exception(response.status_code, response.text)
还有一种方法可以做同样的事情,下面讨论。在此方法中,发送预定义的消息作为通知。
为此,首先导入所需的模块并获取您的访问令牌。
句法:
TOKEN = 'Your Access Token'然后 用你想在正文中发送的所有信息制作一本字典。
句法:
msg = {“type”: “note”, “title”: title, “body”: body}
现在,要发送posts请求,请使用requests 模块中指定的posts 方法。沿整个路径推动 Pushbullet。现在使用json.dumps将所有数据转储到数据变量中。
现在将字典传递给标头变量,其中包括发件人的授权、您的访问令牌和内容类型,在本例中为 application/json。
句法:
requests.post(‘url’, data=json.dumps(msg), headers={‘Authorization’: ‘Bearer ‘ + TOKEN, Content-Type’: ‘application/json’})
现在查看响应状态码;如果是 200,我们就会出错;否则,我们的消息将被正确发送。
下面给出了完整的实现。
程序:
蟒蛇3
# Import the following modules
import requests
import json

# Function to send Push Notification


def pushbullet_noti(title, body):

    TOKEN = 'Your Access Token'  # Pass your Access Token here
    # Make a dictionary that includes, title and body
    msg = {"type": "note", "title": title, "body": body}
    # Sent a posts request
    resp = requests.post('https://api.pushbullet.com/v2/pushes',
                         data=json.dumps(msg),
                         headers={'Authorization': 'Bearer ' + TOKEN,
                                  'Content-Type': 'application/json'})
    if resp.status_code != 200:  # Check if fort message send with the help of status code
        raise Exception('Error', resp.status_code)
    else:
        print('Message sent')


pushbullet_noti("Hey", "How you doing?")
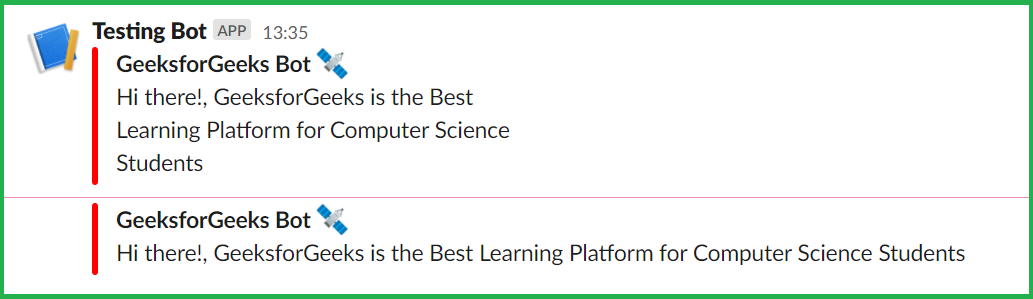
输出:

松弛
在这一部分中,我们将处理从Python脚本中发布的消息,这些消息将出现在 slack 中。为此,我们需要使用webhooks 。您可以使用网络钩子将自动消息从一个应用程序传送到另一个应用程序。当您创建传入 Webhook 时,您将获得一个唯一的 URL,您可以向该 URL 发送 JSON 有效负载,包括消息文本和一些参数。
设置
在此处创建 Slack 工作区 和 创建您自己的应用程序。
- 转到浏览 Slack

- 选择应用
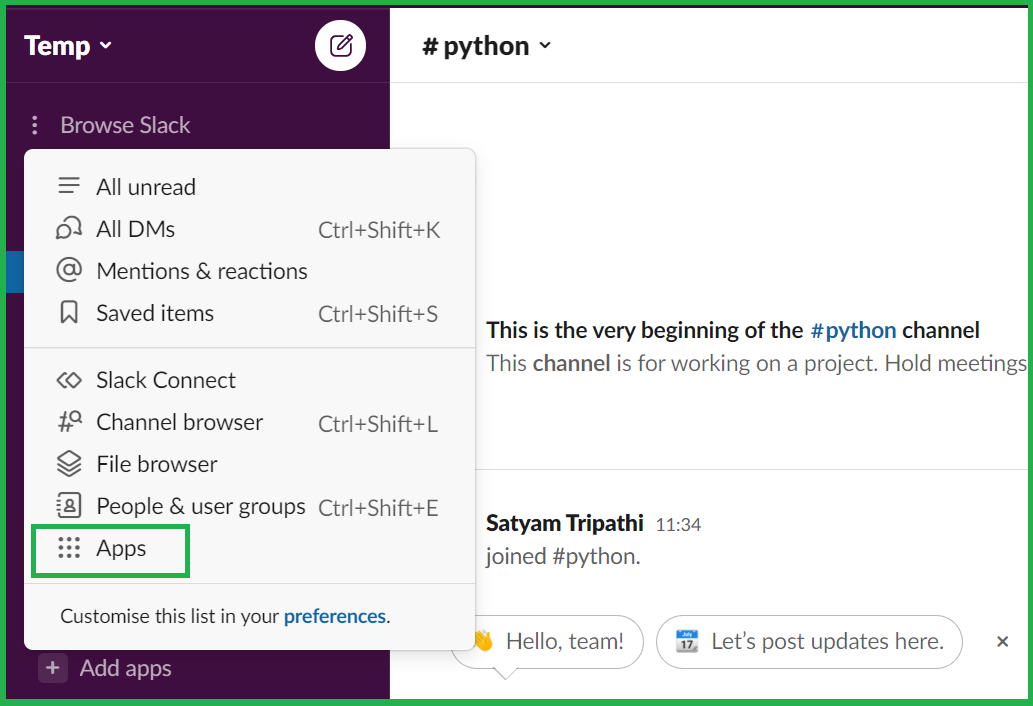
- 将出现一个新窗口。从那里选择应用程序目录
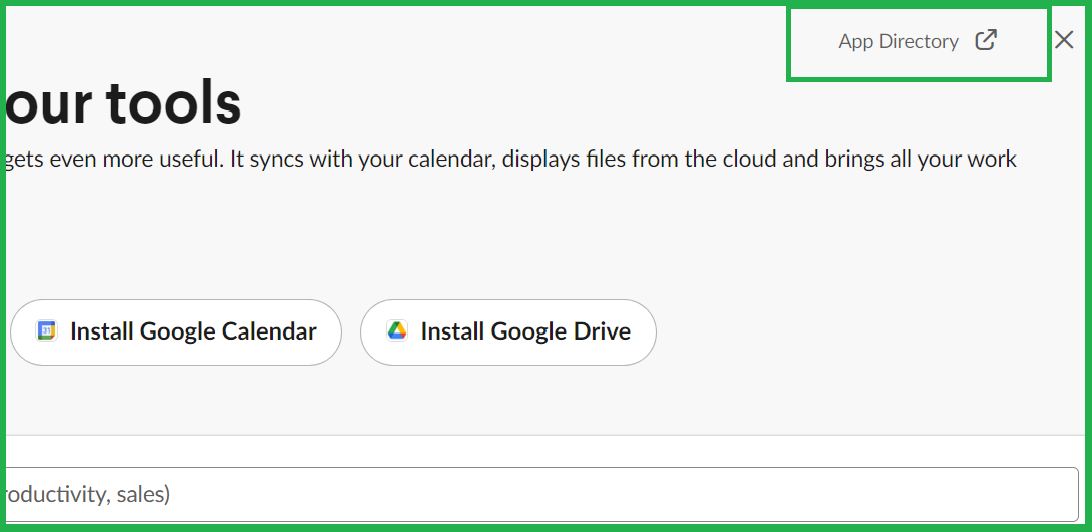
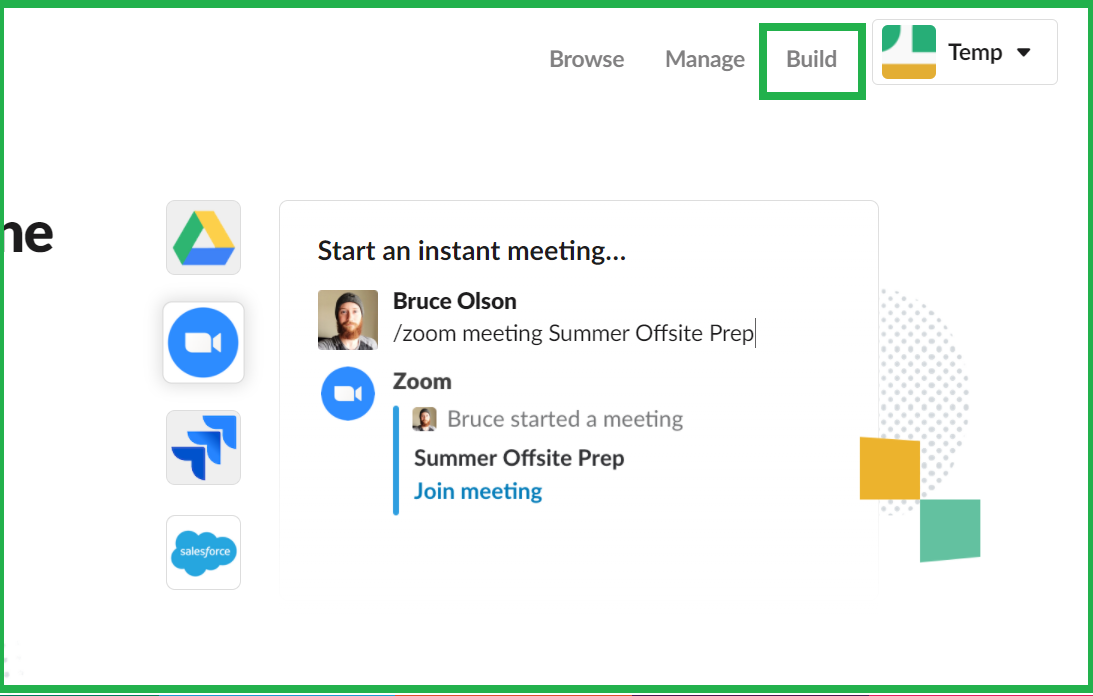
- 现在选择构建
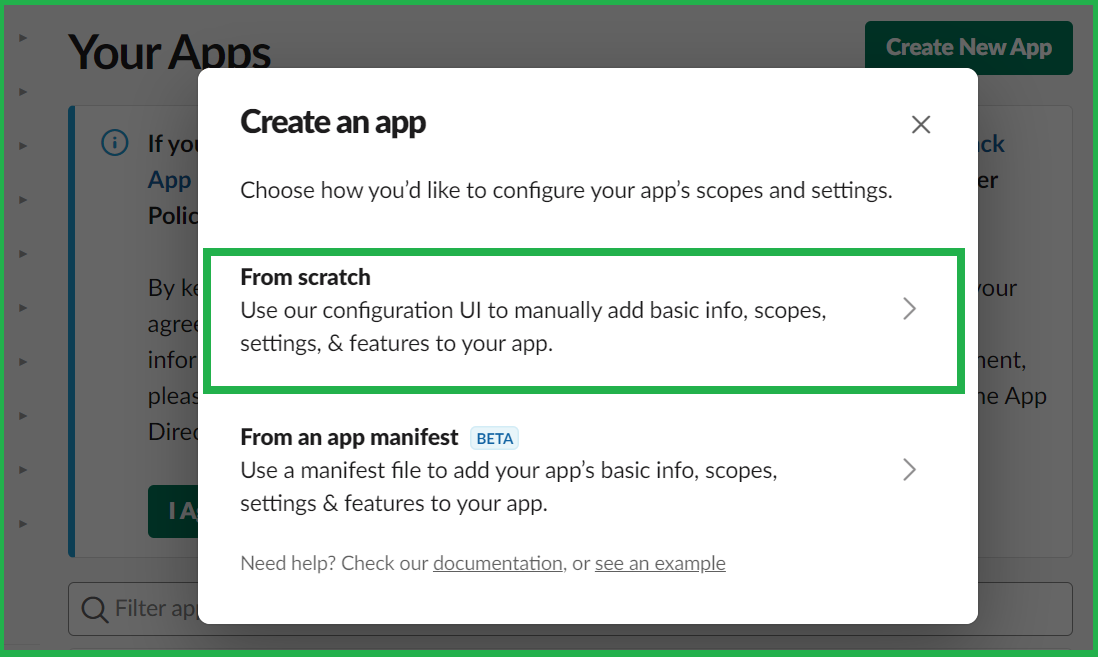
- 再次打开一个新窗口,选择创建一个应用程序

- 从头开始选择
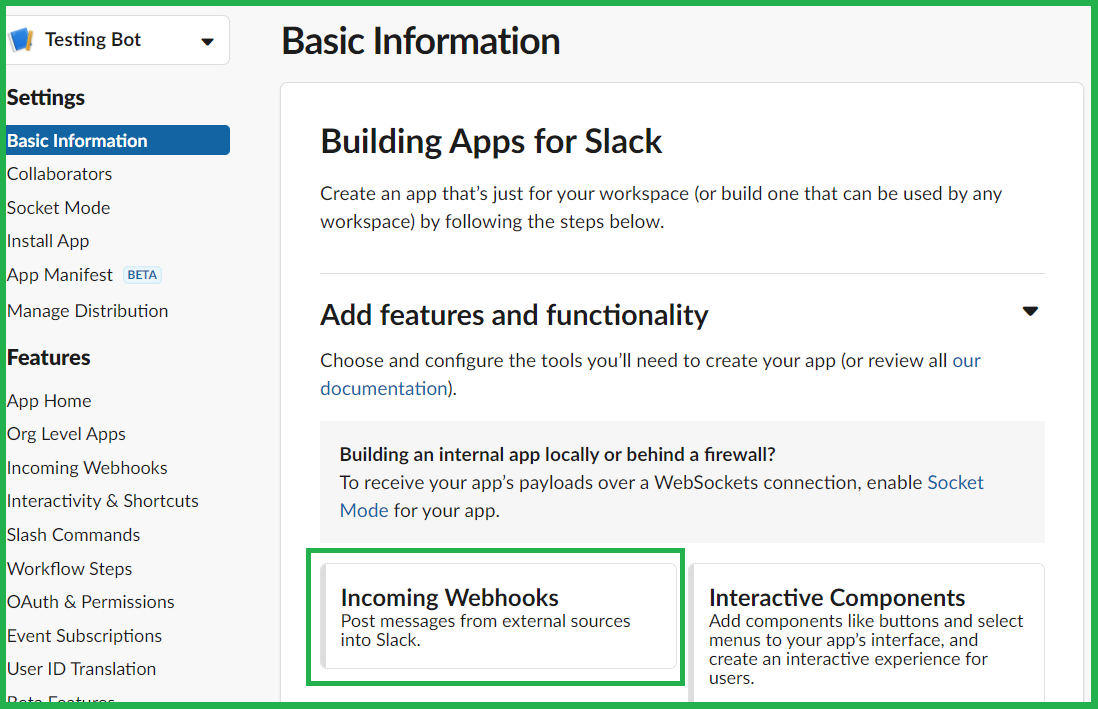
- 设置应用名称和工作区
- 然后创建应用

- 选择传入 Webhook
- 打开激活传入的 webhook 并将新的 webhook 添加到工作区

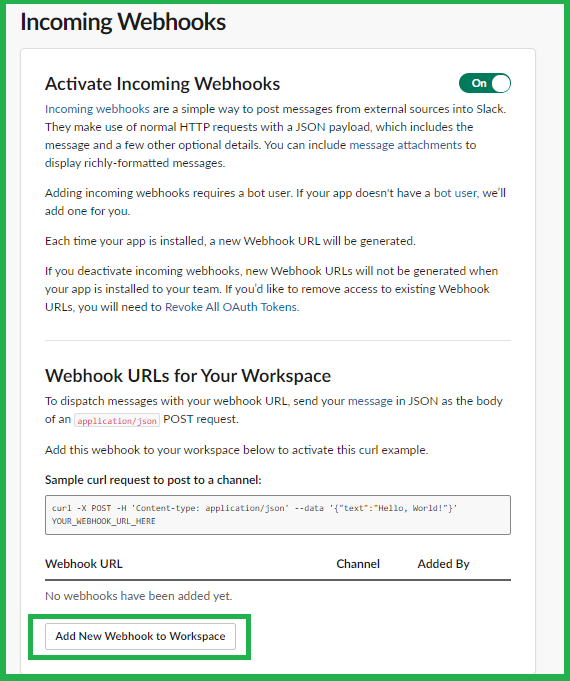
- 选择一个机器人并给它允许访问

- 复制 webhook URL,因为这将在以后使用

现在我们已经创建了应用程序并获得了 webhook URL,是时候开始编码了。
我们首先必须导入所有必需的模块。现在,获取您的 webhook URL 并将其保存到变量中。在变量中,保存要发送的消息和标题。
现在是时候制作我们想要发送的所有松弛数据了。它由您的用户名组成,在附件部分我们有:
- 您要选择的颜色。
- 字段由以下内容组成:
- 我们消息的标题。
- 我们要发送的消息。
- Short 表示,显示消息应该是 sort 类型或 long 类型。
现在使用sys模块,我们将获取slack 数据的大小并将其存储在变量中。现在对于headers ,我们将定义Content-Type和Content-Length 。使用requests模块的post方法将所有的,使用json模块的dumps函数dump 后的数据进行post。最后,使用状态码检查响应是否有效。
程序:通过 slack 发送通知
蟒蛇3
# Import the following modules
import json
import sys
import requests
import base64

if __name__ == '__main__':
    # Webhooks URL
    url = "https://hooks.slack.com/services/xxxyyyzzz"

    # Message you wanna send
    message = (
        "Hi there!, GeeksforGeeks is the Best Learning Platform\
        for Computer Science Students")

    # Title
    title = (f"GeeksforGeeks Bot :satellite:")

    # All slack data
    slack_data = {

        "username": "Testing",
        "attachments": [
            {
                "color": "#FF0000",
                "fields": [
                    {
                        "title": title,
                        "value": message,
                        "short": "false",

                    }
                ]
            }
        ]
    }

    # Size of the slack data
    byte_length = str(sys.getsizeof(slack_data))
    headers = {'Content-Type': "application/json",
               'Content-Length': byte_length}

    # Posting requests after dumping the slack data
    response = requests.post(url, data=json.dumps(slack_data), headers=headers)

    # Post request is valid or not!
    if response.status_code != 200:
        raise Exception(response.status_code, response.text)
输出: