Python| Kivy 中的浮动布局
Kivy 是Python中一个独立于平台的 GUI 工具。因为它可以在Android、IOS、linux和Windows等平台上运行。它基本上是用来开发Android应用程序的,但这并不意味着它不能在桌面应用程序上使用。
👉🏽 Kivy Tutorial – Learn Kivy with Examples.
浮动布局:
Floatlayout允许我们根据当前窗口大小和高度相对放置元素,尤其是在移动设备中,即Floatlayout允许我们使用称为相对位置的东西放置元素。这意味着我们将使用窗口大小的百分比来放置所有内容,而不是定义特定位置或坐标。当我们改变窗口的尺寸时,放置在窗口中的所有东西都会相应地调整其大小和位置。这使得应用程序更加可靠并且可扩展至窗口大小。
注意: FloatLayout 尊重其子项的pos_hint和size_hint属性。
使用 FloatLayout 我们需要做的第一件事就是导入它。
from kivy.uix.floatlayout import FloatLayoutBasic Approach:
1) import kivy
2) import kivyApp
3) import button
4) import Floatlayout
5) Set minimum version(optional)
6) create App class
7) return Layout/widget/Class(according to requirement)
8) Run an instance of the class例如,创建一个大小为 (300, 300) 的 FloatLayout:
layout = FloatLayout(size=(300, 300))默认情况下,所有小部件都有其size_hint = (1, 1) ,因此下面的按钮将采用与布局相同的大小:
button = Button(text='Hello world')
layout.add_widget(button)
要创建一个放置在特定位置的具有特定宽度和高度布局的按钮,您可以执行以下操作 -
方法的实施:
Python3
# Sample Python application demonstrating the
# working of FloatLayout in Kivy

import kivy

# base Class of your App inherits from the App class.
# app:always refers to the instance of your application
from kivy.app import App

# creates the button in kivy
# if not imported shows the error
from kivy.uix.button import Button

# module consist the floatlayout
# to work with FloatLayout first
# you have to import it
from kivy.uix.floatlayout import FloatLayout

# To change the kivy default settings
# we use this module config
from kivy.config import Config

# 0 being off 1 being on as in true / false
# you can use 0 or 1 && True or False
Config.set('graphics', 'resizable', True)

# creating the App class
class MyApp(App):

    def build(self):

        # creating Floatlayout
        Fl = FloatLayout()

        # creating button
        # a button 30 % of the width and 20 %
        # of the height of the layout and
        # positioned at (300, 200), you can do:
        btn = Button(text ='Hello world',
                    size_hint =(.3, .2),
                    pos =(300, 200))

        # adding widget i.e button
        Fl.add_widget(btn)

        # return the layout
        return Fl

# run the App
if __name__ == "__main__":
    MyApp().run()
Python3
# Sample Python application demonstrating the
# working of Dynamic placement in FloatLayout in Kivy

import kivy

# base Class of your App inherits from the App class.
# app:always refers to the instance of your application
from kivy.app import App

# creates the button in kivy
# if not imported shows the error
from kivy.uix.button import Button

# module consist the floatlayout
# to work with FloatLayout first
# you have to import it
from kivy.uix.floatlayout import FloatLayout

# To change the kivy default settings
# we use this module config
from kivy.config import Config

# 0 being off 1 being on as in true / false
# you can use 0 or 1 && True or False
Config.set('graphics', 'resizable', True)

# creating the App class
class MyApp(App):

    def build(self):

        # creating Floatlayout
        Fl = FloatLayout()

        # creating button
        # a button 30 % of the width and 50 %
        # of the height of the layout and
        # positioned at 20 % right and 20 % up
        # from bottom left, i.e x, y = 200, 200 from bottom left:
        btn = Button(text ='Hello world', size_hint =(.3, .5),
                     background_color =(.3, .6, .7, 1),
                    pos_hint ={'x':.2, 'y':.2 })

        # adding widget i.e button
        Fl.add_widget(btn)

        # return the layout
        return Fl

# run the App
if __name__ == "__main__":
    MyApp().run()
输出: 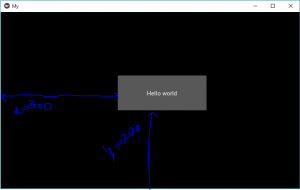
注意:现在如果你改变窗口的大小,它会相对改变它的位置和大小。此布局可用于应用程序。大多数时候,您将使用窗口的大小。
动态展示位置 -
现在你可以说缺少一些东西或者上面的代码并不完美。我们仍然需要添加按钮的位置。
我们有 2 个属性来创建动态展示位置:
1) pos_hint: provide hint of position
We can define upto 6 keys i.e. it takes arguments in form of dictionary.
pos_hint = {“x”:1, “y”:1, “left”:1, “right”:1, “top”:1, “bottom”:1}
2) size_hint: provide hint of size
Contains two arguments i.e. width and height
笔记:
- size_hint 和 pos_hint 只能使用 0-1 之间的值。其中 0 = 0% 和 1 = 100%。
- kivy 中的坐标系从左下角开始工作!这在放置我们的对象时很重要。 (即 (0, 0) 是左下角)。
实现动态定位的代码:
Python3
# Sample Python application demonstrating the
# working of Dynamic placement in FloatLayout in Kivy

import kivy

# base Class of your App inherits from the App class.
# app:always refers to the instance of your application
from kivy.app import App

# creates the button in kivy
# if not imported shows the error
from kivy.uix.button import Button

# module consist the floatlayout
# to work with FloatLayout first
# you have to import it
from kivy.uix.floatlayout import FloatLayout

# To change the kivy default settings
# we use this module config
from kivy.config import Config

# 0 being off 1 being on as in true / false
# you can use 0 or 1 && True or False
Config.set('graphics', 'resizable', True)

# creating the App class
class MyApp(App):

    def build(self):

        # creating Floatlayout
        Fl = FloatLayout()

        # creating button
        # a button 30 % of the width and 50 %
        # of the height of the layout and
        # positioned at 20 % right and 20 % up
        # from bottom left, i.e x, y = 200, 200 from bottom left:
        btn = Button(text ='Hello world', size_hint =(.3, .5),
                     background_color =(.3, .6, .7, 1),
                    pos_hint ={'x':.2, 'y':.2 })

        # adding widget i.e button
        Fl.add_widget(btn)

        # return the layout
        return Fl

# run the App
if __name__ == "__main__":
    MyApp().run()
输出: 
视频输出:
https://kivy.org/doc/stable/api-kivy.uix.floatlayout.html
https://techwithtim.net/tutorials/kivy-tutorial/floatlayout/