📌 相关文章
- ionic 4与ionic 3(1)
- ionic (1)
- ionic 段(1)
- ionic 段
- ionic 4与ionic 3
- Android-相机
- Android-相机(1)
- 按钮相机代码 (1)
- ionic 列表
- ionic 列表(1)
- javascript 相机 - Javascript (1)
- ionic - 任何代码示例
- Ionic键和Ionic化合物
- Ionic键和Ionic化合物(1)
- ionic安装(1)
- ionic安装
- ionic - Shell-Bash (1)
- ionic 输入
- ionic 输入(1)
- javascript 相机 - Javascript 代码示例
- ionic 按钮
- ionic 按钮(1)
- ionic 选择(1)
- ionic 选择
- ionic 新项目 (1)
- ionic 颜色
- ionic 颜色(1)
- ionic 范围
- ionic 范围(1)
📜 ionic 相机
📅 最后修改于: 2021-01-03 05:04:59 🧑 作者: Mango
ionic 相机
在本节中,我们将看到一个示例,用于基于Angular访问本机设备摄像头。
要访问或集成本机设备功能,您需要一个Cordova插件。 Ionic Native充当Cordova插件的包装,该插件提供与Angular和TypeScript的集成。
Ionic原生相机插件允许我们使用设备相机进行拍照。让我们逐步了解如何使用相机在Ionic中拍照。
步骤1:创建一个新项目。您可以从此处了解如何在Ionic 4中创建项目。如果您已经有一个Ionic项目,则可以跳过此步骤。
步骤2:接下来,导航到项目并使用以下命令安装以下相机插件。
$ cd myApp
$ ionic cordova plugin add cordova-plugin-camera
$ npm install @ionic-native/camera
步骤3:将照相机插件导入app.module.ts文件,并将插件包括在提供程序中,如下所示。
App.module.ts
import { NgModule } from '@angular/core';
import { BrowserModule } from '@angular/platform-browser';
import { RouteReuseStrategy } from '@angular/router';

import { IonicModule, IonicRouteStrategy } from '@ionic/angular';
import { SplashScreen } from '@ionic-native/splash-screen/ngx';
import { StatusBar } from '@ionic-native/status-bar/ngx';

import { AppComponent } from './app.component';
import { AppRoutingModule } from './app-routing.module';
import { Camera } from '@ionic-native/camera/ngx';
import { WebView } from '@ionic-native/ionic-webview/ngx';

@NgModule({
  declarations: [AppComponent],
  entryComponents: [],
  imports: [BrowserModule, IonicModule.forRoot(), AppRoutingModule],
  providers: [
    StatusBar,
    SplashScreen,
    Camera,
    WebView,
    { provide: RouteReuseStrategy, useClass: IonicRouteStrategy }
  ],
  bootstrap: [AppComponent]
})
export class AppModule {}
步骤4:打开home.page.ts文件并导入照相机插件,然后使用构造函数创建对象引用。现在,创建用于捕获照片的函数。以下代码段为您提供了详细说明。
主页
import { Component } from '@angular/core';
import { Camera, CameraOptions } from '@ionic-native/camera/ngx';

@Component({
  selector: 'app-home',
  templateUrl: 'home.page.html',
  styleUrls: ['home.page.scss'],
})
export class HomePage {

  capturedSnapURL: string;

  cameraOptions: CameraOptions = {
    quality: 20,
    destinationType: this.camera.DestinationType.DATA_URL,
    encodingType: this.camera.EncodingType.JPEG,
    mediaType: this.camera.MediaType.PICTURE
  };

  constructor(private camera: Camera) {}

  takeSnap() {
    this.camera.getPicture(this.cameraOptions).then((imageData) => {
      // this.camera.DestinationType.FILE_URI gives file URI saved in local
      // this.camera.DestinationType.DATA_URL gives base64 URI

      const base64Image = 'data:image/jpeg;base64,' + imageData;
      this.capturedSnapURL = base64Image;
    }, (err) => {

      console.log(err);
      // Handle error
    });
  }
}
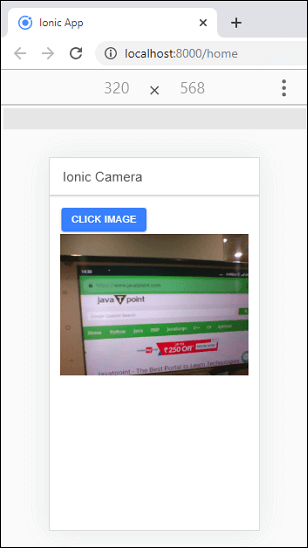
步骤5:创建函数,打开home.page.html文件。在此文件中,您需要创建一个按钮并单击event以使用home.page.ts文件中定义的函数。
Home.page.html
    Ionic Camera


      Click Image
![]()
步骤6:现在,您需要添加目标平台来部署应用程序。您可以使用手机来运行和测试该应用。为此,您需要安装以下命令。
$ ionic cordova platform add android
$ ionic cordova run android --aot
如果要在浏览器中测试您的应用程序,请运行以下命令。
$ ionic cordova run browser
您将获得输出,单击按钮,设备摄像头将打开。现在您可以拍照。
相机选项
相机可以使用多个选项。下表列出了这些选项。
| Parameter | Type | Description |
|---|---|---|
| qualityNumber | It | is used to set the quality of the image in the range of 0-100. |
| destinationType | Number | It is used to choose the format of the image. |
| sourceType | Number | It is used to set the source of the image. |
| encodingType | Number | It is used to choose the encoding type of the image. The value zero will set JPEG, and value one will set the PNG image format. |
| allowEdit | Boolean | It is used for allowing editing of the image before selection. |
| targetHeight | Number | It is used for scaling image width in pixels. |
| targetWidth | Number | It is used for scaling image width in pixels. |
| cameraDirection | Number | It is used to set the camera to use front or back facing. |
| popoverOptions | String | IOS-only options that specify popover location on iPad. |
| mediaType | String | It is used to set the media type. |
| correctOrientation | Boolean | It is used for correcting the orientation of the device during capturing. |
| saveToPhotoAlbum | Boolean | It is used for saving images to photo album on the device. |