- Android 相机教程
- Android 相机教程(1)
- Android 中的相机权限 (1)
- 相机权限 android (1)
- 相机权限 android - 任何代码示例
- Android 中的相机权限 - 任何代码示例
- android 相机图像 uri (1)
- 按钮相机代码 (1)
- javascript 相机 - Javascript (1)
- 在android中点击相机获取图像-Java(1)
- android 相机图像 uri - 任何代码示例
- 在android中点击相机获取图像-Java代码示例
- 从相机 android 中选择照片 - Java (1)
- javascript 相机 - Javascript 代码示例
- 从相机 android 中选择照片 - Java 代码示例
- javascript 使用相机 - Javascript (1)
- ubuntu 相机 - Shell-Bash (1)
- ionic 相机
- ionic 相机(1)
- OpenCV-使用相机
- OpenCV-使用相机(1)
- javascript 使用相机 - Javascript 代码示例
- ubuntu 假相机 - Shell-Bash 代码示例
- ubuntu 相机 - Shell-Bash 代码示例
- 按钮相机代码 - 任何代码示例
- android 中的相机对焦权限 - Dart (1)
- 相机上的图像形成(1)
- 相机上的图像形成
- 相机上的图像形成
📅 最后修改于: 2021-01-05 05:10:33 🧑 作者: Mango
这是以下两种方式,您可以在应用程序中使用相机
-
在我们的应用程序中使用现有的android camera应用程序
-
在我们的应用程序中直接使用android提供的Camera API
在我们的应用程序中使用现有的android camera应用程序
您将使用MediaStore.ACTION_IMAGE_CAPTURE来启动手机上安装的现有相机应用程序。其语法如下
Intent intent = new Intent(android.provider.MediaStore.ACTION_IMAGE_CAPTURE);
除上述内容外,MediaStore还提供其他可用的Intent。它们列出如下
| Sr.No | Intent type and description |
|---|---|
| 1 |
ACTION_IMAGE_CAPTURE_SECURE It returns the image captured from the camera , when the device is secured |
| 2 |
ACTION_VIDEO_CAPTURE It calls the existing video application in android to capture video |
| 3 |
EXTRA_SCREEN_ORIENTATION It is used to set the orientation of the screen to vertical or landscape |
| 4 |
EXTRA_FULL_SCREEN It is used to control the user interface of the ViewImage |
| 5 |
INTENT_ACTION_VIDEO_CAMERA This intent is used to launch the camera in the video mode |
| 6 |
EXTRA_SIZE_LIMIT It is used to specify the size limit of video or image capture size |
现在,您将使用函数startActivityForResult()启动此活动并等待其结果。其语法如下
startActivityForResult(intent,0)
该方法已在活动类中定义。我们从主要活动中称呼它。活动类中定义的方法执行相同的工作,但不是在从活动而是从其他地方进行调用时使用。它们在下面列出
| Sr.No | Activity function description |
|---|---|
| 1 |
startActivityForResult(Intent intent, int requestCode, Bundle options) It starts an activity , but can take extra bundle of options with it |
| 2 |
startActivityFromChild(Activity child, Intent intent, int requestCode) It launch the activity when your activity is child of any other activity |
| 3 |
startActivityFromChild(Activity child, Intent intent, int requestCode, Bundle options) It work same as above , but it can take extra values in the shape of bundle with it |
| 4 |
startActivityFromFragment(Fragment fragment, Intent intent, int requestCode) It launches activity from the fragment you are currently inside |
| 5 |
startActivityFromFragment(Fragment fragment, Intent intent, int requestCode, Bundle options) It not only launches the activity from the fragment , but can take extra values with it |
无论您使用哪个函数启动活动,它们都将返回结果。可以通过重写onActivityResult函数来获得结果。
例
这是一个示例,显示了如何启动现有的相机应用程序以捕获图像并以位图的形式显示结果。
要尝试使用此示例,您需要在支持相机的实际设备上运行该示例。
| Steps | Description |
|---|---|
| 1 | You will use Android studio IDE to create an Android application and name it as Camera under a com.example.sairamkrishna.myapplication. |
| 2 | Modify src/MainActivity.java file to add intent code to launch the Camera. |
| 3 | Modify layout XML file res/layout/activity_main.xml |
| 4 | Add the Camera permission and run the application and choose a running android device and install the application on it and verify the results. |
以下是修改后的主要活动文件src / MainActivity.java的内容。
package com.example.sairamkrishna.myapplication;

import android.Manifest;
import android.app.Activity;
import android.app.AlertDialog;

import android.content.Context;
import android.content.DialogInterface;
import android.content.Intent;
import android.content.SharedPreferences;
import android.content.pm.PackageManager;

import android.net.Uri;
import android.os.Bundle;
import android.provider.Settings;

import android.support.v4.app.ActivityCompat;
import android.support.v4.content.ContextCompat;
import android.support.v7.app.AppCompatActivity;
import android.support.v7.widget.Toolbar;

public class MainActivity extends AppCompatActivity {
   public static final int MY_PERMISSIONS_REQUEST_CAMERA = 100;
   public static final String ALLOW_KEY = "ALLOWED";
   public static final String CAMERA_PREF = "camera_pref";

   @Override
   protected void onCreate(Bundle savedInstanceState) {
      super.onCreate(savedInstanceState);
      setContentView(R.layout.activity_main);

      if (ContextCompat.checkSelfPermission(this, Manifest.permission.CAMERA) != PackageManager.PERMISSION_GRANTED) {
         if (getFromPref(this, ALLOW_KEY)) {
            showSettingsAlert();
         } else if (ContextCompat.checkSelfPermission(this,
            Manifest.permission.CAMERA)

            != PackageManager.PERMISSION_GRANTED) {

               // Should we show an explanation?
               if (ActivityCompat.shouldShowRequestPermissionRationale(this,
                  Manifest.permission.CAMERA)) {
                  showAlert();
               } else {
                  // No explanation needed, we can request the permission.
                  ActivityCompat.requestPermissions(this,
                     new String[]{Manifest.permission.CAMERA},
                     MY_PERMISSIONS_REQUEST_CAMERA);
               }
            }
      } else {
         openCamera();
      }

   }
   public static void saveToPreferences(Context context, String key, Boolean allowed) {
      SharedPreferences myPrefs = context.getSharedPreferences(CAMERA_PREF,
         Context.MODE_PRIVATE);
      SharedPreferences.Editor prefsEditor = myPrefs.edit();
      prefsEditor.putBoolean(key, allowed);
      prefsEditor.commit();
   }

   public static Boolean getFromPref(Context context, String key) {
      SharedPreferences myPrefs = context.getSharedPreferences(CAMERA_PREF,
         Context.MODE_PRIVATE);
      return (myPrefs.getBoolean(key, false));
   }

   private void showAlert() {
      AlertDialog alertDialog = new AlertDialog.Builder(MainActivity.this).create();
      alertDialog.setTitle("Alert");
      alertDialog.setMessage("App needs to access the Camera.");

      alertDialog.setButton(AlertDialog.BUTTON_NEGATIVE, "DONT ALLOW",
         new DialogInterface.OnClickListener() {
            public void onClick(DialogInterface dialog, int which) {
               dialog.dismiss();
               finish();
            }
      });

      alertDialog.setButton(AlertDialog.BUTTON_POSITIVE, "ALLOW",
         new DialogInterface.OnClickListener() {

            public void onClick(DialogInterface dialog, int which) {
               dialog.dismiss();
               ActivityCompat.requestPermissions(MainActivity.this,
               new String[]{Manifest.permission.CAMERA},
               MY_PERMISSIONS_REQUEST_CAMERA);
            }
      });
      alertDialog.show();
   }

   private void showSettingsAlert() {
      AlertDialog alertDialog = new AlertDialog.Builder(MainActivity.this).create();
      alertDialog.setTitle("Alert");
      alertDialog.setMessage("App needs to access the Camera.");

      alertDialog.setButton(AlertDialog.BUTTON_NEGATIVE, "DONT ALLOW",
         new DialogInterface.OnClickListener() {

            public void onClick(DialogInterface dialog, int which) {
               dialog.dismiss();
               //finish();
            }
      });

      alertDialog.setButton(AlertDialog.BUTTON_POSITIVE, "SETTINGS",
         new DialogInterface.OnClickListener() {

            public void onClick(DialogInterface dialog, int which) {
               dialog.dismiss();
               startInstalledAppDetailsActivity(MainActivity.this);
            }
      });

      alertDialog.show();
   }

   @Override
   public void onRequestPermissionsResult(int requestCode, String permissions[], int[] grantResults) {
      switch (requestCode) {
         case MY_PERMISSIONS_REQUEST_CAMERA: {
            for (int i = 0, len = permissions.length; i < len; i++) {
               String permission = permissions[i];

               if (grantResults[i] == PackageManager.PERMISSION_DENIED) {
                  boolean
                  showRationale =
                     ActivityCompat.shouldShowRequestPermissionRationale(
                     this, permission);

                  if (showRationale) {
                     showAlert();
                  } else if (!showRationale) {
                     // user denied flagging NEVER ASK AGAIN
                     // you can either enable some fall back,
                     // disable features of your app
                     // or open another dialog explaining
                     // again the permission and directing to
                     // the app setting
                     saveToPreferences(MainActivity.this, ALLOW_KEY, true);
                  }
               }
            }
         }

         // other 'case' lines to check for other
         // permissions this app might request
      }
   }

   @Override
   protected void onResume() {
      super.onResume();
   }

   public static void startInstalledAppDetailsActivity(final Activity context) {
      if (context == null) {
         return;
      }

      final Intent i = new Intent();
      i.setAction(Settings.ACTION_APPLICATION_DETAILS_SETTINGS);
      i.addCategory(Intent.CATEGORY_DEFAULT);
      i.setData(Uri.parse("package:" + context.getPackageName()));
      i.addFlags(Intent.FLAG_ACTIVITY_NEW_TASK);
      i.addFlags(Intent.FLAG_ACTIVITY_NO_HISTORY);
      i.addFlags(Intent.FLAG_ACTIVITY_EXCLUDE_FROM_RECENTS);
      context.startActivity(i);
   }

   private void openCamera() {
      Intent intent = new Intent("android.media.action.IMAGE_CAPTURE");
      startActivity(intent);
   }
}
以下是res / layout / activity_main.xml文件的内容–
以下将是res / values /字符串.xml的内容,以定义一个新的常量
My Application
以下是AndroidManifest.xml的默认内容-
让我们尝试运行您的应用程序。我假设您已将实际的Android Mobile设备与计算机连接。要从android studio运行该应用,请打开您项目的活动文件之一,然后点击运行 工具栏中的图标。在启动应用程序之前,Android Studio将显示以下窗口,以选择要在其中运行Android应用程序的选项。
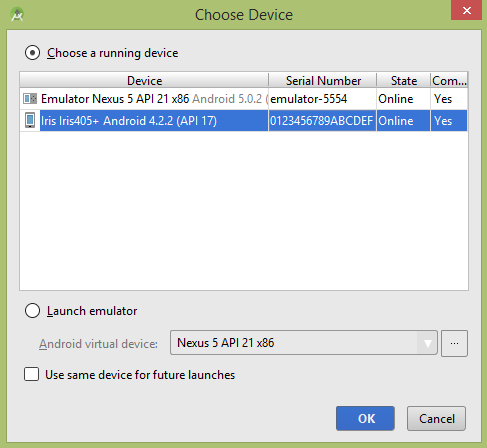
选择您的移动设备作为选项,然后检查您的移动设备,这将打开相机并显示以下屏幕: