Python|在 Kivy 中添加图像小部件
Kivy 是Python中一个独立于平台的 GUI 工具。因为它可以在Android、IOS、Linux和Windows等平台上运行。它基本上是用来开发Android应用程序的,但这并不意味着它不能在桌面应用程序上使用。
👉🏽 Kivy Tutorial – Learn Kivy with Examples.
图像小部件:
Image 小部件用于显示图像。要使用图像小部件,您必须导入:
from kivy.uix.image import Image, AsyncImage因为模块kivy.uix.image具有与图像相关的所有功能。
图像可以通过两种类型加载到应用程序:
1) From system :wimg = Image(source='mylogo.png')
2) Asynchronous Loading:
To load an image asynchronously (for example from an external webserver), use the AsyncImage subclass:aimg = AsyncImage(source='http://mywebsite.com/logo.png')
注意:默认情况下,图像居中并适合小部件边界框。如果您不想这样,可以将allow_stretch设置为 True 并将keep_ratio设置为 False。
Basic Approach to create multiple layout in one file:
1) import kivy
2) import kivyApp
3) import image
4) set minimum version(optional)
5) create App class
6) return Image/layout/widget
7) Run an instance of the class
以下是如何在代码中使用图像的代码:
代码#1:
来自系统的简单图像(必须在保存 .py 文件的文件夹中)
# Program to explain how to add image in kivy

# import kivy module
import kivy

# base Class of your App inherits from the App class.
# app:always refers to the instance of your application
from kivy.app import App

# this restrict the kivy version i.e
# below this kivy version you cannot
# use the app or software
kivy.require('1.9.0')

# The Image widget is used to display an image
# this module contain all features of images
from kivy.uix.image import Image

# creating the App class
class MyApp(App):

    # defining build()

    def build(self):

        # return image
        return Image(source ='download.jpg')

# run the App
MyApp().run()
输出: 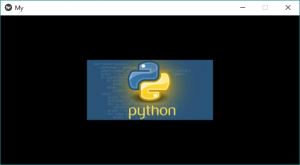 代码#2:
代码#2:
我们如何从网络服务器(外部)添加 AsyncImage 即
# Simple program to show how we add AsyncImage in kivy App

# import kivy module
import kivy

# base Class of your App inherits from the App class.
# app:always refers to the instance of your application
from kivy.app import App

# this restrict the kivy version i.e
# below this kivy version you cannot
# use the app or software
kivy.require('1.9.0')

# The Image widget is used to display an image
# this module contains all features of images
from kivy.uix.image import AsyncImage


# creating the App class
class MyApp(App):

    # defining build()

    def build(self):

        # return image
        return AsyncImage(source ='http://kivy.org/logos/kivy-logo-black-64.png')

# run the App
MyApp().run()
输出: 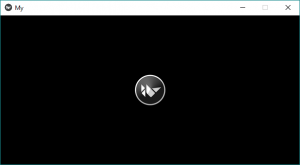
现在想到一件事,您如何更改图像的大小、位置等,下面的代码也将解释这一点:
代码#3:
# Program to Show how to use images in kivy

# import kivy module
import kivy

# base Class of your App inherits from the App class.
# app:always refers to the instance of your application
from kivy.app import App

# this restrict the kivy version i.e
# below this kivy version you cannot
# use the app or software
kivy.require('1.9.0')

# The Image widget is used to display an image
# this module contain all features of images
from kivy.uix.image import Image

# The Widget class is the base class required for creating Widgets
from kivy.uix.widget import Widget

# to change the kivy default settings we use this module config
from kivy.config import Config

# 0 being off 1 being on as in true / false
# you can use 0 or 1 && True or False
Config.set('graphics', 'resizable', True)


# creating the App class
class MyApp(App):

    # defining build()

    def build(self):

        # loading image
        self.img = Image(source ='download.jpg')

        # By default, the image is centered and fits
        # inside the widget bounding box.
        # If you don’t want that,
        # you can set allow_stretch to
        # True and keep_ratio to False.
        self.img.allow_stretch = True
        self.img.keep_ratio = False

        # Providing Size to the image
        # it varies from 0 to 1
        self.img.size_hint_x = 1
        self.img.size_hint_y = 1

        # Position set
        self.img.pos = (200, 100)

        # Opacity adjust the fadeness of the image if
        # 0 then it is complete black
        # 1 then original
        # it varies from 0 to 1
        self.img.opacity = 1


        # adding image to widget
        s = Widget()
        s.add_widget(self.img)

        # return widget
        return s

# run the app
MyApp().run()
输出: 