Stack widget 是flutter SDK 中的一个内置小部件,它允许我们通过将它们相互叠加来制作一层小部件。很多时候,简单的行和列布局是不够的,我们需要一种方法将一个小部件叠加在另一个小部件上,例如,我们可能希望在图像上显示一些文本,因此为了解决这种情况,我们有堆栈小部件。堆栈部件有两种类型的子之一被定位被包裹在定位部件和另一种是非–定位 它没有包含在Positioned小部件中。对于所有未定位的小部件,对齐属性设置为左上角。定位的子小部件通过top 、 right 、 left 和bottom属性定位。子小部件属于 Stack 打印,以便最顶部的小部件成为屏幕上最底部的部件,反之亦然。我们可以使用 Stack 小部件的key属性来更改该顺序或分配不同的顺序。
Stack 类的构造函数:
Stack(
{Key key,
AlignmentGeometry alignment: AlignmentDirectional.topStart,
TextDirection textDirection,
StackFit fit: StackFit.loose,
Overflow overflow: Overflow.clip,
Clip clipBehavior: Clip.hardEdge,
List children: const []}
)
堆栈小部件的属性:
- 对齐:此属性采用 Alignment Geometry 参数,并控制未定位或部分定位的子控件如何在Stack 中对齐。
- clipBehaviour:此属性决定是否剪切内容。
- 适合:此属性决定了堆栈中未定位的子项将如何填充可用空间。
- 溢出:该属性控制内容的溢出部分是否可见,
- textDirection:通过这个属性,我们可以选择从右到左的文本方向。或从左到右。
示例 1:
Dart
import 'package:flutter/material.dart';

void main() {
  runApp(MaterialApp(
          home: Scaffold(
              appBar: AppBar(
                title: Text('GeeksforGeeks'),
                backgroundColor: Colors.greenAccent[400],
              ), //AppBar
              body: Center(
                child: SizedBox(
                  width: 300,
                  height: 300,
                  child: Center(
                    child: Stack(
                      children: [
                        Container(
                          width: 300,
                          height: 300,
                          color: Colors.red,
                        ), //Container
                        Container(
                          width: 250,
                          height: 250,
                          color: Colors.black,
                        ), //Container
                        Container(
                          height: 200,
                          width: 200,
                          color: Colors.purple,
                        ), //Container
                      ], //[]
                    ), //Stack
                  ), //Center
                ), //SizedBox
              ) //Center
              ) //Scaffold
          ) //MaterilApp
      );
}
Dart
import 'package:flutter/material.dart';

void main() {
  runApp(MaterialApp(
          home: Scaffold(
              appBar: AppBar(
                title: Text('GeeksforGeeks'),
                backgroundColor: Colors.greenAccent[400],
              ), //AppBar
              body: Center(
                child: SizedBox(
                  width: 300,
                  height: 300,
                  child: Center(
                    child: Stack(
                      children: [
                        Container(
                          width: 300,
                          height: 300,
                          color: Colors.red,
                          padding: EdgeInsets.all(15.0),
                          alignment: Alignment.topRight,
                          child: Text(
                            'One',
                            style: TextStyle(color: Colors.white),
                          ), //Text
                        ), //Container
                        Container(
                          width: 250,
                          height: 250,
                          color: Colors.black,
                          padding: EdgeInsets.all(15.0),
                          alignment: Alignment.bottomLeft,
                          child: Text(
                            'Two',
                            style: TextStyle(color: Colors.white),
                          ), //Text
                        ), //Container
                        Container(
                          height: 200,
                          width: 200,
                          padding: EdgeInsets.all(15.0),
                          alignment: Alignment.bottomCenter,
                          decoration: BoxDecoration(
                            image: DecorationImage(
                                image: NetworkImage(
                                    "https://pbs.twimg.com/profile_images/1304985167476523008/QNHrwL2q_400x400.jpg") //NetworkImage
                                ), //DecorationImage
                          ), //BoxDecoration
                          child: Text(
                            "GeeksforGeeks",
                            style:
                                TextStyle(color: Colors.white, fontSize: 20.0),
                          ), //Text
                        ), //Container
                      ], //[]
                    ), //Stack
                  ), //Center
                ), //SizedBox
              ) //Center
              ) //Scaffold
          ) //MaterialApp
      );
}
Dart
import 'package:flutter/material.dart';

void main() {
  runApp(MaterialApp(
          home: Scaffold(
              appBar: AppBar(
                title: Text('GeeksforGeeks'),
                backgroundColor: Colors.greenAccent[400],
              ), //AppBar
              body: Center(
                child: SizedBox(
                  width: 300,
                  height: 300,
                  child: Center(
                    child: Stack(
                      fit: StackFit.expand,
                      clipBehavior: Clip.antiAliasWithSaveLayer,
                      overflow: Overflow.visible,
                      children: [
                        Container(
                          width: 300,
                          height: 300,
                          color: Colors.red,
                        ), //Container
                        Positioned(
                          top: 80,
                          left: 80,
                          child: Container(
                            width: 250,
                            height: 250,
                            color: Colors.black,
                          ),
                        ), //Container
                        Positioned(
                          left: 20,
                          top: 20,
                          child: Container(
                            height: 200,
                            width: 200,
                            color: Colors.purple,
                          ),
                        ), //Container
                      ], //[]
                    ), //Stack
                  ), //Center
                ), //SizedBox
              ) //Center
              ) //Scaffold
          ) //MaterilApp
      );
}
输出:
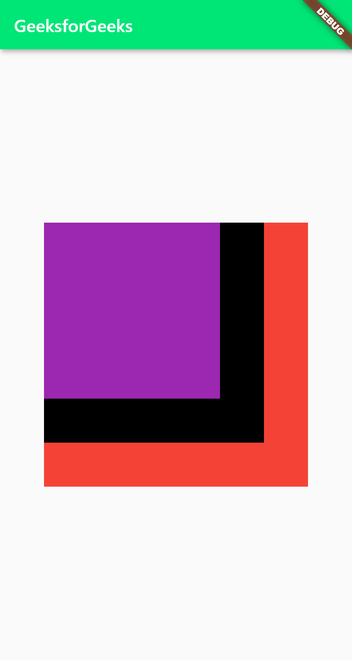
说明:查看这个flutter app的代码,我们可以看到这个app的父widget是Scaffold。在小部件树的顶部,我们有AppBar小部件,标题文本小部件为“ GeeksforGeeks ”,应用栏的背景颜色为greenAccent [400]。在该应用的主体中,窗口小部件是父中心随后高度300的SizedBox和宽度300 SizedBox还具有子中心而这又是保持堆栈插件。在Stack小部件中,我们有一个包含三个Container小部件的子小部件列表。第一个Container小部件的高度和宽度为 300,与SizedBox相同,颜色为红色。第二个容器的宽度和高度为 250,黑色。第三个容器的宽度和高度为 200,颜色为紫色。现在,查看应用程序,我们可以看到作为Stack子项的所有三个容器都堆叠在彼此的顶部,红色容器位于顶部紫色底部,黑色容器位于中间。这三个容器在Stack中都是非定位小部件,因此它们的对齐属性设置为 Alignment.topRight,因此我们可以看到它们都对齐到右上角。
示例 2:
Dart
import 'package:flutter/material.dart';

void main() {
  runApp(MaterialApp(
          home: Scaffold(
              appBar: AppBar(
                title: Text('GeeksforGeeks'),
                backgroundColor: Colors.greenAccent[400],
              ), //AppBar
              body: Center(
                child: SizedBox(
                  width: 300,
                  height: 300,
                  child: Center(
                    child: Stack(
                      children: [
                        Container(
                          width: 300,
                          height: 300,
                          color: Colors.red,
                          padding: EdgeInsets.all(15.0),
                          alignment: Alignment.topRight,
                          child: Text(
                            'One',
                            style: TextStyle(color: Colors.white),
                          ), //Text
                        ), //Container
                        Container(
                          width: 250,
                          height: 250,
                          color: Colors.black,
                          padding: EdgeInsets.all(15.0),
                          alignment: Alignment.bottomLeft,
                          child: Text(
                            'Two',
                            style: TextStyle(color: Colors.white),
                          ), //Text
                        ), //Container
                        Container(
                          height: 200,
                          width: 200,
                          padding: EdgeInsets.all(15.0),
                          alignment: Alignment.bottomCenter,
                          decoration: BoxDecoration(
                            image: DecorationImage(
                                image: NetworkImage(
                                    "https://pbs.twimg.com/profile_images/1304985167476523008/QNHrwL2q_400x400.jpg") //NetworkImage
                                ), //DecorationImage
                          ), //BoxDecoration
                          child: Text(
                            "GeeksforGeeks",
                            style:
                                TextStyle(color: Colors.white, fontSize: 20.0),
                          ), //Text
                        ), //Container
                      ], //[]
                    ), //Stack
                  ), //Center
                ), //SizedBox
              ) //Center
              ) //Scaffold
          ) //MaterialApp
      );
}
输出:
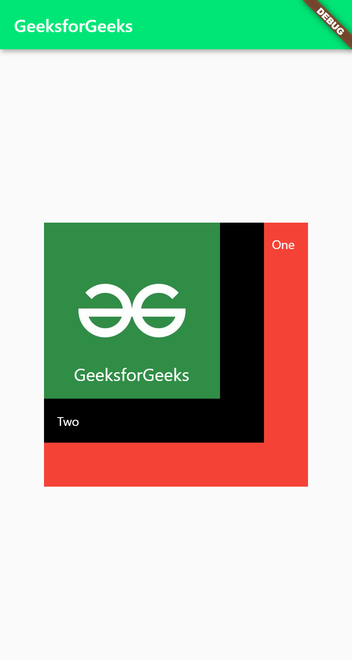
说明:在这个程序中,我们添加了补和一个孩子特XT部件是每个文字的颜色是白色的容器。在第一个容器中, 文本为“一”,对齐方式设置为 Alignment.topRight,这将文本小部件置于右上角。在第二个Container 中,文本为 ‘Two’,对齐方式设置为 Alignment.bottem left,这将作为Text的 child 放置在左下角。在第三个容器中, 我们通过使用容器中的装饰属性添加了一个显示GeeksforGeeks徽标的背景图像。此容器中的文本是“GeeksforGeeks”,对齐方式设置为底部中心,这将测试置于容器底部中心部分的图像上方。
这就是我们如何使用Stack小部件在另一个小部件顶部显示文本(或任何其他小部件)。
示例 3:
Dart
import 'package:flutter/material.dart';

void main() {
  runApp(MaterialApp(
          home: Scaffold(
              appBar: AppBar(
                title: Text('GeeksforGeeks'),
                backgroundColor: Colors.greenAccent[400],
              ), //AppBar
              body: Center(
                child: SizedBox(
                  width: 300,
                  height: 300,
                  child: Center(
                    child: Stack(
                      fit: StackFit.expand,
                      clipBehavior: Clip.antiAliasWithSaveLayer,
                      overflow: Overflow.visible,
                      children: [
                        Container(
                          width: 300,
                          height: 300,
                          color: Colors.red,
                        ), //Container
                        Positioned(
                          top: 80,
                          left: 80,
                          child: Container(
                            width: 250,
                            height: 250,
                            color: Colors.black,
                          ),
                        ), //Container
                        Positioned(
                          left: 20,
                          top: 20,
                          child: Container(
                            height: 200,
                            width: 200,
                            color: Colors.purple,
                          ),
                        ), //Container
                      ], //[]
                    ), //Stack
                  ), //Center
                ), //SizedBox
              ) //Center
              ) //Scaffold
          ) //MaterilApp
      );
}
输出:

说明:在这个应用程序中,我们用一个定位小部件包裹了紫色和黑色的容器,所以这些子小部件现在是定位小部件。在Stack小部件中, fit属性设置为StackFit.expand ,这将强制其所有子小部件占用最大可用空间。剪辑属性设置为antiAliasWithSaveLayer,可避免任何出血边缘。并将溢出设置为可见,使溢出部分可见。现在,我们已经用Positioned小部件包装了容器,我们需要指定它们的位置。对于黑色Container , top和left属性分别设置为 80 ,这使其溢出SizedBox和红色Container 。 但是由于溢出设置为可见,所以我们能够看到黑色容器的溢出部分。对于紫色Container ,顶部和左侧各设置为 20,与第一个示例相比,这使其有点偏移。
因此,这就是Stack小部件的使用方式。但是我们也可以使用CustomSingleChildLayout小部件和CustomMultiChildLayout小部件实现类似或相同的结果。