在谈论Flutter的Layout 之前,只有一件事要记住“ Flutter的一切都是 Widget”。这意味着任何Flutter应用程序中布局的核心是小部件。简单地说,所有的图像、图标、标签和文本等在技术上都是不同类型和布局的小部件。在本文中,我们将详细探讨flutter中布局的概念。
为了更好地理解这个概念,让我们举一个例子并分解这些组件以更好地理解。

图。1
在上图中,您刚刚看到的布局只是几个基本小部件的组合。

图2
现在看看上面的图片,我们只是概述了布局,仔细观察你可以看到在一个原始小部件中有 3 列小部件,每列包含一个图标和一个标签。看看下面的小部件树图。
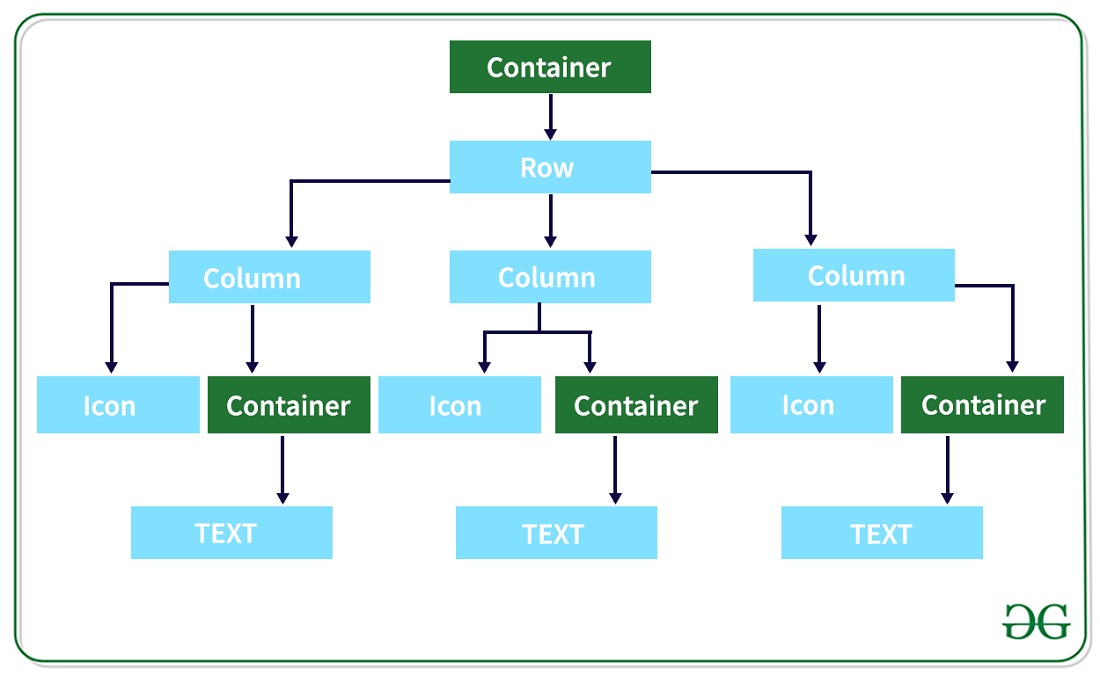
图 3
现在仔细看图 2和图 03 ,父小部件是一个行小部件,在第 3 列小部件内,在每列中,有一个图标,在容器内,有一个文本小部件。
现在让我们来谈谈一些常见的布局小部件。常见的布局widget可以分为两类:
- 标准小部件
- 材质小部件
标准小部件:
flutter中几乎所有的应用程序都使用了一些基本且有用的小部件。在flutter标准部件是容器,GridView控件,ListView控件,堆栈。
容器:
容器是flutter最常用的小部件。我们可以在这个小部件中添加内边距、边距、边框和类似背景颜色的属性,我们可以根据需要对其进行自定义。它只包含一个小部件或子部件。
例子:
Dart
Scaffold(
      appBar: AppBar(
        title: Text(widget.title),
      ),
      body: SafeArea(
             // Container implementation
              child: Container(
               height: 100.0,
               width: 100.0,
              color: Colors.green,
        ),
      )

    );
Dart
// function returning container widget
Widget _buildImageColumn() => Container(
        decoration: BoxDecoration(
          color: Colors.black12,
        ),
        child: Column(
          children: [
            Container(
              height: 100.0,
              width: 50.0,
              color: Colors.red,
            ),
            Container(
              height: 100.0,
              width: 50.0,
              color: Colors.yellow,
            ),
          ],
        ),
      );


@override
  Widget build(BuildContext context) {
    return Scaffold(
        appBar: AppBar(
          backgroundColor: Colors.green,
          title: Text(widget.title),
        ),

      // replace this section in your app
        body: Center(
          child:_buildImageColumn()
        ));
  }
Dart
// Method returning Grid Widget
Widget _buildGrid() => GridView.extent(
      maxCrossAxisExtent: 150,
      padding: const EdgeInsets.all(4),
      mainAxisSpacing: 4,
      crossAxisSpacing: 4,
      children: _buildGridTileList(10));

  List _buildGridTileList(int count) => List.generate(
      count,
      (i) => Container(
            width: 100,
            height: 100,
            color: Colors.blue,
          ));


  @override
  Widget build(BuildContext context) {
    return Scaffold(
        appBar: AppBar(
          backgroundColor: Colors.green,
          title: Text(widget.title),
        ),

      // Replace this section in your app
        body: Center(child: _buildGrid()));
  }
Dart
// function returning List view weidget
Widget _buildList() => ListView(

        // name is a listTile widget which is definedd below
      children: [
        name('james', 'thomas'),
        name('Ajay', 'kumar'),
        name('Arun', 'das'),
        name('Roxie', 'St'),
        name('Stanlee', 'jr'),
        name('AMC', 'hales'),
        Divider(),
        name('Monty',"Chopra"),
        name('Emmy', 'Ave'),
        name(
            'Chaitanya', ' kumar'),
        name('Rio', 'St'),
      ],
    );


// name is a function returning ListTile widget
ListTile name(String firstName, String lastName) => ListTile(
      title: Text(firstName,
          style: TextStyle(
            fontWeight: FontWeight.w500,
            fontSize: 20,
          )),
      subtitle: Text(lastName),
      leading: Icon(
        Icons.arrow_back_ios,
        color: Colors.blue[500],
      ),
    );


  @override
  Widget build(BuildContext context) {
    return Scaffold(
        appBar: AppBar(
          backgroundColor: Colors.green,
          title: Text(widget.title),
        ),

      // replace this section in your app
        body: Center(child: _buildList()));
  }
Dart
// this function returns a stack widget
Widget _buildStack() => Stack(
        alignment: const Alignment(0.6, 0.6),
        children: [
          Container(
            width: 150,
            height: 150,
            decoration: BoxDecoration(
              color: Colors.black45,
              shape: BoxShape.circle
            ),
            child: Center(
              child: Text(
                'Mia B',
                style: TextStyle(
                  fontSize: 20,
                  fontWeight: FontWeight.bold,
                  color: Colors.black,
                ),
              ),
            ),
          ),
        ],
      );

@override
  Widget build(BuildContext context) {
    return Scaffold(
        appBar: AppBar(
          backgroundColor: Colors.green,
          title: Text(widget.title),
        ),

      // replace this section in your app
        body: Center(child: _buildStack()));
  }
Dart
// Function returns thw SizeBox Widget inside that Card widget is present

Widget _buildCard() => SizedBox(
    height: 210,
    child: Card(
      elevation: 20,
      child: Column(
        children: [
          ListTile(
            title: Text('Geeks For Geeks',
                style: TextStyle(fontWeight: FontWeight.w500)),
            subtitle: Text('log writting'),
            leading: Icon(
              Icons.restaurant_menu,
              color: Colors.blue[500],
            ),
          ),
          Divider(),
          ListTile(
            title: Text('Noida, India',
                style: TextStyle(fontWeight: FontWeight.w500)),
            leading: Icon(
              Icons.contact_phone,
              color: Colors.blue[500],
            ),
          ),
          ListTile(
            title: Text('gfg@contribute.com'),
            leading: Icon(
              Icons.contact_mail,
              color: Colors.blue[500],
            ),
          ),
        ],
      ),
    ),
  );

  @override
  Widget build(BuildContext context) {
    return Scaffold(
        appBar: AppBar(
          backgroundColor: Colors.green,
          title: Text(widget.title),
        ),

      // Replace this section in your app
        body: Center(child: _buildCard()));
  }
Dart
@override
  Widget build(BuildContext context) {
    return Scaffold(
        appBar: AppBar(
          backgroundColor: Colors.green,
          title: Text(widget.title),
        ),
        body: Container(
          child: ListTile(
            title: Text('Geeks For Geeks',
                style: TextStyle(fontWeight: FontWeight.w500)),
            subtitle: Text('log writting'),
            leading: Icon(
              Icons.restaurant_menu,
              color: Colors.blue[500],
            ),
          ),
        ));
  }
输出:
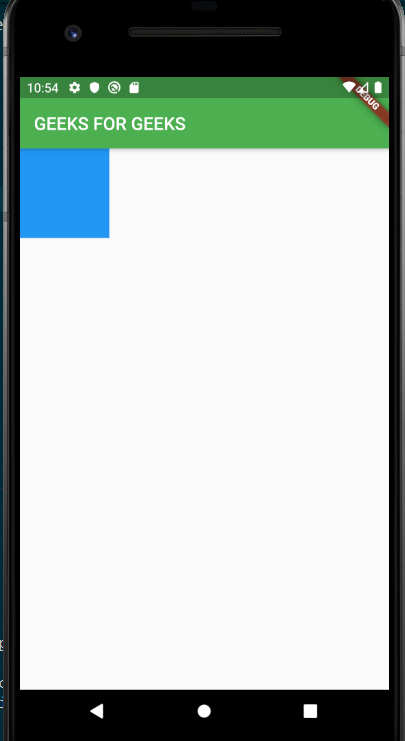
这里我们将定义返回容器小部件的函数
Dart
// function returning container widget
Widget _buildImageColumn() => Container(
        decoration: BoxDecoration(
          color: Colors.black12,
        ),
        child: Column(
          children: [
            Container(
              height: 100.0,
              width: 50.0,
              color: Colors.red,
            ),
            Container(
              height: 100.0,
              width: 50.0,
              color: Colors.yellow,
            ),
          ],
        ),
      );


@override
  Widget build(BuildContext context) {
    return Scaffold(
        appBar: AppBar(
          backgroundColor: Colors.green,
          title: Text(widget.title),
        ),

      // replace this section in your app
        body: Center(
          child:_buildImageColumn()
        ));
  }
输出:

这是一个有点复杂的例子,看看buildImage() ,我们创建了一个背景图像为黑色的容器,它是一个父控件,然后我们创建一个列控件,它是容器的子控件,在列内,我们创建了两个不同颜色的容器,希望你能明白。
网格视图:
网格视图小部件是一个二维可滚动列表,默认情况下它提供两个预制列表,但您可以对其进行自定义并构建您的自定义网格。
- 您可以更改grid.count属性并指定列数。
- gridView.extend 允许图块的最大像素宽度。
例子:
Dart
// Method returning Grid Widget
Widget _buildGrid() => GridView.extent(
      maxCrossAxisExtent: 150,
      padding: const EdgeInsets.all(4),
      mainAxisSpacing: 4,
      crossAxisSpacing: 4,
      children: _buildGridTileList(10));

  List _buildGridTileList(int count) => List.generate(
      count,
      (i) => Container(
            width: 100,
            height: 100,
            color: Colors.blue,
          ));


  @override
  Widget build(BuildContext context) {
    return Scaffold(
        appBar: AppBar(
          backgroundColor: Colors.green,
          title: Text(widget.title),
        ),

      // Replace this section in your app
        body: Center(child: _buildGrid()));
  }
输出:
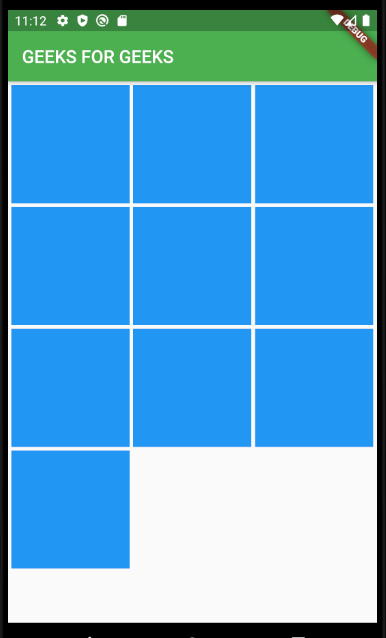
Note: Just try to change the max maxCrossAxisExtent value you can figure out what is the use of maxCrossAxisExtent.列表显示:
列表视图就像一个列小部件,但它有一个优点是可以滚动。 Listview 可以是水平的或垂直的。如果列表视图中的内容不合适,则它会添加可滚动功能。
例子:
Dart
// function returning List view weidget
Widget _buildList() => ListView(

        // name is a listTile widget which is definedd below
      children: [
        name('james', 'thomas'),
        name('Ajay', 'kumar'),
        name('Arun', 'das'),
        name('Roxie', 'St'),
        name('Stanlee', 'jr'),
        name('AMC', 'hales'),
        Divider(),
        name('Monty',"Chopra"),
        name('Emmy', 'Ave'),
        name(
            'Chaitanya', ' kumar'),
        name('Rio', 'St'),
      ],
    );


// name is a function returning ListTile widget
ListTile name(String firstName, String lastName) => ListTile(
      title: Text(firstName,
          style: TextStyle(
            fontWeight: FontWeight.w500,
            fontSize: 20,
          )),
      subtitle: Text(lastName),
      leading: Icon(
        Icons.arrow_back_ios,
        color: Colors.blue[500],
      ),
    );


  @override
  Widget build(BuildContext context) {
    return Scaffold(
        appBar: AppBar(
          backgroundColor: Colors.green,
          title: Text(widget.title),
        ),

      // replace this section in your app
        body: Center(child: _buildList()));
  }
输出:

堆:
每个人都知道堆栈的含义,即在另一个之上。正是这个小部件以这种方式服务,我们可以将小部件放在另一个上面。
Note: This is not similar to column widget, in column widget the children are in a column fashion
      that is one after another not overlapping to each other, but in the stack widget case we can
see the widgets can be overlapped to each other.- 子列表中的第一个小部件是基础小部件;随后的子项覆盖在该基本小部件的顶部。
- 堆栈不能滚动。
例子:
Dart
// this function returns a stack widget
Widget _buildStack() => Stack(
        alignment: const Alignment(0.6, 0.6),
        children: [
          Container(
            width: 150,
            height: 150,
            decoration: BoxDecoration(
              color: Colors.black45,
              shape: BoxShape.circle
            ),
            child: Center(
              child: Text(
                'Mia B',
                style: TextStyle(
                  fontSize: 20,
                  fontWeight: FontWeight.bold,
                  color: Colors.black,
                ),
              ),
            ),
          ),
        ],
      );

@override
  Widget build(BuildContext context) {
    return Scaffold(
        appBar: AppBar(
          backgroundColor: Colors.green,
          title: Text(widget.title),
        ),

      // replace this section in your app
        body: Center(child: _buildStack()));
  }
输出:

卡片 :
卡片来自 Material 库,它可以包含一个孩子,所有现代应用程序都在他们的应用程序中使用卡片。在Flutter,卡片具有略微圆角和阴影,使其具有 3D 效果。通过更改卡片高度属性,您可以像控制投影一样控制 3D 效果。
例子:
Dart
// Function returns thw SizeBox Widget inside that Card widget is present

Widget _buildCard() => SizedBox(
    height: 210,
    child: Card(
      elevation: 20,
      child: Column(
        children: [
          ListTile(
            title: Text('Geeks For Geeks',
                style: TextStyle(fontWeight: FontWeight.w500)),
            subtitle: Text('log writting'),
            leading: Icon(
              Icons.restaurant_menu,
              color: Colors.blue[500],
            ),
          ),
          Divider(),
          ListTile(
            title: Text('Noida, India',
                style: TextStyle(fontWeight: FontWeight.w500)),
            leading: Icon(
              Icons.contact_phone,
              color: Colors.blue[500],
            ),
          ),
          ListTile(
            title: Text('gfg@contribute.com'),
            leading: Icon(
              Icons.contact_mail,
              color: Colors.blue[500],
            ),
          ),
        ],
      ),
    ),
  );

  @override
  Widget build(BuildContext context) {
    return Scaffold(
        appBar: AppBar(
          backgroundColor: Colors.green,
          title: Text(widget.title),
        ),

      // Replace this section in your app
        body: Center(child: _buildCard()));
  }
输出:

在此示例中,我们将高程设为 20,您可以更改它并查看结果。
列表磁贴:
ListTile 也来自材料库。用于创建包含最多 3 行文本和可选的前导和尾随图标的行的简单方法。 ListTile 最常用于 Card 或 ListView,但也可以在其他地方使用。
例子:
Dart
@override
  Widget build(BuildContext context) {
    return Scaffold(
        appBar: AppBar(
          backgroundColor: Colors.green,
          title: Text(widget.title),
        ),
        body: Container(
          child: ListTile(
            title: Text('Geeks For Geeks',
                style: TextStyle(fontWeight: FontWeight.w500)),
            subtitle: Text('log writting'),
            leading: Icon(
              Icons.restaurant_menu,
              color: Colors.blue[500],
            ),
          ),
        ));
  }
输出:
