Spring Boot – @Service 注解和@Repository 注解的区别
Spring Annotations是一种元数据形式,提供有关程序的数据。注释用于提供有关程序的补充信息。它对他们注释的代码的操作没有直接影响。它不会改变编译程序的动作。
@Service 注解
在应用程序中,业务逻辑位于服务层中,因此我们使用@Service 注解来指示一个类属于该层。它也是@Component Annotation的一个特化,就像@Repository Annotation一样。 @Service 注解最重要的一点是它只能应用于类。它用于将类标记为服务提供者。因此,整体 @Service 注释与提供某些业务功能的类一起使用。当使用基于注释的配置和类路径扫描时,Spring 上下文将自动检测这些类。
分步实施
第 1 步:创建一个简单的 Spring Boot 项目
第 2 步:在 pom.xml 文件中添加 spring-context 依赖项。转到项目中的 pom.xml 文件并添加以下 spring-context 依赖项。
XML
    org.springframework
    spring-context
    5.3.13
Java
// Java Program to Illustrate MyServiceClass

// Importing package module to code module
package com.example.demo.service;
// Importing required classes
import org.springframework.stereotype.Service;

// Annotation
@Service

// Class
public class MyServiceClass {

    // Method
    // To compute factorial
    public int factorial(int n)
    {
        // Base case
        if (n == 0)
            return 1;

        return n * factorial(n - 1);
    }
}
Java
// Java Program to Illustrate DemoApplication

// Importing package module to code fragment
package com.example.demo;
// Importing required classes
import com.example.demo.service.MyServiceClass;
import org.springframework.boot.autoconfigure.SpringBootApplication;
import org.springframework.context.annotation.AnnotationConfigApplicationContext;

// Annotation
@SpringBootApplication

// Main class
public class DemoApplication {

    // MAin driver method
    public static void main(String[] args)
    {

        AnnotationConfigApplicationContext context
            = new AnnotationConfigApplicationContext();
        context.scan("com.example.demo");

        context.refresh();

        MyServiceClass myServiceClass
            = context.getBean(MyServiceClass.class);

        // Testing the factorial method
        int factorialOf5 = myServiceClass.factorial(5);
        System.out.println("Factorial of 5 is: "
                           + factorialOf5);

        // Closing the spring context
        // using close() method
        context.close();
    }
}
XML
    org.springframework
    spring-context
    5.3.13
Java
// Java Program to Illustrate Simple POJO (Plain Old Java
// Object) Class

package com.example.demo.entity;

// Class
public class Student {

    // Attributes
    private Long id;
    private String name;
    private int age;

    // Generating the constructor
    public Student(Long id, String name, int age)
    {
        this.id = id;
        this.name = name;
        this.age = age;
    }

    // Getter-setters
    public Long getId() { return id; }

    public void setId(Long id) { this.id = id; }

    public String getName() { return name; }

    public void setName(String name) { this.name = name; }

    public int getAge() { return age; }

    public void setAge(int age) { this.age = age; }

    // Overriding toString() method of String class
    @Override public String toString()
    {
        return "Student{"
            + "id=" + id + ", name='" + name + '\''
            + ", age=" + age + '}';
    }
}
Java
// Java Program to illustrate DemoRepository File

package com.example.demo.repository;

public interface DemoRepository {

    // Save method
    public void save(T t);

    // Find a student by its id
    public T findStudentById(Long id);

}
Java
// Java Program to Illustrate StudentRepository File

package com.example.demo.repository;

import com.example.demo.entity.Student;
import org.springframework.stereotype.Repository;

import java.util.HashMap;
import java.util.Map;

@Repository
public class StudentRepository implements DemoRepository {

    // Using an in-memory Map
    // to store the object data
    private Map repository;

    public StudentRepository() {
        this.repository = new HashMap<>();
    }

    // Implementation for save method
    @Override
    public void save(Student student) {
        repository.put(student.getId(), student);
    }

    // Implementation for findStudentById method
    @Override
    public Student findStudentById(Long id) {
        return repository.get(id);
    }
}
Java
// Java Program to Illustrate Spring Repository Test

package com.example.demo;

import com.example.demo.entity.Student;
import com.example.demo.repository.StudentRepository;
import org.springframework.boot.autoconfigure.SpringBootApplication;
import org.springframework.context.annotation.AnnotationConfigApplicationContext;

// Class
@SpringBootApplication
public class DemoApplication {

    // Main driver method
    public static void main(String[] args)
    {

        AnnotationConfigApplicationContext context
            = new AnnotationConfigApplicationContext();
        context.scan("com.example.demo");
        context.refresh();

        StudentRepository repository
            = context.getBean(StudentRepository.class);

        // Testing the store method
        repository.save(new Student(1L, "Anshul", 25));
        repository.save(new Student(2L, "Mayank", 23));

        // Testing the retrieve method
        Student student = repository.findStudentById(1L);
        System.out.println(student);

        // Closing the spring context
        // using standard close() method
        context.close();
    }
}
第 3 步:在您的项目中创建一个包并将包命名为“服务”。在服务中,包创建一个类并将其命名为“ MyServiceClass” 。
Java
// Java Program to Illustrate MyServiceClass

// Importing package module to code module
package com.example.demo.service;
// Importing required classes
import org.springframework.stereotype.Service;

// Annotation
@Service

// Class
public class MyServiceClass {

    // Method
    // To compute factorial
    public int factorial(int n)
    {
        // Base case
        if (n == 0)
            return 1;

        return n * factorial(n - 1);
    }
}
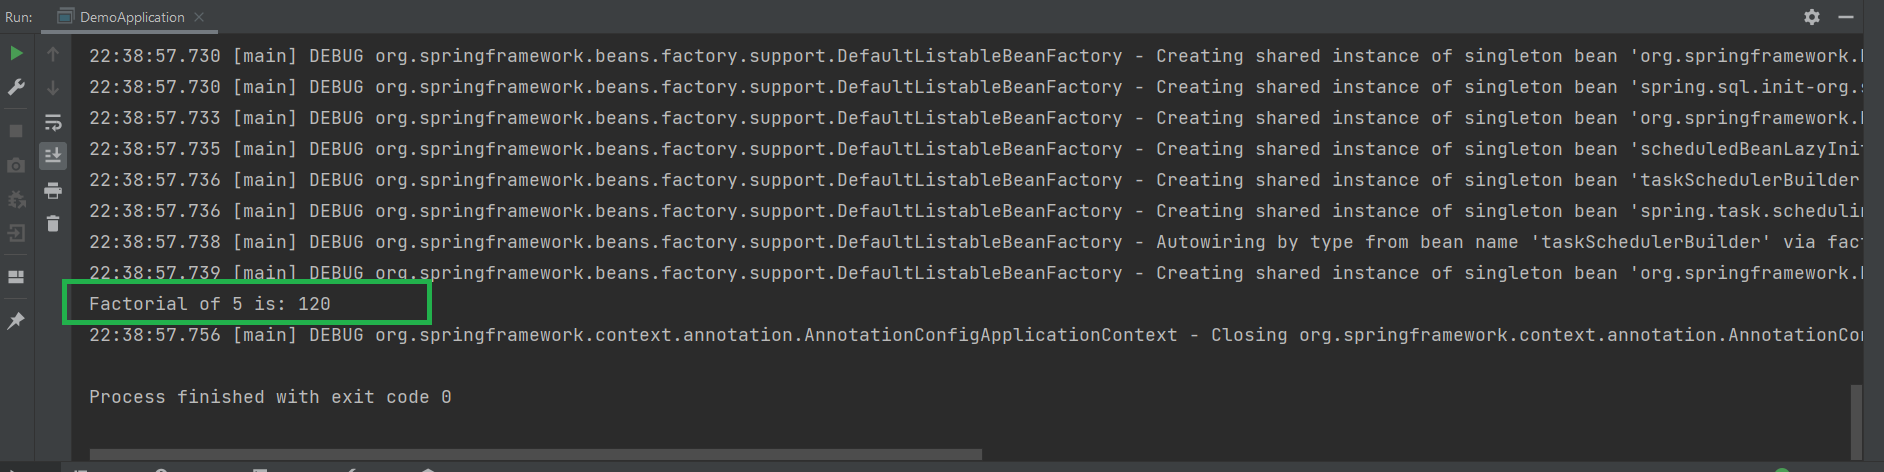
请注意,在这段代码中,它是一个简单的Java类,提供了计算数字的阶乘的功能。所以我们可以称它为服务提供者。我们使用 @Service 注释对其进行了注释,以便 spring-context 可以自动检测它,并且我们可以从上下文中获取它的实例。
第 4 步: Spring 存储库测试
所以现在我们的 Spring Repository 已经准备好了,让我们测试一下。转到演示应用程序。 Java文件并参考下面的代码。
Java
// Java Program to Illustrate DemoApplication

// Importing package module to code fragment
package com.example.demo;
// Importing required classes
import com.example.demo.service.MyServiceClass;
import org.springframework.boot.autoconfigure.SpringBootApplication;
import org.springframework.context.annotation.AnnotationConfigApplicationContext;

// Annotation
@SpringBootApplication

// Main class
public class DemoApplication {

    // MAin driver method
    public static void main(String[] args)
    {

        AnnotationConfigApplicationContext context
            = new AnnotationConfigApplicationContext();
        context.scan("com.example.demo");

        context.refresh();

        MyServiceClass myServiceClass
            = context.getBean(MyServiceClass.class);

        // Testing the factorial method
        int factorialOf5 = myServiceClass.factorial(5);
        System.out.println("Factorial of 5 is: "
                           + factorialOf5);

        // Closing the spring context
        // using close() method
        context.close();
    }
}
输出:
@Repository 注解
@Repository 注解是@Component注解的一种特殊化,用于表示该类提供了对对象进行存储、检索、更新、删除和搜索操作的机制。虽然它是 @Component 注解的特化,所以 Spring Repository 类是由 Spring 框架通过类路径扫描自动检测到的。这个注解是一个通用的原型注解,它非常接近 DAO 模式,其中 DAO 类负责在数据库表上提供 CRUD 操作。
分步实施
第 1 步:创建一个简单的 Spring Boot 项目
参考这篇文章在 Eclipse IDE 中创建和设置 Spring Boot 项目并创建一个简单的 Spring Boot 项目。
第 2 步:在 pom.xml 文件中添加 spring-context 依赖项。转到项目中的 pom.xml 文件并添加以下 spring-context 依赖项。
XML
    org.springframework
    spring-context
    5.3.13
第 3 步:在您的项目中创建两个包,并将包命名为“实体”和“存储库”。在实体中,包创建了一个名为 Student 的类。在存储库中,包创建一个名为 DemoRepository 的通用接口和一个名为 StudentRepository 的类。
第 4 步:创建一个实体类,我们将为其实现一个 spring 存储库。这里我们的实体类是Student。下面是学生的代码。 Java文件。
Java
// Java Program to Illustrate Simple POJO (Plain Old Java
// Object) Class

package com.example.demo.entity;

// Class
public class Student {

    // Attributes
    private Long id;
    private String name;
    private int age;

    // Generating the constructor
    public Student(Long id, String name, int age)
    {
        this.id = id;
        this.name = name;
        this.age = age;
    }

    // Getter-setters
    public Long getId() { return id; }

    public void setId(Long id) { this.id = id; }

    public String getName() { return name; }

    public void setName(String name) { this.name = name; }

    public int getAge() { return age; }

    public void setAge(int age) { this.age = age; }

    // Overriding toString() method of String class
    @Override public String toString()
    {
        return "Student{"
            + "id=" + id + ", name='" + name + '\''
            + ", age=" + age + '}';
    }
}
第 5 步:在实现 Repository 类之前,我们创建了一个通用的 DemoRepository 接口来为我们的存储库类提供要实现的契约。
Java
// Java Program to illustrate DemoRepository File

package com.example.demo.repository;

public interface DemoRepository {

    // Save method
    public void save(T t);

    // Find a student by its id
    public T findStudentById(Long id);

}
第 6 步:现在让我们看看 StudentRepository 类的实现。
Java
// Java Program to Illustrate StudentRepository File

package com.example.demo.repository;

import com.example.demo.entity.Student;
import org.springframework.stereotype.Repository;

import java.util.HashMap;
import java.util.Map;

@Repository
public class StudentRepository implements DemoRepository {

    // Using an in-memory Map
    // to store the object data
    private Map repository;

    public StudentRepository() {
        this.repository = new HashMap<>();
    }

    // Implementation for save method
    @Override
    public void save(Student student) {
        repository.put(student.getId(), student);
    }

    // Implementation for findStudentById method
    @Override
    public Student findStudentById(Long id) {
        return repository.get(id);
    }
}
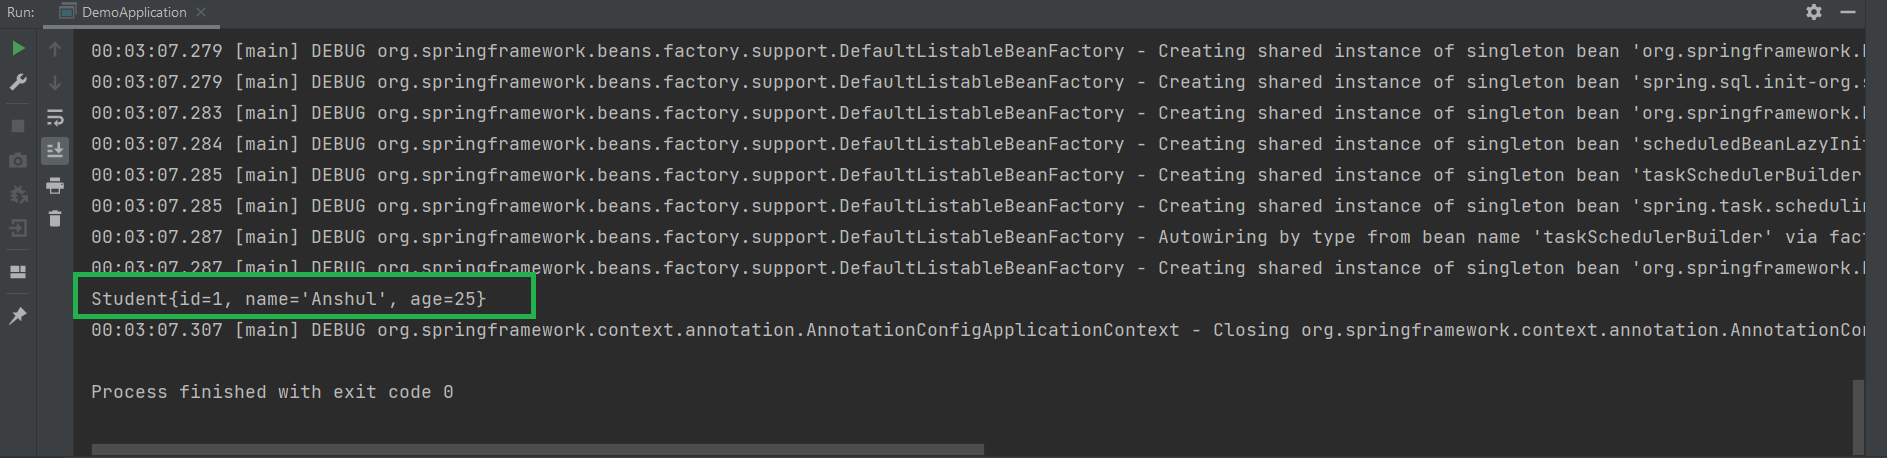
在这个StudentRepository 中。在Java文件中,可以注意到我们添加了@Repository注解,表示该类提供了对对象进行存储、检索、更新、删除和搜索操作的机制。
Note: Here we have used an in-memory Map to store the object data, you can use any other mechanisms too. In the real world, we use Databases to store object data.
第 7 步: Spring 存储库测试
所以现在我们的 Spring Repository 已经准备好了,让我们测试一下。转到演示应用程序。 Java文件并参考下面的代码。
Java
// Java Program to Illustrate Spring Repository Test

package com.example.demo;

import com.example.demo.entity.Student;
import com.example.demo.repository.StudentRepository;
import org.springframework.boot.autoconfigure.SpringBootApplication;
import org.springframework.context.annotation.AnnotationConfigApplicationContext;

// Class
@SpringBootApplication
public class DemoApplication {

    // Main driver method
    public static void main(String[] args)
    {

        AnnotationConfigApplicationContext context
            = new AnnotationConfigApplicationContext();
        context.scan("com.example.demo");
        context.refresh();

        StudentRepository repository
            = context.getBean(StudentRepository.class);

        // Testing the store method
        repository.save(new Student(1L, "Anshul", 25));
        repository.save(new Student(2L, "Mayank", 23));

        // Testing the retrieve method
        Student student = repository.findStudentById(1L);
        System.out.println(student);

        // Closing the spring context
        // using standard close() method
        context.close();
    }
}
输出:最后,运行您的应用程序,您应该得到如下输出,如下所示:
@Service 注解和@Repository 注解的区别
@Service Annotation | @Repository Annotation |
|---|---|
| @Service annotation is used with classes that provide some business functionalities. | @Repository Annotation is used to indicate that the class provides the mechanism for storage, retrieval, update, delete and search operation on objects. |
| @Service Annotation is a specialization of @Component Annotation. | @Repository Annotation is also a specialization of @Component Annotation. |
| It can be applied only to classes. | It is used at the class level. |
| It is used to mark the class as a service provider. | It is used to mark the interface as DAO (Data Access Object) provider. |
| It is a Stereotype Annotations. | It is also a Stereotype Annotations. |