在Python .docx 模块中处理文本
先决条件:使用 .docx 模块
Word 文档包含包装在三个对象级别内的格式化文本。最低级别运行对象、中间级别段落对象和最高级别文档对象。因此,我们无法使用普通文本编辑器处理这些文档。但是,我们可以使用 python-docx 模块在Python中操作这些 word 文档。安装这个模块的pip命令是:
pip install python-docxPython docx 模块允许用户通过操作现有文档或创建新的空文档并对其进行操作来操作文档。它是一个强大的工具,因为它可以帮助您在非常大的范围内操作文档。您还可以使用此模块操作字体大小、颜色及其样式。
字体大小
要增加/减少文本的字体大小,您必须首先创建一个段落对象,然后您必须使用 add_run() 方法来添加内容。您可以直接使用 add_paragraph() 方法添加段落,但是如果您想增加/减少文本的字体大小,您必须使用 add_run() 因为所有块级格式化都是通过使用 add_paragraph() 方法完成的,而所有的字符级格式化是通过使用 add_run() 完成的。
现在要设置新的字体大小,我们将使用.font.size方法。这是字体对象的方法,用于设置文本的新字体大小。
Syntax: para.font.size = Length
Parameter:
Length: It defines the size of the font. It can be in inches, pt or cm.
示例 1:设置段落中文本的字体大小。
Python3
# Import docx NOT python-docx
import docx
from docx.shared import Pt

# Create an instance of a word document
doc = docx.Document()

# Add a Title to the document
doc.add_heading('GeeksForGeeks', 0)

# Adding paragraph with Increased font size
doc.add_heading('Increased Font Size Paragraph:', 3)
para = doc.add_paragraph().add_run(
    'GeeksforGeeks is a Computer Science portal for geeks.')
# Increasing size of the font
para.font.size = Pt(12)

# Adding paragraph with normal font size
doc.add_heading('Normal Font Size Paragraph:', 3)
doc.add_paragraph(
    'GeeksforGeeks is a Computer Science portal for geeks.')

# Now save the document to a location
doc.save('gfg.docx')
Python3
# Import docx NOT python-docx
import docx
from docx.shared import RGBColor

# Create an instance of a word document
doc = docx.Document()

# Add a Title to the document
doc.add_heading('GeeksForGeeks', 0)

# Adding paragraph
doc.add_heading('Font Colour:', 3)
para = doc.add_paragraph().add_run(
    'GeeksforGeeks is a Computer Science portal for geeks.')

# Adding forest green colour to the text
# RGBColor(R, G, B)
para.font.color.rgb = RGBColor(0x22, 0x8b, 0x22)

# Now save the document to a location
doc.save('gfg.docx')
Python3
# Import docx NOT python-docx
import docx

# Create an instance of a word document
doc = docx.Document()

# Add a Title to the document
doc.add_heading('GeeksForGeeks', 0)

# Adding paragraph with new font Style
doc.add_heading('Font Style: Roboto', 3)
para = doc.add_paragraph().add_run(
    'GeeksforGeeks is a Computer Science portal for geeks.')
# Setting new font style
para.font.name = 'Roboto'

# Adding paragraph with default font Style
doc.add_heading('Font Style: Default [Cambria]', 3)
doc.add_paragraph(
    'GeeksforGeeks is a Computer Science portal for geeks.')

# Now save the document to a location
doc.save('gfg.docx')
Python3
# Import docx NOT python-docx
import docx

# Create an instance of a word document
doc = docx.Document()

# Add a Title to the document
doc.add_heading('GeeksForGeeks', 0)

# Creating paragraph
para = doc.add_paragraph()

# Adding content to paragraph
bold_para = para.add_run(
    '''GeeksforGeeks is a Computer Science portal for geeks. It contains well written, well thought and well-explained computer science and programming articles, quizzes etc.''')

# Setting bold to true
bold_para.bold = True

# Now save the document to a location
doc.save('gfg.docx')
Python3
# Import docx NOT python-docx
import docx

# Create an instance of a word document
doc = docx.Document()

# Add a Title to the document
doc.add_heading('GeeksForGeeks', 0)

# Creating paragraph with some content
para = doc.add_paragraph(
    '''GeeksforGeeks is a Computer Science portal for geeks.''')

# Adding more content to paragraph and Setting bold to true
para.add_run(
    ''' It contains well written, well thought and well-explained ''').bold = True

# Adding more content to paragraph
para.add_run('''computer science and programming articles, quizzes etc.''')

# Now save the document to a location
doc.save('gfg.docx')
Python3
# Import docx NOT python-docx
import docx

# Create an instance of a word document
doc = docx.Document()

# Add a Title to the document
doc.add_heading('GeeksForGeeks', 0)

# Creating paragraph
para = doc.add_paragraph()

# Adding content to paragraph
italic_para = para.add_run(
    '''GeeksforGeeks is a Computer Science portal for geeks. It contains well written, well thought and well-explained computer science and programming articles, quizzes etc.''')

# Applying italics to true
italic_para.italic = True

# Now save the document to a location
doc.save('gfg.docx')
Python3
# Import docx NOT python-docx
import docx

# Create an instance of a word document
doc = docx.Document()

# Add a Title to the document
doc.add_heading('GeeksForGeeks', 0)

# Creating paragraph with some content
para = doc.add_paragraph(
    '''GeeksforGeeks is a Computer Science portal for geeks.''')

# Adding more content to paragraph and applying italics to true
para.add_run(
    ''' It contains well written, well thought and well-explained ''').italic = True

# Adding more content to paragraph
para.add_run('''computer science and programming articles, quizzes etc.''')

# Now save the document to a location
doc.save('gfg.docx')
Python3
# Import docx NOT python-docx
import docx

# Create an instance of a word document
doc = docx.Document()

# Add a Title to the document
doc.add_heading('GeeksForGeeks', 0)

# Creating paragraph
para = doc.add_paragraph()

# Adding content to paragraph
underline_para = para.add_run(
    '''GeeksforGeeks is a Computer Science portal for geeks. It contains well written, well thought and well-explained computer science and programming articles, quizzes etc.''')

# Applying undeline to true
underline_para.underline = True

# Now save the document to a location
doc.save('gfg.docx')
Python3
# Import docx NOT python-docx
import docx

# Create an instance of a word document
doc = docx.Document()

# Add a Title to the document
doc.add_heading('GeeksForGeeks', 0)

# Creating paragraph with some content
para = doc.add_paragraph(
    '''GeeksforGeeks is a Computer Science portal for geeks.''')

# Adding more content to paragraph and applying underline to them
para.add_run(
    ''' It contains well written, well thought and well-explained ''').underline = True

# Adding more content to paragraph
para.add_run('''computer science and programming articles, quizzes etc.''')

# Now save the document to a location
doc.save('gfg.docx')
输出:

字体颜色
要将字体颜色应用于文本,您必须首先创建一个段落对象,然后您必须使用 add_run() 方法来添加内容。您可以直接使用 add_paragraph() 方法添加段落,但是如果要将字体颜色应用于文本,则必须使用 add_run() 因为所有块级格式化都是通过使用 add_paragraph() 方法完成的,而所有字符 -级别格式化是通过使用 add_run() 完成的。
要将颜色设置为字体,我们将使用RGBColor()对象,该对象接受颜色的十六进制输入并将相同的颜色设置为文本。
Syntax: para.font.color.rgb = RGBColor([RGB Colour Value in Hexadecimal])
Parameter:
RGB Colour Value: It is the hexadecimal value of the colour you want to set. It is given in the form of R, G, B as input.
注意:您必须在代码中调用RGBColor()函数之前添加 ' from docx.shared import RGBColor ' import 语句。
示例 2:为段落中的文本添加颜色。
蟒蛇3
# Import docx NOT python-docx
import docx
from docx.shared import RGBColor

# Create an instance of a word document
doc = docx.Document()

# Add a Title to the document
doc.add_heading('GeeksForGeeks', 0)

# Adding paragraph
doc.add_heading('Font Colour:', 3)
para = doc.add_paragraph().add_run(
    'GeeksforGeeks is a Computer Science portal for geeks.')

# Adding forest green colour to the text
# RGBColor(R, G, B)
para.font.color.rgb = RGBColor(0x22, 0x8b, 0x22)

# Now save the document to a location
doc.save('gfg.docx')
输出:

字体样式
要为文本设置新的字体样式,您必须首先创建一个段落对象,然后您必须使用 add_run() 方法添加内容。您可以直接使用 add_paragraph() 方法来添加段落,但是如果要设置文本的新字体样式,则必须使用 add_run() 因为所有块级格式都是通过使用 add_paragraph() 方法完成的,而所有字符级格式化是通过使用 add_run() 完成的。
现在要设置一个新的字体名称,我们将使用.font.name方法。这是字体对象的方法,用于为文本设置新的字体名称。
Syntax: para.font.name = String s
Parameter:
String s: It is the name of the new font style. If you give any random name as input string then default style is adopted for the text.
示例 3:为段落设置新字体名称。
蟒蛇3
# Import docx NOT python-docx
import docx
# Create an instance of a word document
doc = docx.Document()
# Add a Title to the document
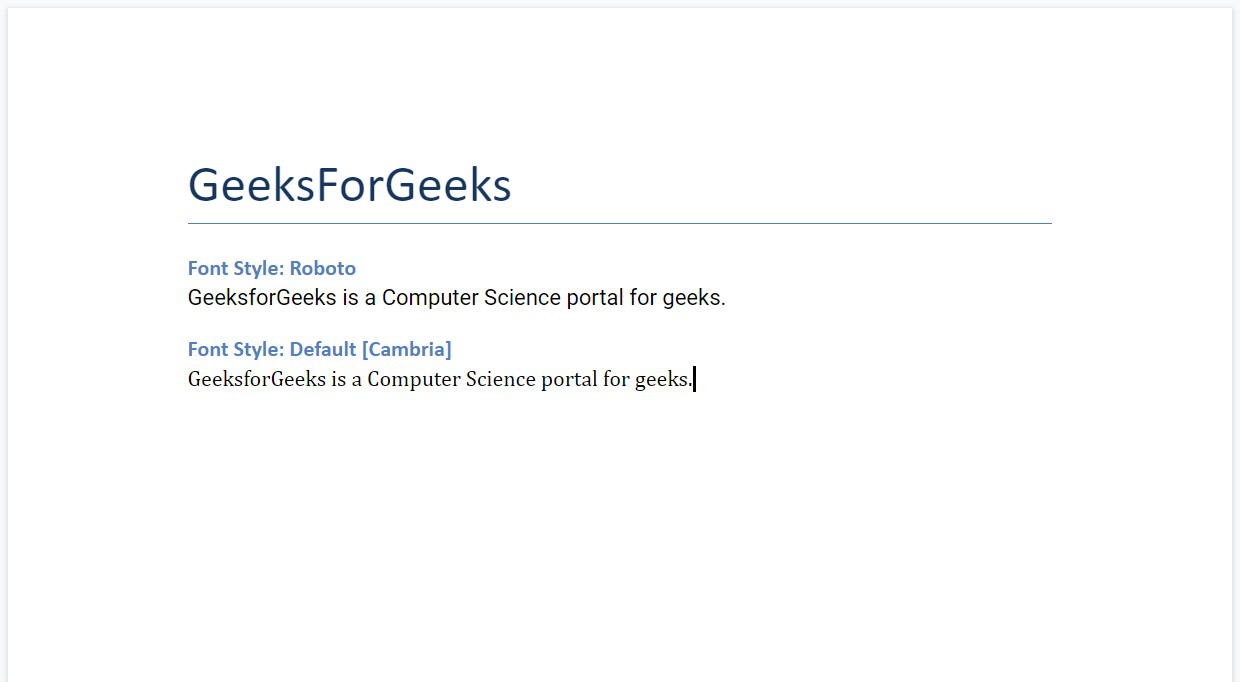
doc.add_heading('GeeksForGeeks', 0)
# Adding paragraph with new font Style
doc.add_heading('Font Style: Roboto', 3)
para = doc.add_paragraph().add_run(
'GeeksforGeeks is a Computer Science portal for geeks.')
# Setting new font style
para.font.name = 'Roboto'
# Adding paragraph with default font Style
doc.add_heading('Font Style: Default [Cambria]', 3)
doc.add_paragraph(
'GeeksforGeeks is a Computer Science portal for geeks.')
# Now save the document to a location
doc.save('gfg.docx')
输出:
粗体
要将文本设置为粗体,您必须将其设置为 true。
doc.bold = True要突出显示特定单词,需要将粗体及其 add_run() 语句设置为 True。
add_run(" text ").bold=True示例 1:对完整段落应用粗体。
蟒蛇3
# Import docx NOT python-docx
import docx

# Create an instance of a word document
doc = docx.Document()

# Add a Title to the document
doc.add_heading('GeeksForGeeks', 0)

# Creating paragraph
para = doc.add_paragraph()

# Adding content to paragraph
bold_para = para.add_run(
    '''GeeksforGeeks is a Computer Science portal for geeks. It contains well written, well thought and well-explained computer science and programming articles, quizzes etc.''')

# Setting bold to true
bold_para.bold = True

# Now save the document to a location
doc.save('gfg.docx')
输出:
文档 gfg.docx
示例 2:将粗体应用于特定单词或短语。
蟒蛇3
# Import docx NOT python-docx
import docx
# Create an instance of a word document
doc = docx.Document()
# Add a Title to the document
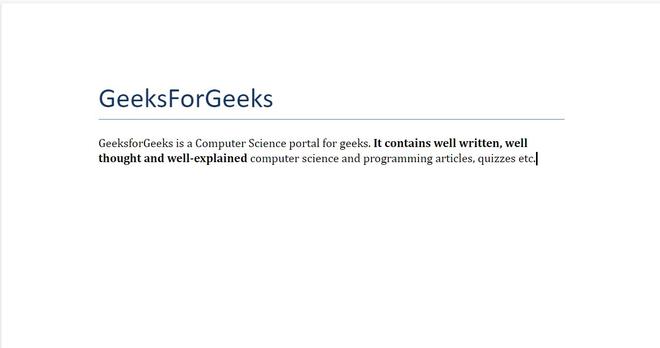
doc.add_heading('GeeksForGeeks', 0)
# Creating paragraph with some content
para = doc.add_paragraph(
'''GeeksforGeeks is a Computer Science portal for geeks.''')
# Adding more content to paragraph and Setting bold to true
para.add_run(
''' It contains well written, well thought and well-explained ''').bold = True
# Adding more content to paragraph
para.add_run('''computer science and programming articles, quizzes etc.''')
# Now save the document to a location
doc.save('gfg.docx')
输出:
文档 gfg.docx
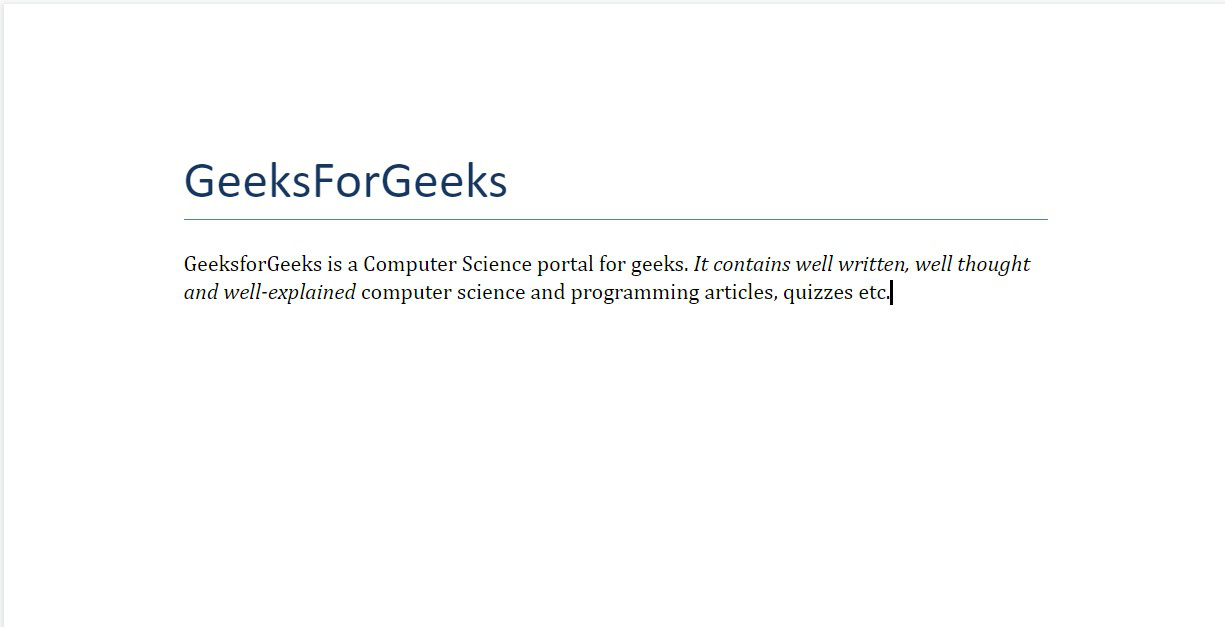
斜体文字
要将文本设置为斜体,您必须将其设置为 true。
doc.italic = True要使某些特定单词斜体,需要将它的 add_run() 语句设置为 True。
add_run(" text ").italic=True示例 3:将斜体应用于完整的段落。
蟒蛇3
# Import docx NOT python-docx
import docx
# Create an instance of a word document
doc = docx.Document()
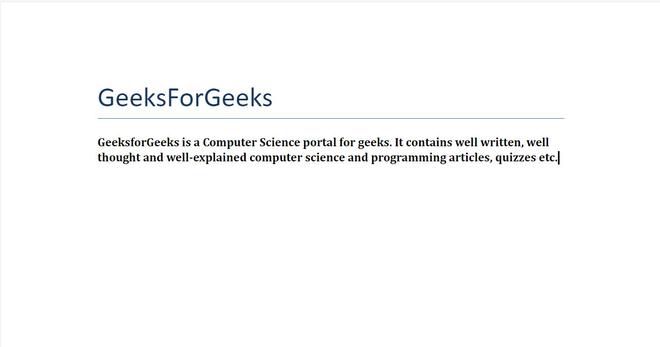
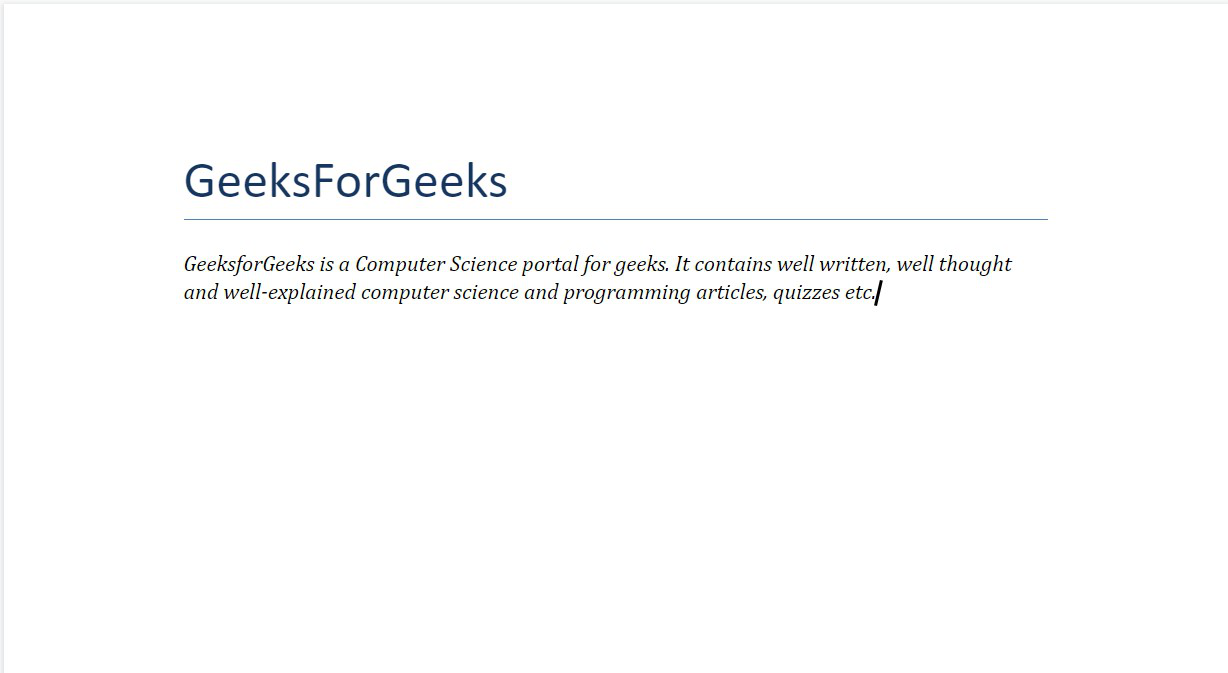
# Add a Title to the document
doc.add_heading('GeeksForGeeks', 0)
# Creating paragraph
para = doc.add_paragraph()
# Adding content to paragraph
italic_para = para.add_run(
'''GeeksforGeeks is a Computer Science portal for geeks. It contains well written, well thought and well-explained computer science and programming articles, quizzes etc.''')
# Applying italics to true
italic_para.italic = True
# Now save the document to a location
doc.save('gfg.docx')
输出:
文档 gfg.docx
示例 4:将斜体应用于特定单词或短语。
蟒蛇3
# Import docx NOT python-docx
import docx

# Create an instance of a word document
doc = docx.Document()

# Add a Title to the document
doc.add_heading('GeeksForGeeks', 0)

# Creating paragraph with some content
para = doc.add_paragraph(
    '''GeeksforGeeks is a Computer Science portal for geeks.''')

# Adding more content to paragraph and applying italics to true
para.add_run(
    ''' It contains well written, well thought and well-explained ''').italic = True

# Adding more content to paragraph
para.add_run('''computer science and programming articles, quizzes etc.''')

# Now save the document to a location
doc.save('gfg.docx')
输出:
文档 gfg.docx
带下划线的文字
要将下划线应用于文本,您必须将其设置为 true。
doc.underline = True要为特定部分加下划线,下划线需要设置 True 及其 add_run()函数
add_run("text").underline=True示例 5:将下划线应用于完整的段落。
蟒蛇3
# Import docx NOT python-docx
import docx

# Create an instance of a word document
doc = docx.Document()

# Add a Title to the document
doc.add_heading('GeeksForGeeks', 0)

# Creating paragraph
para = doc.add_paragraph()

# Adding content to paragraph
underline_para = para.add_run(
    '''GeeksforGeeks is a Computer Science portal for geeks. It contains well written, well thought and well-explained computer science and programming articles, quizzes etc.''')

# Applying undeline to true
underline_para.underline = True

# Now save the document to a location
doc.save('gfg.docx')
输出:
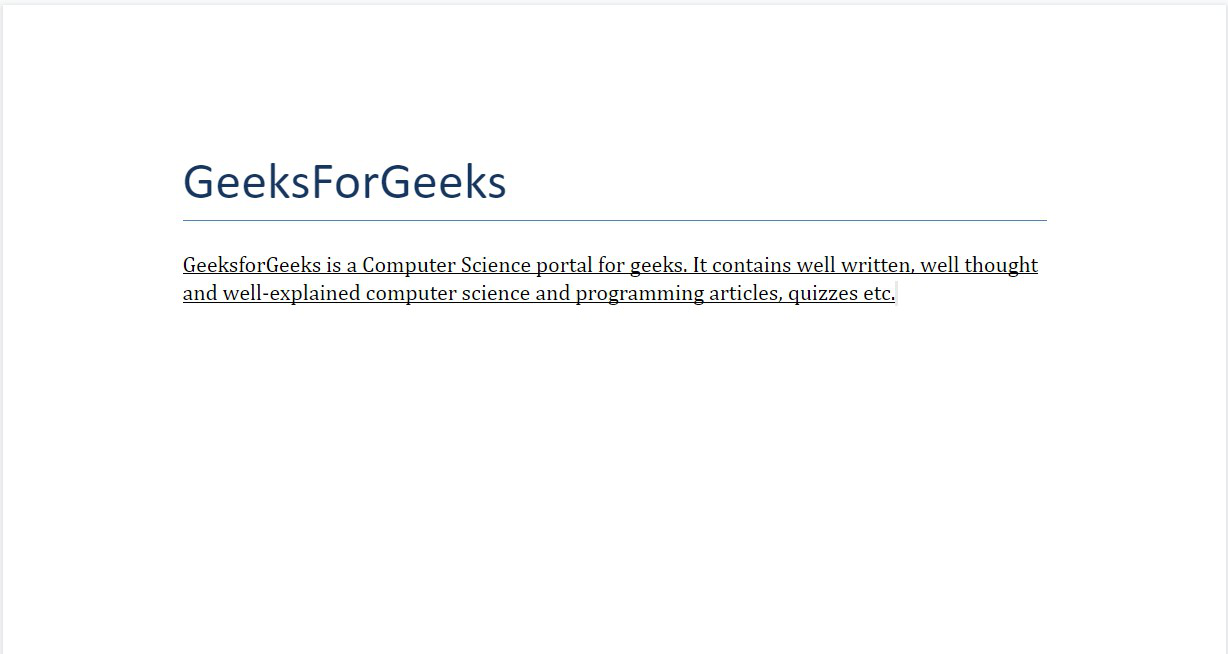
文档 gfg.docx
示例 6:对特定单词或短语应用下划线。
蟒蛇3
# Import docx NOT python-docx
import docx

# Create an instance of a word document
doc = docx.Document()

# Add a Title to the document
doc.add_heading('GeeksForGeeks', 0)

# Creating paragraph with some content
para = doc.add_paragraph(
    '''GeeksforGeeks is a Computer Science portal for geeks.''')

# Adding more content to paragraph and applying underline to them
para.add_run(
    ''' It contains well written, well thought and well-explained ''').underline = True

# Adding more content to paragraph
para.add_run('''computer science and programming articles, quizzes etc.''')

# Now save the document to a location
doc.save('gfg.docx')
输出:
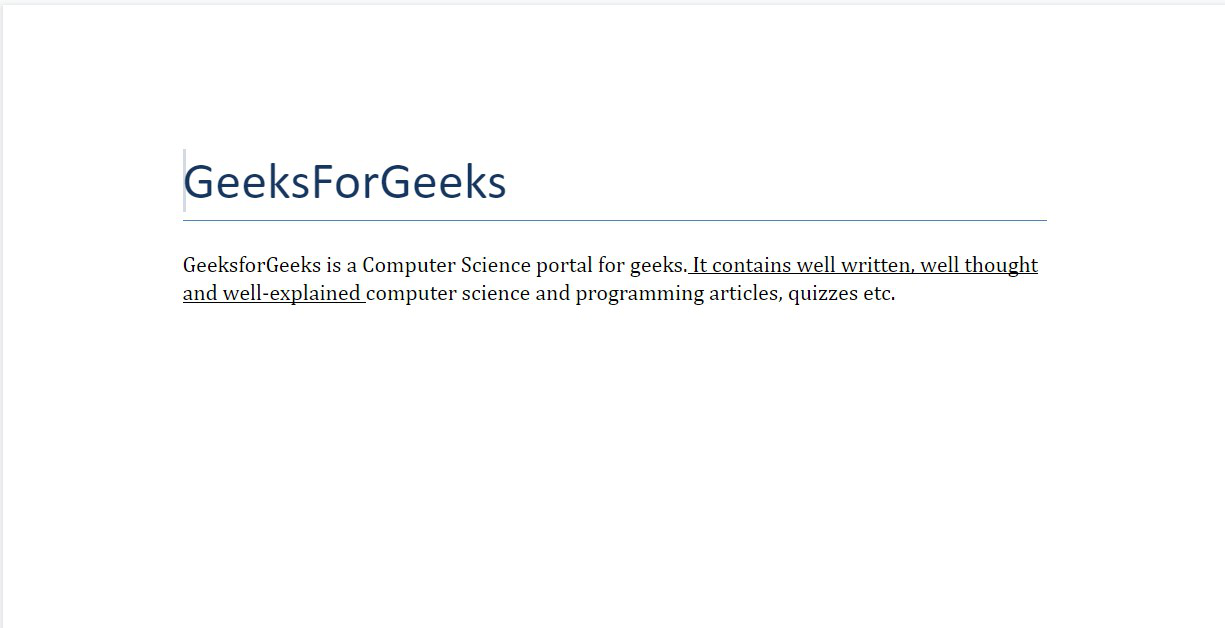
文档 gfg.docx