在 Flask 中使用 Web Scrapping 创建 Cricket Score API
板球是世界著名的户外运动之一。提供实时记分牌的 API 很少,而且没有一个可以免费使用。使用任何可用的记分板,我们可以为自己创建 API。这种方法不仅适用于板球记分牌,也适用于任何在线可用信息。以下是本博客将指导创建 API 和部署它的流程。
- 设置应用程序目录
- 来自 NDTV Sports 的网络抓取数据。
- 将使用Python的Beautiful Soup。
- 创建 API。
- 将使用烧瓶。
- Heroku 将用于部署,
设置应用程序目录
第 1 步:创建一个文件夹(例如 CricGFG)。
第 2 步:设置虚拟环境。这里我们创建一个环境.env
python -m venv .env第 3 步:激活环境。
.env\Scripts\activate
获取数据
第 1 步:在Python,我们有 Beautiful Soup,它是一个从 HTML 文件中提取数据的库。要安装 Beautiful Soup,运行一个简单的命令;
pip install beautifulsoup4
同样,安装Python的 Requests 模块。
pip install requests我们将使用 NDTV Sports Cricket Scorecard 来获取数据。
第 3 步:以下是从网页抓取数据的步骤。从网页中获取 HTML 文本;
html_text = requests.get(‘https://sports.ndtv.com/cricket/live-scores’).text
为了将解析的对象表示为一个整体,我们使用 BeautifulSoup 对象,
soup = BeautifulSoup(html_text, "html.parser")注意:建议在每一步之后运行并检查代码,以了解差异并彻底理解概念。
例子:
Python
from bs4 import BeautifulSoup
import requests

html_text = requests.get('https://sports.ndtv.com/cricket/live-scores').text
soup = BeautifulSoup(html_text, "html.parser")
print(soup)
Python
from bs4 import BeautifulSoup
import requests

html_text = requests.get('https://sports.ndtv.com/cricket/live-scores').text
soup = BeautifulSoup(html_text, "html.parser")
sect = soup.find_all('div', class_='sp-scr_wrp')
section = sect[0]
description = section.find('span', class_='description').text
location = section.find('span', class_='location').text
current = section.find('div', class_='scr_dt-red').text
link = "https://sports.ndtv.com/" + \
    section.find('a', class_='scr_ful-sbr-txt').get('href')
Python3
from bs4 import BeautifulSoup
import requests

html_text = requests.get('https://sports.ndtv.com/cricket/live-scores').text
soup = BeautifulSoup(html_text, "html.parser")
sect = soup.find_all('div', class_='sp-scr_wrp ind-hig_crd vevent')

section = sect[0]
description = section.find('span', class_='description').text
location = section.find('span', class_='location').text
current = section.find('div', class_='scr_dt-red').text
link = "https://sports.ndtv.com/" + section.find(
    'a', class_='scr_ful-sbr-txt').get('href')

try:
    status = section.find_all('div', class_="scr_dt-red")[1].text
    block = section.find_all('div', class_='scr_tm-wrp')
    team1_block = block[0]
    team1_name = team1_block.find('div', class_='scr_tm-nm').text
    team1_score = team1_block.find('span', class_='scr_tm-run').text
    team2_block = block[1]
    team2_name = team2_block.find('div', class_='scr_tm-nm').text
    team2_score = team2_block.find('span', class_='scr_tm-run').text
    print(description)
    print(location)
    print(status)
    print(current)
    print(team1_name.strip())
    print(team1_score.strip())
    print(team2_name.strip())
    print(team2_score.strip())
    print(link)
except:
    print("Data not available")
Python3
# We import the Flask Class, an instance of
# this class will be our WSGI appliction.
from flask import Flask

# We create an instance of this class. The first
# argument is the name of the application’s module
# or package. __name__ is a convenient shortcut for
# this that is appropriate for most cases.This is
# needed so that Flask knows where to look for resources
# such as templates and static files.
app = Flask(__name__)

# We use the route() decorator to tell Flask what URL
# should trigger our function.
@app.route('/')
def cricgfg():
    return "Welcome to CricGFG!"

# main driver function
if __name__ == "__main__":

    # run() method of Flask class runs the
    # application on the local development server.
    app.run(debug=True)
Python3
from flask import Flask, jsonify

app = Flask(__name__)

@app.route('/')
def cricgfg():

    # Creating a dictionary with data to test jsonfiy.
    result = {
        "Description": "Live score England vs India 3rd Test,Pataudi \
        Trophy, 2021",
        "Location": "Headingley, Leeds",
        "Status": "England lead by 223 runs",
        "Current": "Day 2 | Post Tea Session",
        "Team A": "England",
        "Team A Score": "301/3 (96.0)",
        "Team B": "India",
        "Team B Score": "78",
        "Full Scoreboard": "https://sports.ndtv.com//cricket/live-scorecard\
        /england-vs-india-3rd-test-leeds-enin08252021199051",
        "Credits": "NDTV Sports"
    }
    return jsonify(result)

if __name__ == "__main__":
    app.run(debug=True)
Python3
import requests
from bs4 import BeautifulSoup
from flask import Flask, jsonify

app = Flask(__name__)


@app.route('/')
def cricgfg():
    html_text = requests.get('https://sports.ndtv.com/cricket/live-scores').text
    soup = BeautifulSoup(html_text, "html.parser")
    sect = soup.find_all('div', class_='sp-scr_wrp ind-hig_crd vevent')

    section = sect[0]
    description = section.find('span', class_='description').text
    location = section.find('span', class_='location').text
    current = section.find('div', class_='scr_dt-red').text
    link = "https://sports.ndtv.com/" + section.find(
    'a', class_='scr_ful-sbr-txt').get('href')

    try:
        status = section.find_all('div', class_="scr_dt-red")[1].text
        block = section.find_all('div', class_='scr_tm-wrp')
        team1_block = block[0]
        team1_name = team1_block.find('div', class_='scr_tm-nm').text
        team1_score = team1_block.find('span', class_='scr_tm-run').text
        team2_block = block[1]
        team2_name = team2_block.find('div', class_='scr_tm-nm').text
        team2_score = team2_block.find('span', class_='scr_tm-run').text
        result = {
            "Description": description,
            "Location": location,
            "Status": status,
            "Current": current,
            "Team A": team1_name,
            "Team A Score": team1_score,
            "Team B": team2_name,
            "Team B Score": team2_score,
            "Full Scoreboard": link,
            "Credits": "NDTV Sports"
        }
    except:
        pass
    return jsonify(result)

if __name__ == "__main__":
    app.run(debug=True)
我们将进一步找到所有必需的 div 和其他标签及其各自的类。
Python
from bs4 import BeautifulSoup
import requests

html_text = requests.get('https://sports.ndtv.com/cricket/live-scores').text
soup = BeautifulSoup(html_text, "html.parser")
sect = soup.find_all('div', class_='sp-scr_wrp')
section = sect[0]
description = section.find('span', class_='description').text
location = section.find('span', class_='location').text
current = section.find('div', class_='scr_dt-red').text
link = "https://sports.ndtv.com/" + \
    section.find('a', class_='scr_ful-sbr-txt').get('href')
代码的下一部分包含我们的数据,即我们的结果。如果由于任何原因代码不存在于 HTML 文件中,则会导致错误,因此将该部分包含在 try 和 except 块中。
完整代码:
蟒蛇3
from bs4 import BeautifulSoup
import requests

html_text = requests.get('https://sports.ndtv.com/cricket/live-scores').text
soup = BeautifulSoup(html_text, "html.parser")
sect = soup.find_all('div', class_='sp-scr_wrp ind-hig_crd vevent')

section = sect[0]
description = section.find('span', class_='description').text
location = section.find('span', class_='location').text
current = section.find('div', class_='scr_dt-red').text
link = "https://sports.ndtv.com/" + section.find(
    'a', class_='scr_ful-sbr-txt').get('href')

try:
    status = section.find_all('div', class_="scr_dt-red")[1].text
    block = section.find_all('div', class_='scr_tm-wrp')
    team1_block = block[0]
    team1_name = team1_block.find('div', class_='scr_tm-nm').text
    team1_score = team1_block.find('span', class_='scr_tm-run').text
    team2_block = block[1]
    team2_name = team2_block.find('div', class_='scr_tm-nm').text
    team2_score = team2_block.find('span', class_='scr_tm-run').text
    print(description)
    print(location)
    print(status)
    print(current)
    print(team1_name.strip())
    print(team1_score.strip())
    print(team2_name.strip())
    print(team2_score.strip())
    print(link)
except:
    print("Data not available")
输出:
Live score England vs India 3rd Test,Pataudi Trophy, 2021
Headingley, Leeds
England lead by 223 runs
Day 2 | Post Tea Session
England
301/3 (96.0)
India
78
https://sports.ndtv.com//cricket/live-scorecard/england-vs-india-3rd-test-leeds-enin08252021199051
创建 API
我们将使用 Flask,它是一个用Python编写的微型 Web 框架。
pip install Flask以下是我们的flask 应用程序的启动代码。
蟒蛇3
# We import the Flask Class, an instance of
# this class will be our WSGI appliction.
from flask import Flask

# We create an instance of this class. The first
# argument is the name of the application’s module
# or package. __name__ is a convenient shortcut for
# this that is appropriate for most cases.This is
# needed so that Flask knows where to look for resources
# such as templates and static files.
app = Flask(__name__)

# We use the route() decorator to tell Flask what URL
# should trigger our function.
@app.route('/')
def cricgfg():
    return "Welcome to CricGFG!"

# main driver function
if __name__ == "__main__":

    # run() method of Flask class runs the
    # application on the local development server.
    app.run(debug=True)
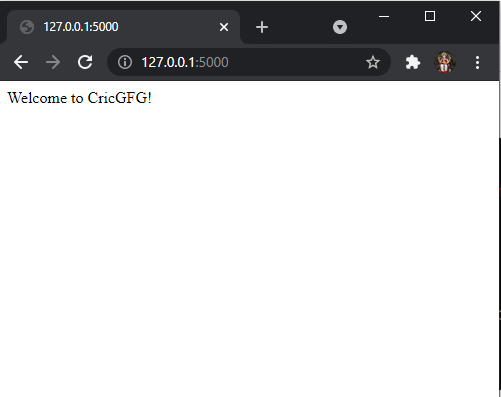
输出:

在浏览器上打开本地主机:
我们现在将我们的 Web Scrapping 代码添加到这个和 Flask 提供的一些帮助方法中,以正确返回 JSON 数据。
理解 Jsonify
jsonify 是 Flask 中的一个函数。它将数据序列化为 JavaScript Object Notation (JSON) 格式。考虑以下代码:
蟒蛇3
from flask import Flask, jsonify

app = Flask(__name__)

@app.route('/')
def cricgfg():

    # Creating a dictionary with data to test jsonfiy.
    result = {
        "Description": "Live score England vs India 3rd Test,Pataudi \
        Trophy, 2021",
        "Location": "Headingley, Leeds",
        "Status": "England lead by 223 runs",
        "Current": "Day 2 | Post Tea Session",
        "Team A": "England",
        "Team A Score": "301/3 (96.0)",
        "Team B": "India",
        "Team B Score": "78",
        "Full Scoreboard": "https://sports.ndtv.com//cricket/live-scorecard\
        /england-vs-india-3rd-test-leeds-enin08252021199051",
        "Credits": "NDTV Sports"
    }
    return jsonify(result)

if __name__ == "__main__":
    app.run(debug=True)
输出:

现在是时候合并我们所有的代码了。开始吧!
蟒蛇3
import requests
from bs4 import BeautifulSoup
from flask import Flask, jsonify

app = Flask(__name__)


@app.route('/')
def cricgfg():
    html_text = requests.get('https://sports.ndtv.com/cricket/live-scores').text
    soup = BeautifulSoup(html_text, "html.parser")
    sect = soup.find_all('div', class_='sp-scr_wrp ind-hig_crd vevent')

    section = sect[0]
    description = section.find('span', class_='description').text
    location = section.find('span', class_='location').text
    current = section.find('div', class_='scr_dt-red').text
    link = "https://sports.ndtv.com/" + section.find(
    'a', class_='scr_ful-sbr-txt').get('href')

    try:
        status = section.find_all('div', class_="scr_dt-red")[1].text
        block = section.find_all('div', class_='scr_tm-wrp')
        team1_block = block[0]
        team1_name = team1_block.find('div', class_='scr_tm-nm').text
        team1_score = team1_block.find('span', class_='scr_tm-run').text
        team2_block = block[1]
        team2_name = team2_block.find('div', class_='scr_tm-nm').text
        team2_score = team2_block.find('span', class_='scr_tm-run').text
        result = {
            "Description": description,
            "Location": location,
            "Status": status,
            "Current": current,
            "Team A": team1_name,
            "Team A Score": team1_score,
            "Team B": team2_name,
            "Team B Score": team2_score,
            "Full Scoreboard": link,
            "Credits": "NDTV Sports"
        }
    except:
        pass
    return jsonify(result)

if __name__ == "__main__":
    app.run(debug=True)
浏览器输出:

在这里,我们创建了自己的 Cricket API。
在 Heroku 上部署 API
第 1 步:您需要在 Heroku 上创建一个帐户。
第 2 步:在您的机器上安装 Git。
第 3 步:在您的机器上安装 Heroku。
第 4 步:登录您的 Heroku 帐户
heroku login第 5 步:安装 gunicorn,这是一个用于 WSGI 应用程序的纯 Python HTTP 服务器。它允许您通过运行多个Python进程来同时运行任何Python应用程序。
pip install gunicorn第 6 步:我们需要在应用程序的根目录中创建一个 procfile,它是一个文本文件,以明确声明应该执行什么命令来启动我们的应用程序。
web: gunicorn CricGFG:app
第 7 步:我们进一步创建一个 requirements.txt 文件,其中包含 Heroku 运行我们的 Flask 应用程序所需的所有必要模块。
pip freeze >> requirements.txt第 8 步:在 Heroku 上创建一个应用程序,单击此处。

第 9 步:我们现在初始化一个 git 存储库并将我们的文件添加到其中。
git init
git add .
git commit -m "Cricket API Completed"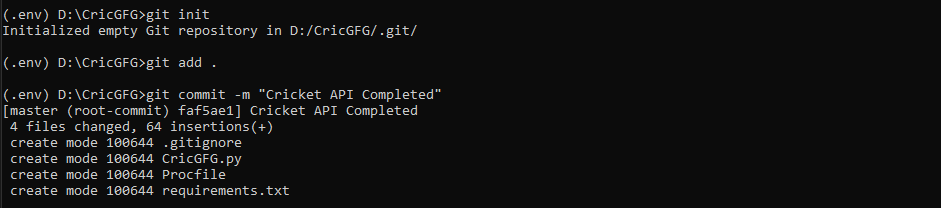
第 10 步:我们现在将 Heroku 指向我们的 git 存储库。
heroku git:remote -a cricgfg第 11 步:我们现在将我们的文件推送到 Heroku。
git push heroku master最后,我们的 API 现在可以在 https://cricgfg.herokuapp.com/ 上使用
