使用 PyTorch 进行深度学习 |一个介绍
PyTorch 在很多方面都表现得像我们喜欢的 Numpy 数组。毕竟,这些 Numpy 数组只是张量。 PyTorch 采用这些张量,并且可以轻松地将它们移动到 GPU 上,以便在训练神经网络时进行更快的处理。它还提供了一个自动计算梯度(用于反向传播)的模块和另一个专门用于构建神经网络的模块。总之,与 TensorFlow 和其他框架相比,PyTorch 最终使用Python和 Numpy 堆栈更加灵活。
神经网络:
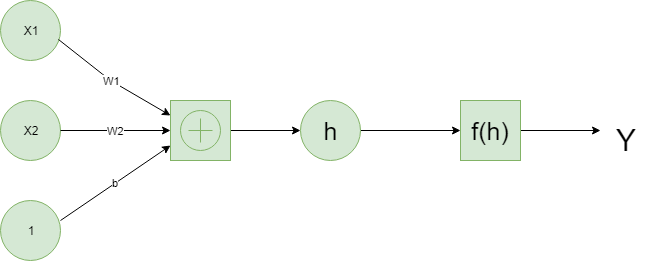
深度学习基于自 1950 年代后期以来以某种形式出现的人工神经网络。这些网络由近似神经元的各个部分构成,通常称为单元或简称为“神经元”。每个单元都有一定数量的加权输入。这些加权输入相加(线性组合),然后通过激活函数得到单元的输出。
下面是一个简单的神经网络的例子。

张量:
事实证明,神经网络计算只是张量上的一堆线性代数运算,是矩阵的泛化。向量是一维张量,矩阵是二维张量,具有三个索引的数组是三维张量。神经网络的基本数据结构是张量,而 PyTorch 是围绕张量构建的。
是时候探索我们如何使用 PyTorch 构建一个简单的神经网络了。
# First, import PyTorch
import torch
定义激活函数(sigmoid)来计算线性输出
def activation(x):
    """ Sigmoid activation function

        Arguments
        ---------
        x: torch.Tensor
    """
    return 1/(1 + torch.exp(-x))
# Generate some data
# Features are 3 random normal variables
features = torch.randn((1, 5))

# True weights for our data, random normal variables again
weights = torch.randn_like(features)

# and a true bias term
bias = torch.randn((1, 1))
features = torch.randn((1, 5)) creates a tensor with shape (1, 5), one row and five columns, that contains values randomly distributed according to the normal distribution with a mean of zero and standard deviation of one.
weights = torch.randn_like(features) creates another tensor with the same shape as features, again containing values from a normal distribution.
Finally, bias = torch.randn((1, 1)) creates a single value from a normal distribution.
现在我们使用矩阵乘法计算网络的输出。
y = activation(torch.mm(features, weights.view(5, 1)) + bias)
这就是我们如何计算单个神经元的输出。当您开始将这些单独的单元堆叠成层和层堆栈,形成神经元网络时,该算法的真正威力就会出现。一层神经元的输出成为下一层的输入。对于多个输入单元和输出单元,我们现在需要将权重表示为矩阵。
我们定义神经网络的结构并初始化权重和偏差。
# Features are 3 random normal variables
features = torch.randn((1, 3))

# Define the size of each layer in our network

# Number of input units, must match number of input features
n_input = features.shape[1]
n_hidden = 2                # Number of hidden units
n_output = 1                # Number of output units

# Weights for inputs to hidden layer
W1 = torch.randn(n_input, n_hidden)

# Weights for hidden layer to output layer
W2 = torch.randn(n_hidden, n_output)

# and bias terms for hidden and output layers
B1 = torch.randn((1, n_hidden))
B2 = torch.randn((1, n_output))
现在我们可以使用权重 W1 和 W2 以及偏差 B1 和 B2 来计算这个多层网络的输出。
h = activation(torch.mm(features, W1) + B1)
output = activation(torch.mm(h, W2) + B2)
print(output)