在 ElectronJS 中监控系统电源状态
ElectronJS是一个开源框架,用于使用能够在 Windows、macOS 和 Linux 操作系统上运行的 HTML、CSS 和 JavaScript 等 Web 技术构建跨平台原生桌面应用程序。它将 Chromium 引擎和NodeJS组合成一个单一的运行时。
一种可以直接影响本机桌面应用程序执行的系统行为是系统电源及其状态的变化。例如,开发人员想知道系统何时从充电切换到电池供电,反之亦然,以便他们可以通过应用程序自动调节系统的亮度,以减少电池电量的消耗。类似地,当系统即将挂起或关闭时,可以让应用程序知道并采取必要的措施,例如干净地退出等。Electron 为我们提供了一种方法,我们可以使用以下方法监控系统电源状态变化内置电源监控模块。本教程将演示如何使用powerMonitor模块实例方法和事件来监控这些系统电源状态。
我们假设您熟悉上述链接中涵盖的先决条件。为了使 Electron 正常工作,需要在系统中预先安装node和npm 。
ElectronJS 中的系统电源状态变化: powerMonitor模块是Main Process的一部分。要在渲染器进程中导入和使用这个模块,我们将使用 Electron远程模块。有关远程模块的更多详细信息,请参阅此链接。在发出app模块的ready事件并且应用程序准备好创建BrowserWindow实例之前,无法使用powerMonitor模块。有关更多信息,请参阅此链接。
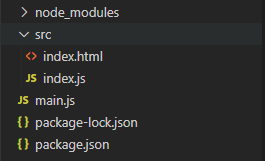
- 项目结构:
示例:我们将首先按照给定的步骤构建用于监控系统电源状态变化的电子应用程序。
- 第 1 步:导航到空目录以设置项目,然后运行以下命令,
npm init生成package.json文件。如果没有安装Electron ,请使用 npm 安装。
npm install electron --save此命令还将创建package-lock.json文件并安装所需的node_modules依赖项。成功安装 Electron 后,打开package.json文件并在scripts键下执行必要的更改。
包.json:{ "name": "electron-power", "version": "1.0.0", "description": "Power State Changes in Electron ", "main": "main.js", "scripts": { "start": "electron ." }, "keywords": [ "electron" ], "author": "Radhesh Khanna", "license": "ISC", "dependencies": { "electron": "^8.3.0" } } - 第二步:根据项目结构创建一个main.js文件。该文件是主进程并充当应用程序的入口点。复制以下链接中给出的main.js文件的样板代码。我们已经修改了代码以满足我们的项目需求。
主.js:
const { app, BrowserWindow } = require('electron') function createWindow () { // Create the browser window. const win = new BrowserWindow({ width: 800, height: 600, webPreferences: { nodeIntegration: true } }) // Load the index.html of the app. win.loadFile('src/index.html') // Open the DevTools. win.webContents.openDevTools() } // This method will be called when Electron has finished // initialization and is ready to create browser windows. // Some APIs can only be used after this event occurs. // This method is equivalent to 'app.on('ready', function())' // The powerMonitor Module cannot be used until this event is emitted. app.whenReady().then(createWindow) // Quit when all windows are closed. app.on('window-all-closed', () => { // On macOS it is common for applications and their menu bar // to stay active until the user quits explicitly with Cmd + Q if (process.platform !== 'darwin') { app.quit() } }) app.on('activate', () => { // On macOS it's common to re-create a window in the // app when the dock icon is clicked and there are no // other windows open. if (BrowserWindow.getAllWindows().length === 0) { createWindow() } }) // In this file, you can include the rest of your // app's specific main process code. You can also // put them in separate files and require them here. - 第三步:根据项目结构在src目录下创建index.html文件和index.js文件。我们还将从上述链接复制index.html文件的样板代码。我们已经修改了代码以满足我们的项目需求。
索引.html:
Hello World! Hello World!
We are using node , Chrome , and Electron .输出:此时,我们的应用程序已设置好,我们可以启动应用程序来检查 GUI 输出。要启动 Electron 应用程序,请运行以下命令:
npm start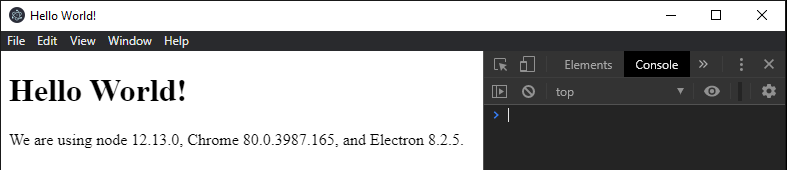
- 第 4 步:我们将监控整个应用程序的系统电源状态变化,而不将此模块绑定到任何 HTML DOM 元素。
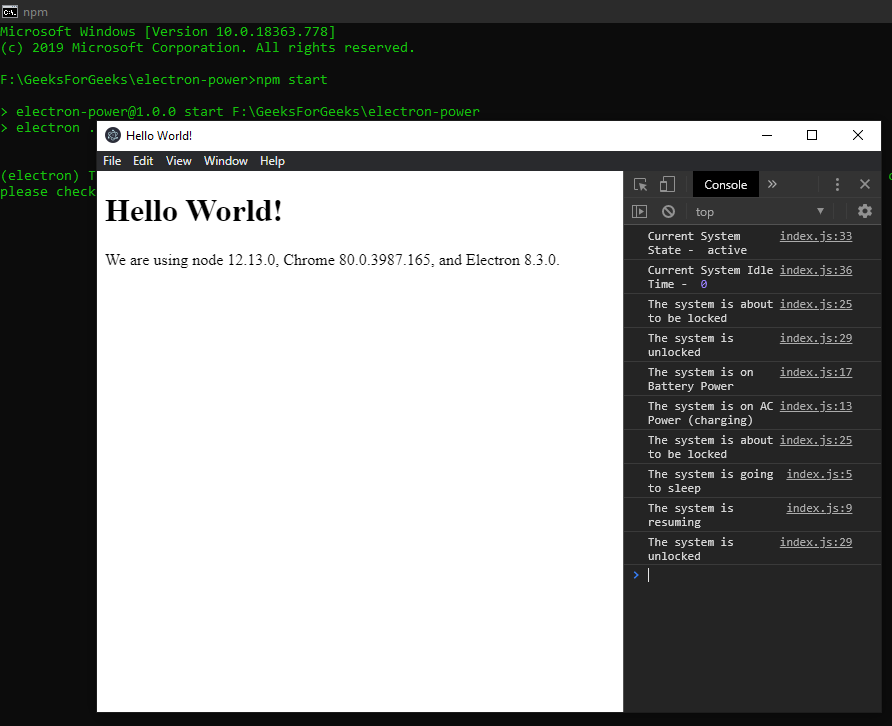
index.js:在该文件中添加以下代码段。const electron = require('electron'); // Importing powerMonitor from Main Process // Using remote Module const powerMonitor = electron.remote.powerMonitor; powerMonitor.on('suspend', () => { console.log('The system is going to sleep'); }); powerMonitor.on('resume', () => { console.log('The system is resuming'); }); powerMonitor.on('on-ac', () => { console.log('The system is on AC Power (charging)'); }); powerMonitor.on('on-battery', () => { console.log('The system is on Battery Power'); }); powerMonitor.on('shutdown', () => { console.log('The system is Shutting Down'); }); powerMonitor.on('lock-screen', () => { console.log('The system is about to be locked'); }); powerMonitor.on('unlock-screen', () => { console.log('The system is unlocked'); }); const state = powerMonitor.getSystemIdleState(4); console.log('Current System State - ', state); const idle = powerMonitor.getSystemIdleTime(); console.log('Current System Idle Time - ', idle);说明:代码中使用的powerMonitor模块的所有Instance事件的详细说明如下。有关更多详细信息,请参阅此链接。
- 挂起:系统即将挂起或进入睡眠模式时发出的事件。
- resume:系统从挂起状态或睡眠模式恢复时发出的事件。
- on-ac:事件此实例事件仅在Windows中受支持。当系统电源状态更改为 AC 电源并且系统正在使用电力运行时(例如在为笔记本电脑充电时),将发出此事件。要在交流电源和电池电源之间切换,只需按照输出中的操作插入/拔出笔记本电脑的充电器。
- on-battery: Event此实例事件仅在Windows中受支持。当系统电源状态更改为电池电源并且系统正在使用电池运行时,将发出此事件。要在交流电源和电池电源之间切换,只需按照输出中的操作插入/拔出笔记本电脑的充电器。
- shutdown: Event此实例事件仅在Linux和macOS中受支持。当系统即将重新启动或关闭时会发出此事件。如果事件处理程序从全局事件对象调用e.preventDefault()方法,Electron 将尝试延迟系统关闭以使应用程序干净地退出。调用此方法时,应用程序应立即退出,使用 main.js 文件中使用的app.quit ()方法停止所有后台进程并关闭所有打开的 BrowserWindow实例。有关app.quit()方法和与之关联的所有实例事件的更多详细信息,请参阅此链接。
- lock-screen: Event此实例事件仅在Windows和macOS中受支持。当系统即将锁定屏幕时会发出此事件。在Windows上,此功能由Windows+L触发。
- unlock-screen: Event此实例事件仅在Windows和macOS中受支持。解锁系统屏幕后立即发出此事件。
下面对代码中用到的powerMonitor模块的所有Instance方法进行详细解释。有关更多详细信息,请参阅此链接。
- powerMonitor.getSystemIdleState(idleThreshold)该方法用于计算系统空闲状态,并根据提供的idleThreshold值返回系统当前状态。 idleThreshold值是在系统被认为处于空闲状态之前的时间量(以秒为单位)。此方法返回一个表示系统当前状态的字符串值。返回值可以是活动的、空闲的、锁定的或未知的。在上面的代码中,我们将 4s 作为idleThreshold ,我们应该将active作为返回值。
注–锁定的返回值仅在选定的系统环境中可用。 - powerMonitor.getSystemIdleTime()此方法用于计算系统处于空闲状态的时间(以秒为单位)。它不接受任何参数。它返回一个整数值,以秒为单位表示系统空闲时间。
注意– powerMonitor模块不控制系统行为,例如防止系统进入睡眠状态等,不要与powerSaveBlocker模块混淆。
输出:
由于无法记录将系统置于睡眠模式并使其恢复,因此以下是这些实例事件的输出。为了让系统进入睡眠模式,系统会执行锁屏操作。同样,当从睡眠模式中恢复系统时,需要解锁系统才能访问。
输出: