Python|使用 Tkinter 进行实时天气检测
先决条件: tkinter 简介 |查找任何城市的当前天气
Python为开发 GUI(图形用户界面)提供了多种选择。在所有的 GUI 方法中,tkinter 是最常用的方法。它是Python随附的 Tk GUI 工具包的标准Python接口。带有 tkinter 的Python输出创建 GUI 应用程序的最快和最简单的方法。现在,这取决于开发人员的想象力或必要性,他/她想使用这个工具包开发什么。
创建一个 tkinter :
- 导入模块 – tkinter
- 创建主窗口(容器)
- 将任意数量的小部件添加到主窗口。
- 在小部件上应用事件触发器。
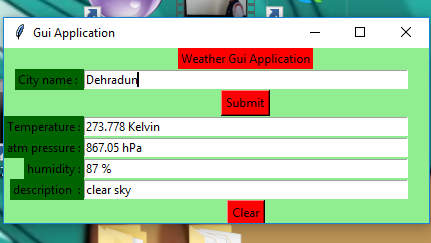
让我们创建一个基于 GUI 的简单实时天气检测应用程序,它可以提供任何城市的天气详细信息。
所需模块:
tkinter
requests
json
下面是实现:
Python3
# import all functions from the tkinter
from tkinter import * from tkinter import messagebox
# function to find weather details
# of any city using openweathermap api
def tell_weather() :
# import required modules
import requests, json
# enter your api key here
api_key = "Your_API_key"
# base_url variable to store url
base_url = "http://api.openweathermap.org/data/2.5/weather?"
# take a city name from city_field entry box
city_name = city_field.get()
# complete_url variable to store complete url address
complete_url = base_url + "appid =" + api_key
+ "&q =" + city_name
# get method of requests module
# return response object
response = requests.get(complete_url)
# json method of response object convert
# json format data into python format data
x = response.json()
# now x contains list of nested dictionaries
# we know dictionary contains key value pair
# check the value of "cod" key is equal to "404"
# or not if not that means city is found
# otherwise city is not found
if x["cod"] != "404" :
# store the value of "main" key in variable y
y = x["main"]
# store the value corresponding to the "temp" key of y
current_temperature = y["temp"]
# store the value corresponding to the "pressure" key of y
current_pressure = y["pressure"]
# store the value corresponding to the "humidity" key of y
current_humidity = y["humidity"]
# store the value of "weather" key in variable z
z = x["weather"]
# store the value corresponding to the "description" key
# at the 0th index of z
weather_description = z[0]["description"]
# insert method inserting the
# value in the text entry box.
temp_field.insert(15, str(current_temperature) + " Kelvin")
atm_field.insert(10, str(current_pressure) + " hPa")
humid_field.insert(15, str(current_humidiy) + " %")
desc_field.insert(10, str(weather_description) )
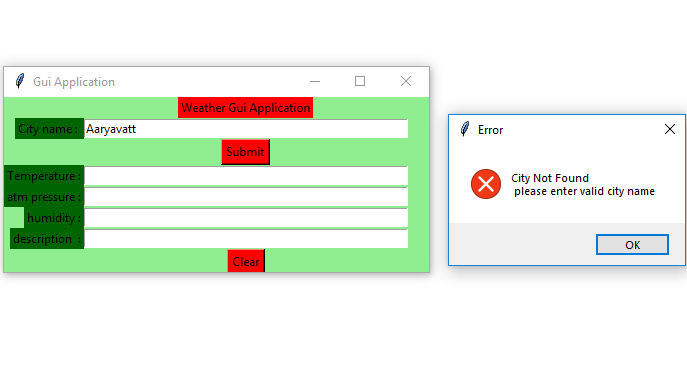
# if city is not found
else :
# message dialog box appear which
# shows given Error message
messagebox.showerror("Error", "City Not Found \n"
"Please enter valid city name")
# clear the content of city_field entry box
city_field.delete(0, END)
# Function for clearing the
# contents of all text entry boxes
def clear_all() :
city_field.delete(0, END)
temp_field.delete(0, END)
atm_field.delete(0, END)
humid_field.delete(0, END)
desc_field.delete(0, END)
# set focus on the city_field entry box
city_field.focus_set()
# Driver code
if __name__ == "__main__" :
# Create a GUI window
root = Tk()
# set the name of tkinter GUI window
root.title("Gui Application")
# Set the background colour of GUI window
root.configure(background = "light green")
# Set the configuration of GUI window
root.geometry("425x175")
# Create a Weather Gui Application label
headlabel = Label(root, text = "Weather Gui Application",
fg = 'black', bg = 'red')
# Create a City name : label
label1 = Label(root, text = "City name : ",
fg = 'black', bg = 'dark green')
# Create a City name : label
label2 = Label(root, text = "Temperature :",
fg = 'black', bg = 'dark green')
# Create a atm pressure : label
label3 = Label(root, text = "atm pressure :",
fg = 'black', bg = 'dark green')
# Create a humidity : label
label4 = Label(root, text = "humidity :",
fg = 'black', bg = 'dark green')
# Create a description :label
label5 = Label(root, text = "description :",
fg = 'black', bg = 'dark green')
# grid method is used for placing
# the widgets at respective positions
# in table like structure .
headlabel.grid(row = 0, column = 1)
label1.grid(row = 1, column = 0, sticky ="E")
label2.grid(row = 3, column = 0, sticky ="E")
label3.grid(row = 4, column = 0, sticky ="E")
label4.grid(row = 5, column = 0, sticky ="E")
label5.grid(row = 6, column = 0, sticky ="E")
# Create a text entry box
# for filling or typing the information.
city_field = Entry(root)
temp_field = Entry(root)
atm_field = Entry(root)
humid_field = Entry(root)
desc_field = Entry(root)
# grid method is used for placing
# the widgets at respective positions
# in table like structure .
# ipadx keyword argument set width of entry space .
city_field.grid(row = 1, column = 1, ipadx ="100")
temp_field.grid(row = 3, column = 1, ipadx ="100")
atm_field.grid(row = 4, column = 1, ipadx ="100")
humid_field.grid(row = 5, column = 1, ipadx ="100")
desc_field.grid(row = 6, column = 1, ipadx ="100")
# Create a Submit Button and attached
# to tell_weather function
button1 = Button(root, text = "Submit", bg = "red",
fg = "black", command = tell_weather)
# Create a Clear Button and attached
# to clear_all function
button2 = Button(root, text = "Clear", bg = "red",
fg = "black", command = clear_all)
# grid method is used for placing
# the widgets at respective positions
# in table like structure .
button1.grid(row = 2, column = 1)
button2.grid(row = 7, column = 1)
# Start the GUI
root.mainloop()输出 :