Python OpenCV - 查找轮廓中心
先决条件:如何使用 OpenCV 在Python检测图像中的形状?
在本文中,我们将学习如何在Python使用 OpenCV 查找轮廓中心。我们将使用 findContours() 和 moment() 函数。
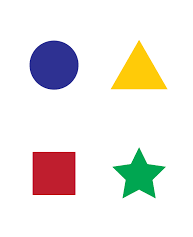
我们将使用以下图像进行中心点检测:
分步实施
第一步:导入需要的模块。
Python3
import cv2 as cv
import numpy as np
Python3
# change it with your absolute path for the image
image = cv.imread("shape.png")
gray = cv.cvtColor(image, cv.COLOR_BGR2GRAY)

blur = cv.GaussianBlur(gray, (5, 5),
                       cv.BORDER_DEFAULT)
ret, thresh = cv.threshold(blur, 200, 255,
                           cv.THRESH_BINARY_INV)
Python3
cv.imwrite("thresh.png",thresh)Python3
contours, hierarchies = cv.findContours(
    thresh, cv.RETR_LIST, cv.CHAIN_APPROX_SIMPLE)
Python3
blank = np.zeros(thresh.shape[:2],
                 dtype='uint8')

cv.drawContours(blank, contours, -1,
                (255, 0, 0), 1)

cv.imwrite("Contours.png", blank)
Python3
for i in contours:
    M = cv.moments(i)
    if M['m00'] != 0:
        cx = int(M['m10']/M['m00'])
        cy = int(M['m01']/M['m00'])
        cv.drawContours(image, [i], -1, (0, 255, 0), 2)
        cv.circle(image, (cx, cy), 7, (0, 0, 255), -1)
        cv.putText(image, "center", (cx - 20, cy - 20),
                   cv.FONT_HERSHEY_SIMPLEX, 0.5, (0, 0, 0), 2)
    print(f"x: {cx} y: {cy}")
Python3
cv.imwrite("image.png", image)
第 2 步:图像的阈值。
在我们进行轮廓检测之前,我们必须对上面的图像进行阈值处理,我们可以使用以下代码片段:
蟒蛇3
# change it with your absolute path for the image
image = cv.imread("shape.png")
gray = cv.cvtColor(image, cv.COLOR_BGR2GRAY)

blur = cv.GaussianBlur(gray, (5, 5),
                       cv.BORDER_DEFAULT)
ret, thresh = cv.threshold(blur, 200, 255,
                           cv.THRESH_BINARY_INV)
阈值和模糊参数可以更改,我们建议您尝试调整它们以查看使用给定参数检测到的轮廓数量。
您可以使用以下方法保存阈值输出:
蟒蛇3
cv.imwrite("thresh.png",thresh)
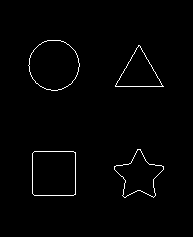
输出:
True它应该是这样的:

我们将使用 findContours() 方法从阈值图像中找到轮廓,该方法返回两个值,所有轮廓及其层次结构的列表。现在,什么是轮廓?简单来说,轮廓是一个列表或点列表树。这些点描述了如何根据与背景的差异来绘制轮廓,即可以绘制为围绕形状各部分的轮廓的矢量。另一方面,层次结构显示了形状如何相互关联,层是如何相互关联的,或者形状是否在彼此的顶部。这可以使用层次结构来确定。
第 3 步:现在要找到阈值图像中的轮廓和层次结构,我们可以使用 findContours() 方法,如下所示:
蟒蛇3
contours, hierarchies = cv.findContours(
    thresh, cv.RETR_LIST, cv.CHAIN_APPROX_SIMPLE)
为简单起见并了解轮廓如何工作并检查我们可以在阈值图像中找到多少个轮廓,我们可以使用以下代码段将它们绘制在空白图像矩阵上:
蟒蛇3
blank = np.zeros(thresh.shape[:2],
                 dtype='uint8')

cv.drawContours(blank, contours, -1,
                (255, 0, 0), 1)

cv.imwrite("Contours.png", blank)
输出:
True这是图像的外观:
第 4 步:将所有中心点归档并绘制在图像上。
现在为了找出中心点,我们将使用 moment() 方法。在这里,我们将使用它来查找特定轮廓的图像矩。图像矩是图像像素强度的特定加权平均值,借助它我们可以找到图像的一些特定属性,例如半径、面积、质心等。
为了找到图像的质心,我们使用特定的公式:
cx = (M10 / M00 )
cy = ( M01 / M00 )
where cx and cy are the x and y coordinates of the center point and M is the moment
以下代码段查找所有中心点并将它们绘制在图像上。
蟒蛇3
for i in contours:
    M = cv.moments(i)
    if M['m00'] != 0:
        cx = int(M['m10']/M['m00'])
        cy = int(M['m01']/M['m00'])
        cv.drawContours(image, [i], -1, (0, 255, 0), 2)
        cv.circle(image, (cx, cy), 7, (0, 0, 255), -1)
        cv.putText(image, "center", (cx - 20, cy - 20),
                   cv.FONT_HERSHEY_SIMPLEX, 0.5, (0, 0, 0), 2)
    print(f"x: {cx} y: {cy}")
第 5 步:最后,我们可以使用以下命令保存图像:
蟒蛇3
cv.imwrite("image.png", image)
输出:
True这是最终图像的样子:
