Python|使用 .kv 文件在 Kivy 中弹出窗口小部件
Kivy 是Python中一个独立于平台的 GUI 工具。因为它可以在Android、IOS、linux和Windows等平台上运行。它基本上是用来开发Android应用程序的,但这并不意味着它不能在桌面应用程序上使用。
👉🏽 Kivy Tutorial – Learn Kivy with Examples.
弹出小部件:
要使用弹出窗口,您必须导入:
from kivy.uix.popup import Popup Popup 小部件用于创建弹出窗口。默认情况下,弹出窗口将覆盖整个“父”窗口。在创建弹窗时,至少要设置一个 Popup.title 和 Popup.content。
请记住一件事,小部件的默认大小是 size_hint=(1, 1)。如果您不希望弹出窗口全屏显示,则必须提供值小于 1 的尺寸提示(例如 size_hint=(.8, .8))或停用 size_hint 并使用固定尺寸属性。
注意:弹出窗口是一个特殊的小部件。不要尝试将其作为孩子添加到任何其他小部件。如果这样做,Popup 将像普通小部件一样被处理,并且不会隐藏在后台创建,例如:
Python3
BoxLayout:
   MyPopup:  # bad !
Python3
# Kivy example for the Popup widget

# Program to Show how to create a switch
# import kivy module
import kivy

# base Class of your App inherits from the App class.
# app:always refers to the instance of your application
from kivy.app import App

# this restrict the kivy version i.e
# below this kivy version you cannot
# use the app or software
kivy.require('1.9.0')

# Widgets are elements of a graphical user
# interface that form part of the User Experience.
from kivy.uix.widget import Widget
# The Label widget is for rendering text.
from kivy.uix.label import Label

# module consist the floatlayout
# to work with FloatLayout first
# you have to import it
from kivy.uix.floatlayout import FloatLayout

# Popup widget is used to create popups.
# By default, the popup will cover
# the whole “parent” window.
# When you are creating a popup,
# you must at least set a Popup.title and Popup.content.
from kivy.uix.popup import Popup


# Creating a widget class
# through this we add button
# the commands of the class is in .kv file
class Widgets(Widget):
    def btn(self):
        # calling of the show popup function
        show_popup()

# Popup class is defined
# The command of the class is in .kv file
class Popups(FloatLayout):
    pass

# create App class
class MyApp(App):
    def build(self):
        # return the widget
        return Widgets()

# define popup function in this we create the popup
def show_popup():
    show = Popups()

    popupWindow = Popup(title ="Popup Window", content = show,
                        size_hint =(None, None), size =(200, 200))

    # open popup window
    popupWindow.open()

    # Attach close button press with popup.dismiss action
    # content.bind(on_press = popup.dismiss)


# run the App
if __name__ == "__main__":
    MyApp().run()
Python3
# .kv file of the popup code

# Adding Button widget
:
    Button:
        text: "Press me"
        on_release: root.btn()

# Adding Label, Button to popup
:

    Label:
        text: "You pressed the button"
        size_hint: 0.6, 0.2
        pos_hint: {"x":0.2, "top":1}

    Button:
        text: "Close the popup"
        # set size of the button
        size_hint: 1, 0.4
        # set position of the button
        pos_hint: {"x":0, "y":0.1}
基本方法:
1) import kivy
2) import kivyApp
3) import Widget
4) import Floatlayout
5) import Label
6) import popup
7) Set minimum version(optional)
8) Create widget class
9) Create Layout class :
10) create App class
9) create .kv file (name same as the app class):
        1) create Widget
        2) create popup
        3) Give label to popup
        4) create button to close popup
10) return Layout/widget/Class(according to requirement)
11) define popup function(Which shows the popup on press the button)
12) Run an instance of the class
方法的实施:
popup.py 文件
Python3
# Kivy example for the Popup widget

# Program to Show how to create a switch
# import kivy module
import kivy

# base Class of your App inherits from the App class.
# app:always refers to the instance of your application
from kivy.app import App

# this restrict the kivy version i.e
# below this kivy version you cannot
# use the app or software
kivy.require('1.9.0')

# Widgets are elements of a graphical user
# interface that form part of the User Experience.
from kivy.uix.widget import Widget
# The Label widget is for rendering text.
from kivy.uix.label import Label

# module consist the floatlayout
# to work with FloatLayout first
# you have to import it
from kivy.uix.floatlayout import FloatLayout

# Popup widget is used to create popups.
# By default, the popup will cover
# the whole “parent” window.
# When you are creating a popup,
# you must at least set a Popup.title and Popup.content.
from kivy.uix.popup import Popup


# Creating a widget class
# through this we add button
# the commands of the class is in .kv file
class Widgets(Widget):
    def btn(self):
        # calling of the show popup function
        show_popup()

# Popup class is defined
# The command of the class is in .kv file
class Popups(FloatLayout):
    pass

# create App class
class MyApp(App):
    def build(self):
        # return the widget
        return Widgets()

# define popup function in this we create the popup
def show_popup():
    show = Popups()

    popupWindow = Popup(title ="Popup Window", content = show,
                        size_hint =(None, None), size =(200, 200))

    # open popup window
    popupWindow.open()

    # Attach close button press with popup.dismiss action
    # content.bind(on_press = popup.dismiss)


# run the App
if __name__ == "__main__":
    MyApp().run()
.kv 文件实现:
Python3
# .kv file of the popup code

# Adding Button widget
:
    Button:
        text: "Press me"
        on_release: root.btn()

# Adding Label, Button to popup
:

    Label:
        text: "You pressed the button"
        size_hint: 0.6, 0.2
        pos_hint: {"x":0.2, "top":1}

    Button:
        text: "Close the popup"
        # set size of the button
        size_hint: 1, 0.4
        # set position of the button
        pos_hint: {"x":0, "y":0.1}
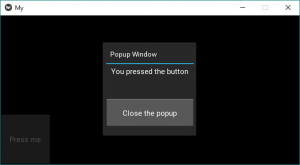
输出:
当按钮按下弹出出现时,单击窗口中的任何位置,除了弹出屏幕弹出将消失: