Flutter应用中的梯度
渐变被认为是 UI/UX 和图形设计中引人注目的元素。在您的应用程序中使用渐变元素可以真正提升您的应用程序的用户体验和感觉。
在本教程中,我们将研究如何在flutter中实现渐变。
Flutter提供 3 种类型的渐变:
- 线性渐变
- 径向渐变
- 扫描渐变
注意:为了实现任何类型的渐变,我们需要使用盒子装饰。盒子装饰构造函数可以分配给容器的装饰属性。
盒子装饰构造器:
const BoxDecoration(
{Color? color,
DecorationImage? image,
BoxBorder? border,
BorderRadiusGeometry? borderRadius,
List? boxShadow,
Gradient? gradient,
BlendMode? backgroundBlendMode,
BoxShape shape = BoxShape.rectangle}
) 要将渐变添加到我们的小部件,我们将使用BoxDecoration构造函数的渐变属性。 gradient属性接受三个构造函数Linear Gradient、Radial Gradient和Sweep Gradient。
在所有三个中,线性和径向是最优选的,但扫描提供更多控制。
让我们从线性渐变开始。让我们从线性梯度构造函数开始:
LinearGradient (
{
    AlignmentGeometry begin = Alignment.centerLeft,
    AlignmentGeometry end = Alignment.centerRight,
    required List colors,
    List? stops,
    TileMode tileMode = TileMode.clamp,
    GradientTransform? Transform
}
) 从构造函数中,很明显参数颜色是必需的。默认情况下,开始和结束属性的值分别设置为centerLeft和centerRight 。
begin & end参数定义了我们的线性渐变的路径。开始是指路径开始的地方,结束是指路径结束的地方。
begin和end参数接受以下值:
- 中左
- 中央
- 向右
- 左上方
- 顶部中心
- 右上
- 左下方
- 底部中心
- 右下角
您还可以使用Alignment(x, y)值。这里x值表示 X 轴上的偏移量, y值表示 Y 轴上的偏移量。通过查看下图,您将获得一个清晰的理解,该图显示了flutter中关于梯度的所有可能对齐方式。
(x, y):

停止参数:
停靠点列表不是必需的小部件。停靠点列表指定向量从开始到结束的部分。 stop 参数为每种颜色采用 0.0 到 1.0 之间的值列表。如果未提及停止参数/为空,则应用均匀分布。
让我们制作一个带有线性渐变的容器。
Dart
child: Container(
           height: MediaQuery.of(context).size.height * 0.7,
           width: MediaQuery.of(context).size.width * 0.9,
             // Below is the code for Linear Gradient.
           decoration: const BoxDecoration(
               gradient: LinearGradient(
               colors: [Colors.purple, Colors.blue],
              begin: Alignment.bottomLeft,
               end: Alignment.topRight,
          ),
        ),
      )
Dart
child: Container(
                  height: MediaQuery.of(context).size.height * 0.7,
                  width: MediaQuery.of(context).size.width * 0.9,
                  decoration: BoxDecoration(
                    borderRadius: BorderRadius.circular(20),
                    gradient: const LinearGradient(
                      colors: [Colors.purple, Colors.blueAccent],
                      begin: Alignment.bottomLeft,
                      end: Alignment.topRight,
                      stops: [0.4, 0.7],
                      tileMode: TileMode.repeated,
                    ),
                  ),
                )
Dart
child: Container(
            height: MediaQuery.of(context).size.height * 0.7,
            width: MediaQuery.of(context).size.width * 0.9,
            decoration: BoxDecoration(
                borderRadius: BorderRadius.circular(20),
                gradient: const RadialGradient(
                    colors: [Colors.red, Colors.yellow],
                    radius: 0.75,
                   ),
            ),
        ),
Dart
child: Container(
            height: MediaQuery.of(context).size.height * 0.7,
            width: MediaQuery.of(context).size.width * 0.9,
            decoration: BoxDecoration(
                borderRadius: BorderRadius.circular(20),
                gradient: const RadialGradient(
                    colors: [Colors.red, Colors.yellow],
                    radius: 0.75,
                    focal: Alignment(0.7, -0.7),
                    tileMode: TileMode.clamp,
                ),
            ),
           ),
Dart
child: Container (
             height: MediaQuery.of(context).size.height * 0.7,
             width: MediaQuery.of(context).size.width * 0.9,
             decoration: BoxDecoration(
             borderRadius: BorderRadius.circular(20),
             gradient: const SweepGradient(
                        colors: [
                              Colors.red,
                              Colors.yellow,
                              Colors.blue,
                              Colors.green,
                              Colors.red,
                       ],
                       stops: [0.0, 0.25, 0.5, 0.75, 1.0],
                       tileMode: TileMode.clamp,
              ),
       ),
Dart
child: Container(
             height: MediaQuery.of(context).size.height * 0.7,
            width: MediaQuery.of(context).size.width * 0.9,
            decoration: BoxDecoration(
                borderRadius: BorderRadius.circular(20),
                gradient: const SweepGradient(
                    startAngle: math.pi * 0.2,
                    endAngle: math.pi * 1.7,
                    colors: [
                              Colors.red,
                              Colors.yellow,
                              Colors.blue,
                              Colors.green,
                              Colors.red,
                    ],
                    stops: [0.0, 0.25, 0.5, 0.75, 1.0],
                    tileMode: TileMode.clamp,
                 ),
            ),
        ),
从上面的例子中,我们看到了如何为容器添加渐变。
在上面的示例中,我们将渐变的路径设置为从bottomLeft到topRight ,并且只设置了 2 种颜色,而您可以将任意数量的颜色添加到列表中。最佳做法是添加不超过 3 种颜色。
不添加更多颜色的原因是颜色过多会使渐变变得尖锐。颜色不会平滑过渡,看起来很笨拙。
这就是在flutter中实现线性渐变的方式。虽然我们还没有使用stop、tileMode和transform 等属性,但我们的渐变看起来仍然更好,这就是flutter的美妙之处。
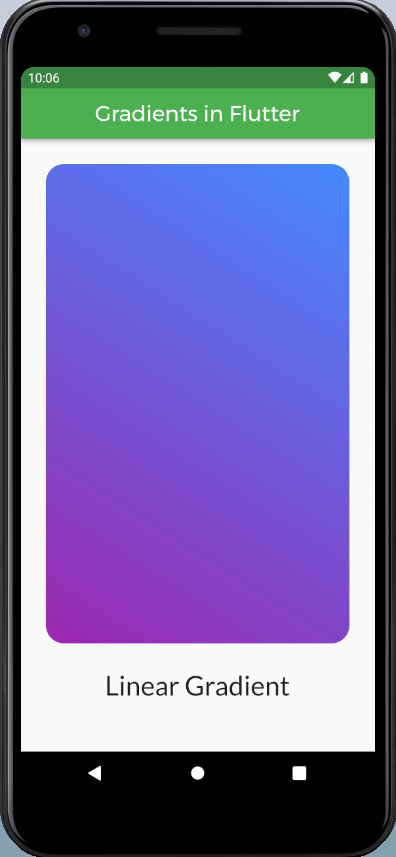
线性渐变
您现在将看到stop和tileMode 究竟做了什么。
Dart
child: Container(
                  height: MediaQuery.of(context).size.height * 0.7,
                  width: MediaQuery.of(context).size.width * 0.9,
                  decoration: BoxDecoration(
                    borderRadius: BorderRadius.circular(20),
                    gradient: const LinearGradient(
                      colors: [Colors.purple, Colors.blueAccent],
                      begin: Alignment.bottomLeft,
                      end: Alignment.topRight,
                      stops: [0.4, 0.7],
                      tileMode: TileMode.repeated,
                    ),
                  ),
                )
上面的代码如下所示:
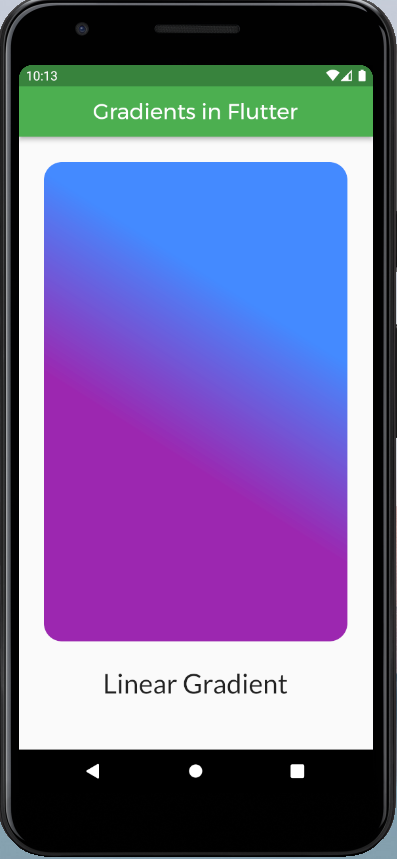
具有停止和平铺模式的线性渐变
这都是关于线性渐变的。
现在让我们转到径向渐变:
据了解, BoxDecoration也使用RadialGradient类。径向渐变类似于线性渐变,但顾名思义,渐变是径向(圆形)。它以同心圆显示渐变。因此,径向梯度具有中心和半径。中心点的值为 0.0,半径范围为 0.0 到 1.0 个单位。这些长度被处理为分数,这允许我们对任何盒子形状使用相同的代码,而变化很小或基本上没有变化。
让我们看一下径向渐变的构造函数。
RadialGradient({
    AlignmentGeometry center = Alignment.center,
    double radius = 0.5,
    required List colors,
    List? stops,
    TileMode tileMode = TileMode.clamp,
    AlignmentGeometry? focal,
    double focalRadius = 0.0,
    GradientTransform? transform
})
从构造函数中可以看出, colors属性是必需的,默认情况下,对齐设置为中心,半径设置为 0.5(像素)。
让我们用径向渐变制作一个容器:
Dart
child: Container(
            height: MediaQuery.of(context).size.height * 0.7,
            width: MediaQuery.of(context).size.width * 0.9,
            decoration: BoxDecoration(
                borderRadius: BorderRadius.circular(20),
                gradient: const RadialGradient(
                    colors: [Colors.red, Colors.yellow],
                    radius: 0.75,
                   ),
            ),
        ),
上面看起来像这样:
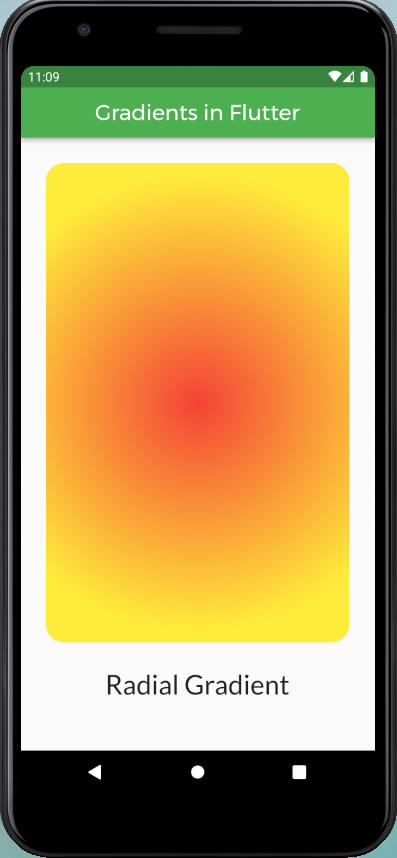
径向渐变
这 stop和tileMode与我们在 Liner Gradients 中讨论过的应用相同。添加停靠点将使您能够非常精确地控制渐变路径并让您拥有所需的形状。
默认情况下,如果我们不提及对齐方式,它会设置为居中。我们还可以通过以下方式更改对齐方式:
Dart
child: Container(
            height: MediaQuery.of(context).size.height * 0.7,
            width: MediaQuery.of(context).size.width * 0.9,
            decoration: BoxDecoration(
                borderRadius: BorderRadius.circular(20),
                gradient: const RadialGradient(
                    colors: [Colors.red, Colors.yellow],
                    radius: 0.75,
                    focal: Alignment(0.7, -0.7),
                    tileMode: TileMode.clamp,
                ),
            ),
           ),
上面的代码如下所示:
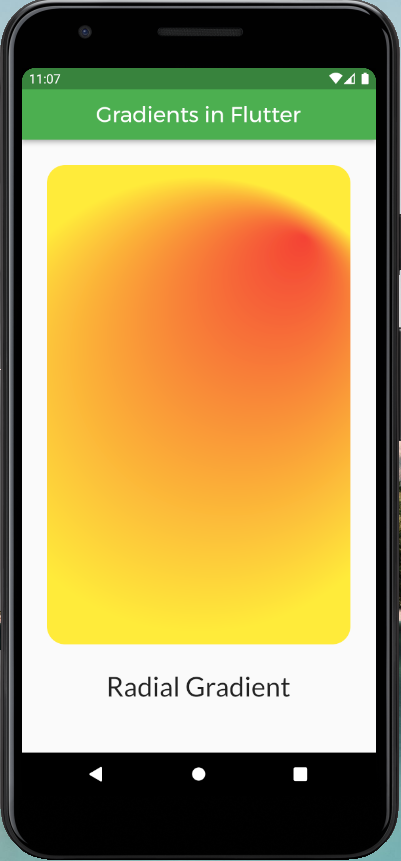
带有停止和 tileMode 的径向渐变
这是关于Flutter中的径向渐变。
让我们转到扫描渐变。顾名思义,扫描渐变以围绕中心点的扫描弧线显示渐变。
我们看一下SweepGradient 的构造函数:
SweepGradient(
{AlignmentGeometry center = Alignment.center,
double startAngle = 0.0,
double endAngle = math.pi * 2,
required List colors,
List? stops,
TileMode tileMode = TileMode.clamp,
GradientTransform? transform}
) 很明显,参数颜色是必需的,如果提供了停止参数,则颜色参数不能为空。默认情况下,alignment、startAngle 和 endAngle 分别设置为 center、0.0 和 2*pi。
正如我们在 Linear Gradient 和 Radial Gradient 中看到的,停止值的范围从 0.0 到 1.0。在Sweep Gradient 的情况下,渐变遵循弧线,因此我们在这里处理角度。 startAngle是指放置渐变的停止点 0.0 的点,类似地, endAngle是指放置渐变的停止点 1.0 的点。开始和结束角度以弧度为单位。注意:如果停止列表为null ,则假定为均匀分布。
让我们看看如何制作SweepGradient:
Dart
child: Container (
             height: MediaQuery.of(context).size.height * 0.7,
             width: MediaQuery.of(context).size.width * 0.9,
             decoration: BoxDecoration(
             borderRadius: BorderRadius.circular(20),
             gradient: const SweepGradient(
                        colors: [
                              Colors.red,
                              Colors.yellow,
                              Colors.blue,
                              Colors.green,
                              Colors.red,
                       ],
                       stops: [0.0, 0.25, 0.5, 0.75, 1.0],
                       tileMode: TileMode.clamp,
              ),
       ),
上面的代码看起来像这样:
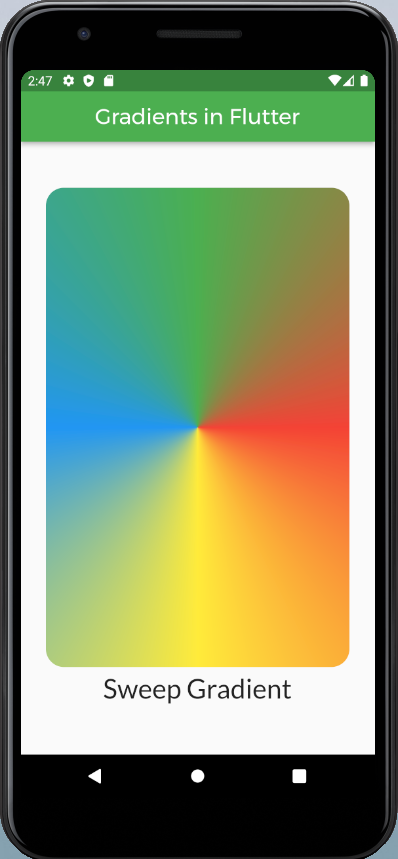
没有开始和结束角度的扫描渐变。
在上面的代码中,我们可以看到在flutter中创建一个SweepGradient是多么容易,并且没有最小值。的代码行。在上面的代码中,我们没有提到 startAngle 和 endAngle 属性,因为默认值 0.0 和 t 2π 正是我们想要的。如果你想改变角度,你可以随心所欲。要使用 π 常数,只需将数学库导入您的工作文件并使用所需的常数。请按照以下步骤操作。
import 'dart:math' as math;在您的项目中使用所需的数学元素。现在π:
void main() {
    print(math.pi * 4);
}
使用自定义开始和停止角度,渐变看起来像:
Dart
child: Container(
             height: MediaQuery.of(context).size.height * 0.7,
            width: MediaQuery.of(context).size.width * 0.9,
            decoration: BoxDecoration(
                borderRadius: BorderRadius.circular(20),
                gradient: const SweepGradient(
                    startAngle: math.pi * 0.2,
                    endAngle: math.pi * 1.7,
                    colors: [
                              Colors.red,
                              Colors.yellow,
                              Colors.blue,
                              Colors.green,
                              Colors.red,
                    ],
                    stops: [0.0, 0.25, 0.5, 0.75, 1.0],
                    tileMode: TileMode.clamp,
                 ),
            ),
        ),
上面的代码看起来像这样:
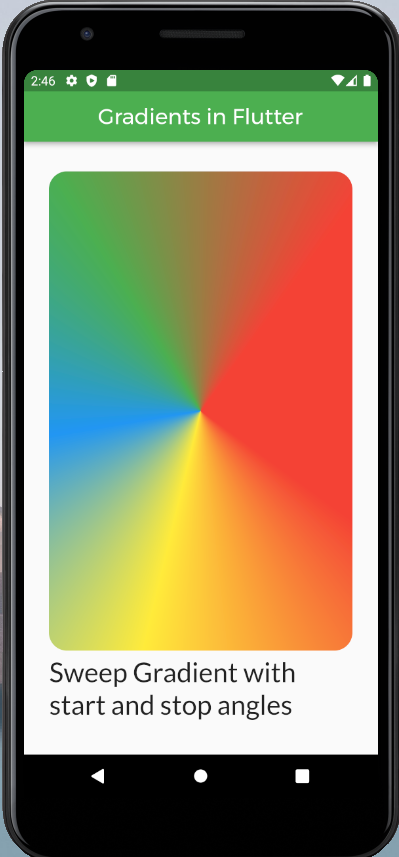
具有自定义开始和停止角度的扫描渐变。
这就是你在flutter中使用渐变的方法。渐变可以应用于您的应用程序的整个屏幕。要将渐变应用到整个屏幕,只需将Container小部件分配给您的body参数,将容器的宽度和高度分别指定为double.infinity和double.infinity这样您就可以对整个应用程序进行渐变。