Python|使用 Tensorflow 对手写数字进行分类
分类手写数字是机器学习的基本问题,可以通过多种方式解决,这里我们将使用 TensorFlow 来实现它们
使用带有 tf.contrib.learn 的线性分类器算法
线性分类器通过基于特征的线性组合的值(也称为特征值)进行选择来实现手写数字的分类,并且通常以称为特征向量的向量呈现给机器。
所需模块:
数字货币:
$ pip install numpy Matplotlib:
$ pip install matplotlib 张量流:
$ pip install tensorflow 要遵循的步骤
第 1 步:导入所有依赖项
Python3
import numpy as np
import matplotlib.pyplot as plt
import tensorflow as tf

learn = tf.contrib.learn

tf.logging.set_verbosity(tf.logging.ERROR)
Python3
mnist = learn.datasets.load_dataset('mnist')
data = mnist.train.images
labels = np.asarray(mnist.train.labels, dtype=np.int32)
test_data = mnist.test.images
test_labels = np.asarray(mnist.test.labels, dtype=np.int32)
Python3
max_examples = 10000
data = data[:max_examples]
labels = labels[:max_examples]
Python3
def display(i):
    img = test_data[i]
    plt.title('label : {}'.format(test_labels[i]))
    plt.imshow(img.reshape((28, 28)))

# image in TensorFlow is 28 by 28 px
display(0)
Python3
feature_columns = learn.infer_real_valued_columns_from_input(data)
classifier = learn.LinearClassifier(n_classes=10,
                                    feature_columns=feature_columns)
classifier.fit(data, labels, batch_size=100, steps=1000)
Python3
classifier.evaluate(test_data, test_labels)
print(classifier.evaluate(test_data, test_labels)["accuracy"])
Python3
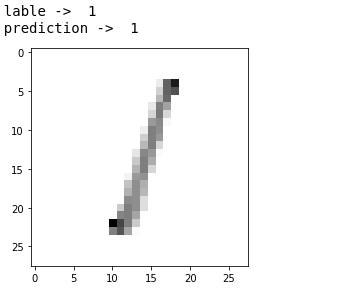
prediction = classifier.predict(np.array([test_data[0]],
                                         dtype=float),
                                         as_iterable=False)
print("prediction : {}, label : {}".format(prediction,
      test_labels[0]) )
Python3
# importing libraries
import numpy as np
import matplotlib.pyplot as plt
import tensorflow as tf

learn = tf.contrib.learn
tf.logging.set_verbosity(tf.logging.ERROR)\

# importing dataset using MNIST
# this is how mnist is used mnist contain test and train dataset
mnist = learn.datasets.load_dataset('mnist')
data = mnist.train.images
labels = np.asarray(mnist.train.labels, dtype = np.int32)
test_data = mnist.test.images
test_labels = np.asarray(mnist.test.labels, dtype = np.int32)

max_examples = 10000
data = data[:max_examples]
labels = labels[:max_examples]

# displaying dataset using Matplotlib
def display(i):
    img = test_data[i]
    plt.title('label : {}'.format(test_labels[i]))
    plt.imshow(img.reshape((28, 28)))

# img in tf is 28 by 28 px
# fitting linear classifier
feature_columns = learn.infer_real_valued_columns_from_input(data)
classifier = learn.LinearClassifier(n_classes = 10,
                                    feature_columns = feature_columns)
classifier.fit(data, labels, batch_size = 100, steps = 1000)

# Evaluate accuracy
classifier.evaluate(test_data, test_labels)
print(classifier.evaluate(test_data, test_labels)["accuracy"])

prediction = classifier.predict(np.array([test_data[0]],
                                         dtype=float),
                                         as_iterable=False)
print("prediction : {}, label : {}".format(prediction,
      test_labels[0]) )

if prediction == test_labels[0]:
     display(0)
Python3
import tensorflow as tf
import numpy as np
import matplotlib.pyplot as plt
Python3
mnist = tf.keras.datasets.mnist
(x_train,y_train) , (x_test,y_test) = mnist.load_data()

x_train = tf.keras.utils.normalize(x_train,axis=1)
x_test = tf.keras.utils.normalize(x_test,axis=1)
Python3
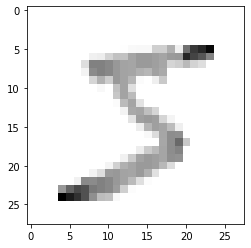
def draw(n):
    plt.imshow(n,cmap=plt.cm.binary)
    plt.show()

draw(x_train[0])
Python3
#there are two types of models
#sequential is most common, why?

model = tf.keras.models.Sequential()

model.add(tf.keras.layers.Flatten(input_shape=(28, 28)))
#reshape

model.add(tf.keras.layers.Dense(128,activation=tf.nn.relu))
model.add(tf.keras.layers.Dense(128,activation=tf.nn.relu))
model.add(tf.keras.layers.Dense(10,activation=tf.nn.softmax))

model.compile(optimizer='adam',
              loss='sparse_categorical_crossentropy',
              metrics=['accuracy']
              )
model.fit(x_train,y_train,epochs=3)
Python3
val_loss,val_acc = model.evaluate(x_test,y_test)
print("loss-> ",val_loss,"\nacc-> ",val_acc)
Python3
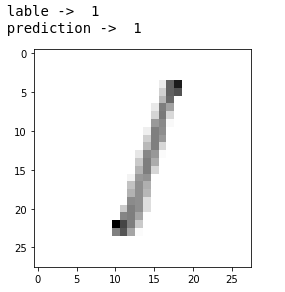
predictions=model.predict([x_test])
print('label -> ',y_test[2])
print('prediction -> ',np.argmax(predictions[2]))

draw(x_test[2])
Python3
#saving the model
# .h5 or .model can be used

model.save('epic_num_reader.h5')
Python3
new_model = tf.keras.models.load_model('epic_num_reader.h5')Python3
predictions=new_model.predict([x_test])


print('label -> ',y_test[2])
print('prediction -> ',np.argmax(predictions[2]))

draw(x_test[2])
第 2 步:使用 MNIST 数据导入数据集
Python3
mnist = learn.datasets.load_dataset('mnist')
data = mnist.train.images
labels = np.asarray(mnist.train.labels, dtype=np.int32)
test_data = mnist.test.images
test_labels = np.asarray(mnist.test.labels, dtype=np.int32)
在这一步之后,将下载 mnist 的数据集。
输出 :
Extracting MNIST-data/train-images-idx3-ubyte.gz
Extracting MNIST-data/train-labels-idx1-ubyte.gz
Extracting MNIST-data/t10k-images-idx3-ubyte.gz
Extracting MNIST-data/t10k-labels-idx1-ubyte.gz
第 3 步:制作数据集
Python3
max_examples = 10000
data = data[:max_examples]
labels = labels[:max_examples]
第 4 步:使用 MatplotLib 显示数据集
Python3
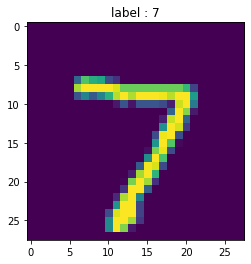
def display(i):
    img = test_data[i]
    plt.title('label : {}'.format(test_labels[i]))
    plt.imshow(img.reshape((28, 28)))

# image in TensorFlow is 28 by 28 px
display(0)
要显示数据,我们可以使用这个函数- display(0)
输出 :
第 5 步:拟合数据,使用线性分类器
Python3
feature_columns = learn.infer_real_valued_columns_from_input(data)
classifier = learn.LinearClassifier(n_classes=10,
                                    feature_columns=feature_columns)
classifier.fit(data, labels, batch_size=100, steps=1000)
第 6 步:评估准确性
Python3
classifier.evaluate(test_data, test_labels)
print(classifier.evaluate(test_data, test_labels)["accuracy"])
输出 :
0.9137第 7 步:预测数据
Python3
prediction = classifier.predict(np.array([test_data[0]],
                                         dtype=float),
                                         as_iterable=False)
print("prediction : {}, label : {}".format(prediction,
      test_labels[0]) )
输出 :
prediction : [7], label : 7手写分类的完整代码
Python3
# importing libraries
import numpy as np
import matplotlib.pyplot as plt
import tensorflow as tf

learn = tf.contrib.learn
tf.logging.set_verbosity(tf.logging.ERROR)\

# importing dataset using MNIST
# this is how mnist is used mnist contain test and train dataset
mnist = learn.datasets.load_dataset('mnist')
data = mnist.train.images
labels = np.asarray(mnist.train.labels, dtype = np.int32)
test_data = mnist.test.images
test_labels = np.asarray(mnist.test.labels, dtype = np.int32)

max_examples = 10000
data = data[:max_examples]
labels = labels[:max_examples]

# displaying dataset using Matplotlib
def display(i):
    img = test_data[i]
    plt.title('label : {}'.format(test_labels[i]))
    plt.imshow(img.reshape((28, 28)))

# img in tf is 28 by 28 px
# fitting linear classifier
feature_columns = learn.infer_real_valued_columns_from_input(data)
classifier = learn.LinearClassifier(n_classes = 10,
                                    feature_columns = feature_columns)
classifier.fit(data, labels, batch_size = 100, steps = 1000)

# Evaluate accuracy
classifier.evaluate(test_data, test_labels)
print(classifier.evaluate(test_data, test_labels)["accuracy"])

prediction = classifier.predict(np.array([test_data[0]],
                                         dtype=float),
                                         as_iterable=False)
print("prediction : {}, label : {}".format(prediction,
      test_labels[0]) )

if prediction == test_labels[0]:
     display(0)
通过 tf.keras 使用深度学习
深度学习是机器学习和人工智能的一个子部分,也称为深度神经网络,该网络能够从提供的无组织或无标签数据中进行无监督学习。今天,我们将在 TensorFlow 中实现一个神经网络来对手写数字进行分类。
所需模块:
数字货币:
$ pip install numpy Matplotlib:
$ pip install matplotlib 张量流:
$ pip install tensorflow 要遵循的步骤
第 1 步:导入所有依赖项
Python3
import tensorflow as tf
import numpy as np
import matplotlib.pyplot as plt
第 2 步:导入数据并对其进行规范化
Python3
mnist = tf.keras.datasets.mnist
(x_train,y_train) , (x_test,y_test) = mnist.load_data()

x_train = tf.keras.utils.normalize(x_train,axis=1)
x_test = tf.keras.utils.normalize(x_test,axis=1)
第三步:查看数据
Python3
def draw(n):
    plt.imshow(n,cmap=plt.cm.binary)
    plt.show()

draw(x_train[0])
第 4 步:制作神经网络并对其进行训练
Python3
#there are two types of models
#sequential is most common, why?

model = tf.keras.models.Sequential()

model.add(tf.keras.layers.Flatten(input_shape=(28, 28)))
#reshape

model.add(tf.keras.layers.Dense(128,activation=tf.nn.relu))
model.add(tf.keras.layers.Dense(128,activation=tf.nn.relu))
model.add(tf.keras.layers.Dense(10,activation=tf.nn.softmax))

model.compile(optimizer='adam',
              loss='sparse_categorical_crossentropy',
              metrics=['accuracy']
              )
model.fit(x_train,y_train,epochs=3)

第 5 步:检查模型的准确性和损失
Python3
val_loss,val_acc = model.evaluate(x_test,y_test)
print("loss-> ",val_loss,"\nacc-> ",val_acc)

第 6 步:使用模型进行预测
Python3
predictions=model.predict([x_test])
print('label -> ',y_test[2])
print('prediction -> ',np.argmax(predictions[2]))

draw(x_test[2])
保存和测试模型
保存模型
Python3
#saving the model
# .h5 or .model can be used

model.save('epic_num_reader.h5')
加载保存的模型
Python3
new_model = tf.keras.models.load_model('epic_num_reader.h5')
使用新模型进行预测
Python3
predictions=new_model.predict([x_test])


print('label -> ',y_test[2])
print('prediction -> ',np.argmax(predictions[2]))

draw(x_test[2])