Spring – SimpleJDBCTemplate 与示例
SimpleJDBCTemplate包括JdbcTemplate类的所有特性和功能,它还支持Java5特性,例如 var-args(可变参数)和自动装箱。除了 JdbcTemplate 类,它还提供了update()方法,该方法接受两个参数,即 SQL 查询和依赖于 SQL 查询的任意参数。为了访问旧 JdbcTemplate 类的方法,我们使用getJdbcOperations()方法,并通过 SimpleJdbcTemplate 调用所有这些方法。
Note: We need to pass the parameters inside the update() method in the same order we defined them in parameterized query.
SimpleJDBCTemplate 类的 update() 方法的语法:
int update(String sqlQuery, Object parameters)例子
在此示例中,我们将使用 SimpleJDBCTemplate 类的 update() 方法更新学生的详细信息。对于本教程,我们将为 Student 表使用以下模式。
Student(id INT, name VARCHAR(45), department VARCHAR(45))分步实施
第 1 步:创建表
在这一步中,我们将创建一个学生表来存储学生的信息。对于本教程,我们将假设您已在数据库中创建了下表。
CREATE TABLE STUDENT(
id INT,
name VARCHAR(45),
department VARCHAR(45));
创建表后,我们将在表中插入以下数据。
INSERT INTO STUDENT VALUES(1, "geek", "computer science");第 2 步:添加依赖项
在这一步中,我们会将 maven 依赖项添加到我们的应用程序中。将以下依赖项添加到您的 pom.xml
Note: Spring 3 JDBC supports SimpleJDBCTemplate class and Java5 features
XML
  4.0.0
  com.geeksforgeeks
  SimpleJDBCTemplate
  0.0.1-SNAPSHOT


            org.springframework
            spring-jdbc
            3.0.0.RELEASE


                org.springframework
                spring-context
                5.0.8.RELEASE


            mysql
            mysql-connector-java
            5.1.44
Java
public class Student {
    // member variables
    private int id;
    private String name;
    private String department;

    // no args constructor
    public Student(){}

    // parameterized constructor
    public Student(int id, String name, String department) {
        super();
        this.id = id;
        this.name = name;
        this.department = department;
    }

    // getters and setters method
    public int getId() {
        return id;
    }
    public void setId(int id) {
        this.id = id;
    }
    public String getName() {
        return name;
    }
    public void setName(String name) {
        this.name = name;
    }
    public String getDepartment() {
        return department;
    }
    public void setDepartment(String department) {
        this.department = department;
    }

    // toString() method
    @Override
    public String toString() {
        return "Student [id=" + id + ", name=" + name + ", department=" + department + "]";
    }
}
Java
import org.springframework.jdbc.core.simple.SimpleJdbcTemplate;

import com.geeksforgeeks.model.Student;

public class StudentDao{

    // Defining SimpleJdbcTemplate as member variable in order
    // to use the update() method of the SimpleJdbcTemplate's class
    private SimpleJdbcTemplate simpleJdbcTemplate;

    // Constructor - used to inject dependency
    // using constructor injection
    // defined in application-context
    public StudentDao(SimpleJdbcTemplate simpleJdbcTemplate) {
        super();
        this.simpleJdbcTemplate = simpleJdbcTemplate;
    }

    // we will maintain the order of parameters with the
    // parameters present in parameterized query
    // here, first we have passed name and then id as
    // we define in query first name then id
    public int update(Student student) {
        String sqlQuery = "UPDATE student SET name=? WHERE id=?";
        return simpleJdbcTemplate.update(sqlQuery, student.getName(), student.getId());
    }

}
XML
Java
import org.springframework.core.io.Resource;
import org.springframework.beans.factory.BeanFactory;
import org.springframework.beans.factory.xml.XmlBeanFactory;
import org.springframework.core.io.ClassPathResource;

import com.geeksforgeeks.dao.StudentDao;
import com.geeksforgeeks.model.Student;

public class TestSimpleJDBCTemplate {

    public static void main(String[] args) {

        // Reading the application-context using ClassPathResources
        Resource resource=new ClassPathResource("application-context.xml");
        BeanFactory factory=new XmlBeanFactory(resource);

        // Spring check the blueprint for studentDao bean
        // from application-context.xml file and return it
        StudentDao studentDao = (StudentDao)factory.getBean("studentDao");

        // This will return a boolean value as 1 or 0
        int res = studentDao.update(new Student(1, "Rohan", "computer science"));
        System.out.println(res);

    }
}
第三步:创建模型类
现在,我们将为我们的学生创建一个模型班。此类将具有三个成员变量 id、name 和部门。我们还将定义它的构造函数、getter 和 setter 方法以及 toString() 方法。
Java
public class Student {
    // member variables
    private int id;
    private String name;
    private String department;

    // no args constructor
    public Student(){}

    // parameterized constructor
    public Student(int id, String name, String department) {
        super();
        this.id = id;
        this.name = name;
        this.department = department;
    }

    // getters and setters method
    public int getId() {
        return id;
    }
    public void setId(int id) {
        this.id = id;
    }
    public String getName() {
        return name;
    }
    public void setName(String name) {
        this.name = name;
    }
    public String getDepartment() {
        return department;
    }
    public void setDepartment(String department) {
        this.department = department;
    }

    // toString() method
    @Override
    public String toString() {
        return "Student [id=" + id + ", name=" + name + ", department=" + department + "]";
    }
}
第 4 步:创建 DAO 类
在这一步中,我们将创建一个 StudentDao。 Java类。在这个类中,我们将定义SimpleJdbcTemplate和update()方法并提供它的定义来更新我们的数据。
Java
import org.springframework.jdbc.core.simple.SimpleJdbcTemplate;

import com.geeksforgeeks.model.Student;

public class StudentDao{

    // Defining SimpleJdbcTemplate as member variable in order
    // to use the update() method of the SimpleJdbcTemplate's class
    private SimpleJdbcTemplate simpleJdbcTemplate;

    // Constructor - used to inject dependency
    // using constructor injection
    // defined in application-context
    public StudentDao(SimpleJdbcTemplate simpleJdbcTemplate) {
        super();
        this.simpleJdbcTemplate = simpleJdbcTemplate;
    }

    // we will maintain the order of parameters with the
    // parameters present in parameterized query
    // here, first we have passed name and then id as
    // we define in query first name then id
    public int update(Student student) {
        String sqlQuery = "UPDATE student SET name=? WHERE id=?";
        return simpleJdbcTemplate.update(sqlQuery, student.getName(), student.getId());
    }

}
第 5 步:Bean 配置
在这一步中,我们将创建 spring 配置文件并将其命名为application-contex.xml 。为了与数据库建立连接,我们需要以下信息用户名、密码、数据库连接、URL 和驱动程序类名称。所有这些信息都包含在DriverManagerDataSource类中,它具有返回Java类型连接的getConnection()方法。我们在 StudentDao 类中使用 SimpleJdbcTemplate 的实例,并使用构造函数注入方法传递它。
Note: In application-context, you need to define the whole path of your dao class
第 6 步:创建实用程序类
现在,我们将创建一个 Utility 类来测试我们的应用程序。为此创建一个新类并将其命名为TestSimpleJDBCTemplate。 Java并将以下代码添加到其中。
Java
import org.springframework.core.io.Resource;
import org.springframework.beans.factory.BeanFactory;
import org.springframework.beans.factory.xml.XmlBeanFactory;
import org.springframework.core.io.ClassPathResource;

import com.geeksforgeeks.dao.StudentDao;
import com.geeksforgeeks.model.Student;

public class TestSimpleJDBCTemplate {

    public static void main(String[] args) {

        // Reading the application-context using ClassPathResources
        Resource resource=new ClassPathResource("application-context.xml");
        BeanFactory factory=new XmlBeanFactory(resource);

        // Spring check the blueprint for studentDao bean
        // from application-context.xml file and return it
        StudentDao studentDao = (StudentDao)factory.getBean("studentDao");

        // This will return a boolean value as 1 or 0
        int res = studentDao.update(new Student(1, "Rohan", "computer science"));
        System.out.println(res);

    }
}
输出:
现在,我们将运行我们的应用程序。如果 update() 方法将返回 1,则表示查询已成功执行,否则不会。
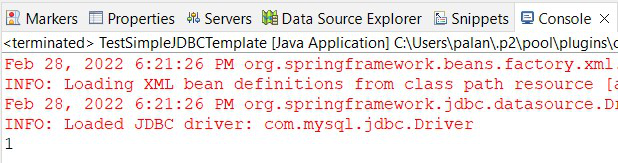
图 1 – 控制台输出
我们还将通过在数据库中执行查询来交叉检查它。我们创建了一个学生表,分别插入了以下数据1,“geek”,“computer science”。
SELECT * FROM student;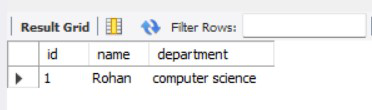
图 2 – 数据库输出