- 实现POST方法以创建用户资源(1)
- 实现POST方法以创建用户资源(1)
- 实现DELETE方法以删除用户资源
- 实现DELETE方法以删除用户资源(1)
- 实现DELETE方法以删除用户资源
- post 方法 - Javascript (1)
- 创建新用户 (1)
- POST (1)
- post 方法 - Javascript 代码示例
- jQuery post()方法
- jQuery post()方法(1)
- jQuery | post() 方法(1)
- jQuery | post() 方法(1)
- jQuery | post() 方法
- jQuery | post() 方法
- $.post javascript (1)
- 实施POST服务为用户创建帖子
- 实施POST服务为用户创建帖子(1)
- 实施POST服务为用户创建帖子
- $.post javascript 代码示例
- POST 方法Python请求(1)
- POST 方法Python请求
- 创建新用户 - 任何代码示例
- PHP-GET和POST方法
- PHP-GET和POST方法(1)
- 在PHP Get()与Post()方法
- POST - 任何代码示例
- 没有这样的表:post_post (1)
- node js post方法 - Javascript(1)
📅 最后修改于: 2021-01-12 00:46:18 🧑 作者: Mango
实施POST方法以创建用户资源
在前面的几个步骤中,我们创建了简单的RESTful服务。在本节中,我们将使用POST方法为特定的URI“ / users ”发布用户资源。
在这里,我们使用两个注释, @ RequestBody和@PathMapping。
@RequestBody
@RequestBody批注将Web请求的主体映射到method参数。请求的主体通过HttpMessageConverter传递。它根据请求的内容类型解析方法参数。 (可选)可以通过使用@Valid注释参数来应用自动验证。
在下面的示例中,当我们在createUser()方法中传递@RequestBody批注时,它映射到user参数。
@PathMapping
@PathMapping批注是@RequestMapping批注的专用版本,用作@RequestMapping(method = RequestMethod = POST)的快捷方式。 @PostMapping方法处理与指定URI匹配的Http POST请求。
让我们创建一个用户资源,并通过POST方法发布该资源。
步骤1:打开UserResource.java并添加@PostMapping(“ / user”) 。
步骤2:创建一个方法createUser()并将User类的对象作为网络的主体传递。
步骤3:保存创建的用户。
UserResource.java
package com.javatpoint.server.main.user;
import java.util.List;
import org.springframework.beans.factory.annotation.Autowired;
import org.springframework.web.bind.annotation.GetMapping;
import org.springframework.web.bind.annotation.PathVariable;
import org.springframework.web.bind.annotation.PostMapping;
import org.springframework.web.bind.annotation.RequestBody;
import org.springframework.web.bind.annotation.RestController;
@RestController
public class UserResource
{
@Autowired
private UserDaoService service;
@GetMapping("/users")
public List retriveAllUsers()
{
return service.findAll();
}
//retrieves a specific user detail
@GetMapping("/users/{id}")
public User retriveUser(@PathVariable int id)
{
return service.findOne(id);
}
//method that posts a new user detail
@PostMapping("/users")
public void createUser(@RequestBody User user)
{
User sevedUser=service.save(user);
}
}
当我们刷新页面时,它返回get请求。但是我们需要发送POST请求。我们可以通过REST客户端发送POST请求。 REST客户端是旨在使用服务器中的服务(RESTful)的客户端。
让我们看看如何使用REST客户端。
步骤4:从https://www.getpostman.com/downloads/下载邮递员。
或在浏览器https://bit.ly/1HCOCwF中添加Google Chrome扩展程序。
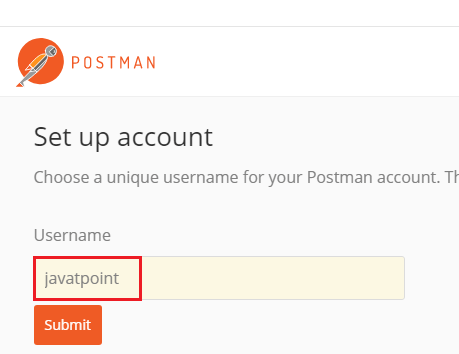
步骤5:启动Postman and Signup 。创建一个用户名。在这里,我们创建了用户名javatpoint,然后单击Submit按钮。考虑下图:
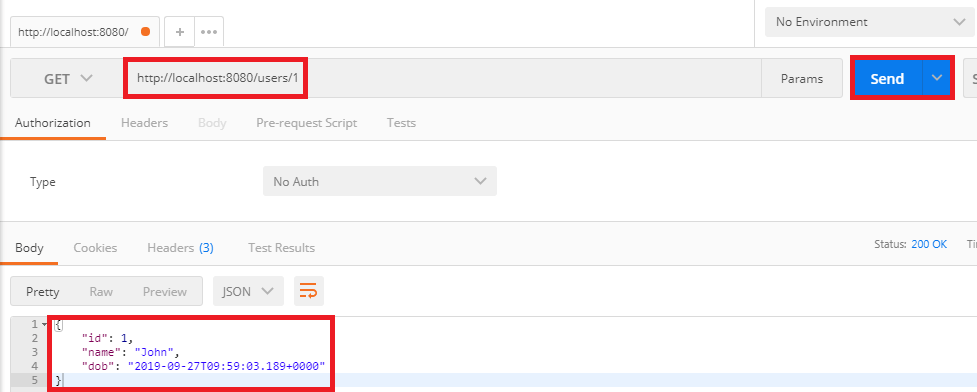
步骤6:首先,我们检查GET请求。在地址栏中输入URL http:// localhost:8080 / users / 1,然后单击“发送”按钮。它返回第一个用户的详细信息。
步骤7:现在我们发送一个POST请求。
- 将方法更改为POST 。
- 复制来自“ / users / 1”的响应正文。
- 单击身体选项卡。现在,我们为POST请求创建一个主体。
- 选择原始选项。它创建一个原始请求。
- 粘贴复制的内容。
- 删除ID,因为它会自动递增。
- 更改“名称”:“ Thomas ”。
- 我们将以JSON格式发送数据,而不是文本。因此,选择JSON(application / json) 。
- 输入URL http:// localhost:8080 / users,然后单击“发送”按钮。
- 单击窗口左侧的“获取”请求。
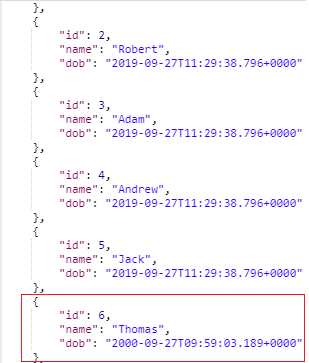
- 现在,我们将再次发送Get请求,因此更改URL http:// localhost:8080 / users并单击Send按钮。它显示所有用户,包括我们创建的用户。
增强POST方法以返回正确的HTTP代码和状态位置
在本节中,我们将返回已创建的用户资源的状态(已创建)和URI(“ / users / 6”)。
ResponseEntity类别
ResponseEntity
- 在RestTemplate和@Controller方法中使用它。
- 在getForEntity()和exchange()方法中用作参数。
- 在Spring MVC中,它也用作@Controller方法中的参数。
RequestEntity类的created()方法
created()方法是RequestEntity的静态方法
句法
public static ResponseEntity.BodyBuilder created(URI location)
参数:接受位置URI作为参数。
返回:返回创建的builder 。
所有Http状态代码都是Enum常量,在HttpStatus类中定义。
ServletUriComponentsBuilder
ServletUriComponentsBuilder是在org.springframework.web.servlet.support.ServletUriComponentsBuilder中定义的类。它扩展了UriComponentsBuilder类。它具有其他静态工厂方法,可以基于当前HttpServletRequest创建链接。
fromCurrentRequest()方法
它与fromRequest(HttpServletRequest)方法类似,除了请求是通过RequestContextHolder获得的。
path()方法
path()是UriComponentsBuilder类的方法。它将给定路径附加到此构建器的现有路径。给定的路径可能包含URI模板变量。
句法
public UriBuilderBuilder path(String path)
参数:接受路径作为参数。
返回:返回UriComponentsBuilder 。
buildAndExpand()方法
它构建UriComponents实例,并将URI模板变量替换为从数组获得的值。这是组合了build()和UriComponents.expand(Object … uriVariableValues)调用的快捷方式。
句法
public UriComponents buildAndExpand(Object...uriVariableValues)
参数:接受URI变量值作为参数。
返回:返回具有扩展值的URI组件。
build()方法
它从构建器中包含的各种组件构建UriComponents实例。
句法
public UriComponents build()
参数:不接受任何参数。
返回:返回Uri Components 。
让我们看看如何返回已创建资源的状态以及如何在响应中设置已创建资源的URI。
步骤1:创建一个创建用户资源并返回ResponseEntity的方法。
UserResource.java
package com.javatpoint.server.main.user;
import java.net.URI;
import java.util.List;
import org.springframework.beans.factory.annotation.Autowired;
import org.springframework.http.ResponseEntity;
import org.springframework.web.bind.annotation.GetMapping;
import org.springframework.web.bind.annotation.PathVariable;
import org.springframework.web.bind.annotation.PostMapping;
import org.springframework.web.bind.annotation.RequestBody;
import org.springframework.web.bind.annotation.RestController;
import org.springframework.web.servlet.support.ServletUriComponentsBuilder;
@RestController
public class UserResource
{
@Autowired
private UserDaoService service;
@GetMapping("/users")
public List retriveAllUsers()
{
return service.findAll();
}
//retrieves a specific user detail
@GetMapping("/users/{id}")
public User retriveUser(@PathVariable int id)
{
return service.findOne(id);
}
//method that posts a new user detail and returns the status of HTTP and location of the user resource
@PostMapping("/users")
public ResponseEntity 步骤2:现在打开REST客户端Postman并创建POST请求。
步骤3:在“历史记录”选项卡下,单击POST请求。
步骤4:单击“正文”选项卡,并将用户名更改为James 。
步骤5:确保已选择JSON(application / json)媒体类型。
步骤5:点击“发送”按钮。
在窗口的右侧,我们可以看到状态:201已创建。这表示资源已正确创建。
第6步:现在,单击“页眉”选项卡以查看位置。位置是所创建资源的URI。它显示了创建的用户James的位置,即“ / users / 6 ”。

如果客户端想知道在哪里创建了用户资源,只需从响应的标题中选取位置即可。