- 使用路径变量增强Hello World服务
- hello world c++ (1)
- c#中的hello world(1)
- hello world c (1)
- C++ hello world - C++ (1)
- hello-world (1)
- Q# hello world - C# (1)
- c# hello world - C# (1)
- hello world c++ - C# (1)
- C++中的hello world(1)
- hello world c# (1)
- hello world c - C# (1)
- C#中的Hello World
- C#中的Hello World(1)
- hello world 的代码 (1)
- python中的hello world(1)
- hello world - Python (1)
- c# hello world - C# 代码示例
- Q# hello world - C# 代码示例
- C++ hello world - C++ 代码示例
- hello world c++ 代码示例
- hello world c# 代码示例
- hello world c - C# 代码示例
- C++代码示例中的hello world
- hello world c++ - C# 代码示例
- c#代码示例中的hello world
- hello world cc++ 代码示例
- java Hello World (1)
- java中的hello world(1)
📅 最后修改于: 2021-01-12 00:45:11 🧑 作者: Mango
使用路径变量增强Hello World服务
@PathVariable批注用于从URI中提取值。它最适合URL包含某些值的RESTful Web服务。 Spring MVC允许我们在同一方法中使用多个@PathVariable批注。路径变量是创建剩余资源的关键部分。
我们将创建另一个带有path参数的hello-world-bean请求。
步骤1:打开HelloWorldController.java文件,并添加另一个helloWorldBean()服务。
HelloWorldController.java
package com.javatpoint.server.main;
import org.springframework.web.bind.annotation.GetMapping;
import org.springframework.web.bind.annotation.PathVariable;
import org.springframework.web.bind.annotation.RestController;
import org.springframework.context.annotation.Configuration;
@Configuration
//Controller
@RestController
public class HelloWorldController
{
//using get method and hello-world URI
@GetMapping(path="/hello-world")
public String helloWorld()
{
return "Hello World";
}
@GetMapping(path="/hello-world-bean")
//method- which returns "Hello World"
public HelloWorldBean helloWorldBean()
{
return new HelloWorldBean("Hello World");//constructor of HelloWorldBean
}
//passing a path variable
@GetMapping(path="/hello-world/path-variable/{name}")
public HelloWorldBean helloWorldPathVariable(@PathVariable String name)
{
return new HelloWorldBean(String.format("Hello World, %s", name)); //%s replace the name
}
}
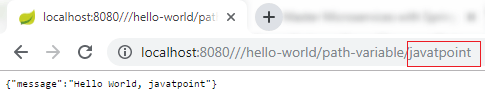
无论我们将传递给path变量的哪个值,控制器都会将其拾取并返回给响应。
步骤2:输入URL http:// localhost:8080 /// hello-world / path-variable / javatpoint
步骤3:运行HelloWorldController.java文件。我们在浏览器上收到以下响应。
让我们再次更改路径变量:http:// localhost:8080 / hello-world / path-variable / Anubhav
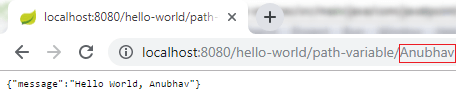
我们可以看到,我们在path变量中编写的任何内容都将返回到响应中。
创建用户Bean和用户服务
在本节中,我们将创建实际资源用户和该职位。我们将使用静态数组列表来表示数据。
步骤1:创建一个名为com.javatpoint.server.main.user的新包。
步骤2:创建一个bean类(用户)来存储用户详细信息。
右键单击软件包用户->新建->类->提供名称->完成。在这里,我们提供了类名User。
步骤3:定义三个私有变量id,name和dob 。
步骤4:生成Getter和Setters 。
右键单击文件->源->生成Getter和Setters …->全选->生成。
步骤5:生成toString 。
右键单击文件->源->生成toString …->全选->生成。
第6步:生成构造函数。
右键单击文件->源->使用字段生成构造器…->生成。
User.java
package com.javatpoint.server.main.user;
import java.util.Date;
public class User
{
public User(Integer id, String name, Date dob)
{
super();
this.id = id;
this.name = name;
this.dob = dob;
}
private Integer id;
private String name;
private Date dob;
public Integer getId()
{
return id;
}
public void setId(Integer id)
{
this.id = id;
}
public String getName()
{
return name;
}
public void setName(String name)
{
this.name = name;
}
public Date getDob()
{
return dob;
}
public void setDob(Date dob)
{
this.dob = dob;
}
@Override
public String toString()
{
//return "User [id=" + id + ", name=" + name + ", dob=" + dob + "]";
return String.format("User [id=%s, name=%s, dob=%s]", id, name, dob);
}
}
在进行下一步之前,首先将com.javatpoint.server.main.helloworld包中的HelloWorldBean.java和HelloWorldController.java移动。
步骤7:在包com.javatpoint.server.main.user中创建一个名称为UserDaoService的类。
UserDaoService.java
package com.javatpoint.server.main.user;
import java.util.ArrayList;
import java.util.Date;
import java.util.List;
import org.springframework.stereotype.Component;
@Component
public class UserDaoService
{
public static int usersCount=5;
//creating an instance of ArrayList
private static List users=new ArrayList<>();
//static block
static
{
//adding users to the list
users.add(new User(1, "John", new Date()));
users.add(new User(2, "Robert", new Date()));
users.add(new User(3, "Adam", new Date()));
users.add(new User(4, "Andrew", new Date()));
users.add(new User(5, "Jack", new Date()));
}
//method that retrieve all users from the list
public List findAll()
{
return users;
}
//method that add the user in the list
public User save(User user)
{
if(user.getId()==null)
{
//increments the user id
user.setId(++usersCount);
}
users.add(user);
return user;
}
//method that find a particular user from the list
public User findOne(int id)
{
for(User user:users)
{
if(user.getId()==id)
return user;
}
return null;
}
}
实现用户资源的获取方法
步骤8:现在创建一个名称为UserResource的用户控制器类。
UserResource.java
package com.javatpoint.server.main.user;
import java.util.List;
import org.springframework.beans.factory.annotation.Autowired;
import org.springframework.web.bind.annotation.GetMapping;
import org.springframework.web.bind.annotation.RestController;
@RestController
public class UserResource
{
@Autowired
private UserDaoService service;
@GetMapping("/users")
public List retriveAllUsers()
{
return service.findAll();
}
}
步骤9:运行应用程序,然后在浏览器的地址栏中键入localhost:8080 / users。它以JSON格式返回用户列表。

如果日期以默认时间戳格式显示为:
“ dob”:“ 1500370250075”
我们需要设置正确的日期格式。
打开application.properties文件。删除调试配置并添加以下配置:
spring.jackson.serialization.write-dates-as-timestamps=false
上面的声明告诉Jackson框架,序列化时不要将日期视为时间戳。
步骤10:如果我们想在浏览器上显示特定的用户详细信息,请添加映射“ / user / {id} ”并在UserResource中创建方法retriveUser() 。
UserResource.java
package com.javatpoint.server.main.user;
import java.util.List;
import org.springframework.beans.factory.annotation.Autowired;
import org.springframework.web.bind.annotation.GetMapping;
import org.springframework.web.bind.annotation.PathVariable;
import org.springframework.web.bind.annotation.RestController;
@RestController
public class UserResource
{
@Autowired
private UserDaoService service;
@GetMapping("/users")
public List retriveAllUsers()
{
return service.findAll();
}
//retrieves a specific user detail
@GetMapping("/users/{id}")
public User retriveUser(@PathVariable int id)
{
return service.findOne(id);
}
}
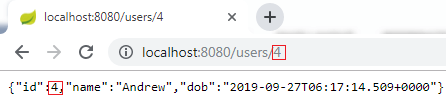
步骤11:运行应用程序,然后在浏览器中键入localhost:8080 / users / {id}。它返回我们在path变量中传递的特定用户ID的详细信息。
在下图中,我们检索了ID为4的用户的详细信息。