使用 Keras 构建自动编码器
先决条件:自动编码器
本文将通过首先使用 Keras 构建自动编码器,然后重建编码数据并可视化重建来演示数据压缩和使用机器学习重建编码数据的过程。我们将使用预加载到 Keras 模块中的MNIST 手写数字数据集,您可以在此处阅读。
代码结构如下:首先定义在构建自动编码器的不同步骤中需要的所有实用函数,然后相应地调用每个函数。
第 1 步:导入所需的库
import numpy as np
import matplotlib.pyplot as plt
from random import randint
from keras import backend as K
from keras.layers import Input, Dense, Conv2D, MaxPooling2D, UpSampling2D
from keras.models import Model
from keras.datasets import mnist
from keras.callbacks import TensorBoard
第 2 步:定义一个实用函数来加载数据
def load_data():
    # defining the input image size
    input_image = Input(shape =(28, 28, 1))

    # Loading the data and dividing the data into training and testing sets
    (X_train, _), (X_test, _) = mnist.load_data()

    # Cleaning and reshaping the data as required by the model
    X_train = X_train.astype('float32') / 255.
    X_train = np.reshape(X_train, (len(X_train), 28, 28, 1))
    X_test = X_test.astype('float32') / 255.
    X_test = np.reshape(X_test, (len(X_test), 28, 28, 1))

    return X_train, X_test, input_image
注意:在加载数据时,注意加载训练标签的空间是空的,因为压缩过程不涉及输出标签
第 3 步:定义一个实用函数来构建自动编码器神经网络
def build_network(input_image):

    # Building the encoder of the Auto-encoder
    x = Conv2D(16, (3, 3), activation ='relu', padding ='same')(input_image)
    x = MaxPooling2D((2, 2), padding ='same')(x)
    x = Conv2D(8, (3, 3), activation ='relu', padding ='same')(x)
    x = MaxPooling2D((2, 2), padding ='same')(x)
    x = Conv2D(8, (3, 3), activation ='relu', padding ='same')(x)
    encoded_layer = MaxPooling2D((2, 2), padding ='same')(x)

    # Building the decoder of the Auto-encoder
    x = Conv2D(8, (3, 3), activation ='relu', padding ='same')(encoded_layer)
    x = UpSampling2D((2, 2))(x)
    x = Conv2D(8, (3, 3), activation ='relu', padding ='same')(x)
    x = UpSampling2D((2, 2))(x)
    x = Conv2D(16, (3, 3), activation ='relu')(x)
    x = UpSampling2D((2, 2))(x)
    decoded_layer = Conv2D(1, (3, 3), activation ='sigmoid', padding ='same')(x)

    return decoded_layer
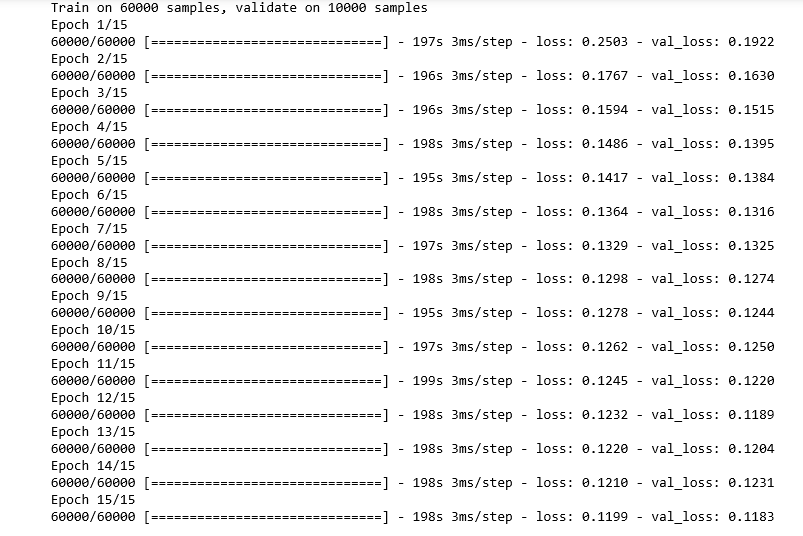
第 4 步:定义一个实用函数来构建和训练自动编码器网络
def build_auto_encoder_model(X_train, X_test, input_image, decoded_layer):

    # Defining the parameters of the Auto-encoder
    autoencoder = Model(input_image, decoded_layer)
    autoencoder.compile(optimizer ='adadelta', loss ='binary_crossentropy')

    # Training the Auto-encoder
    autoencoder.fit(X_train, X_train,
                epochs = 15,
                batch_size = 256,
                shuffle = True,
                validation_data =(X_test, X_test),
                callbacks =[TensorBoard(log_dir ='/tmp / autoencoder')])

    return autoencoder
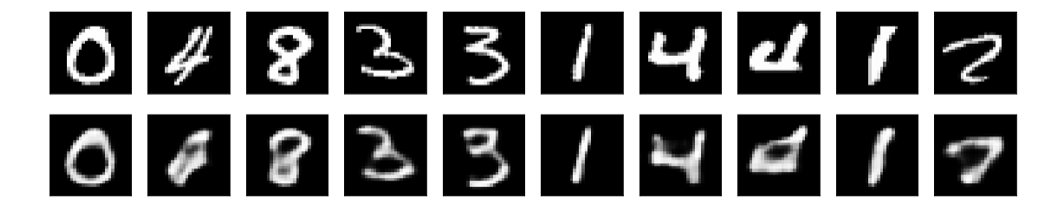
第 5 步:定义效用函数以可视化重建
def visualize(model, X_test):

    # Reconstructing the encoded images
    reconstructed_images = model.predict(X_test)

    plt.figure(figsize =(20, 4))
    for i in range(1, 11):

        # Generating a random to get random results
        rand_num = randint(0, 10001)

        # To display the original image
        ax = plt.subplot(2, 10, i)
        plt.imshow(X_test[rand_num].reshape(28, 28))
        plt.gray()
        ax.get_xaxis().set_visible(False)
        ax.get_yaxis().set_visible(False)

        # To display the reconstructed image
        ax = plt.subplot(2, 10, i + 10)
        plt.imshow(reconstructed_images[rand_num].reshape(28, 28))
        plt.gray()
        ax.get_xaxis().set_visible(False)
        ax.get_yaxis().set_visible(False)

    # Displaying the plot
    plt.show()
第 6 步:以适当的顺序调用实用程序函数
a)加载数据
X_train, X_test, input_image = load_data()
b)构建网络
decoded_layer = build_network(input_image)
c)构建和训练自动编码器
auto_encoder_model = build_auto_encoder_model(X_train,
                                             X_test,
                                             input_image,
                                             decoded_layer)
d)可视化重建
visualize(auto_encoder_model, X_test)