在 Pytorch 中更改张量视图
在本文中,我们将更改 PyTorch 中给定张量的视图。为此,我们将使用 view()函数来更改二维格式的 IE 行和列中的张量。我们必须指定要查看的行数和列数。
Syntax: tensor.view(no_of_rows,no_of_columns)
示例 1: Python程序,用于创建具有 10 个元素的张量和具有 5 行和 2 列的视图,反之亦然
Python3
# importing torch module
import torch
# create one dimensional tensor
# 10 elements
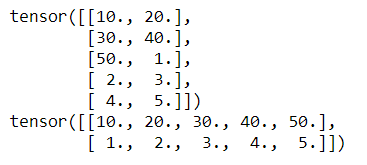
a = torch.FloatTensor([10, 20, 30, 40, 50, 1, 2, 3, 4, 5])
# view tensor in 5 rows and 2
# columns
print(a.view(5, 2))
# view tensor in 2 rows and 5
# columns
print(a.view(2, 5))Python3
# importing torch module
import torch
# create one dimensional tensor 12 elements
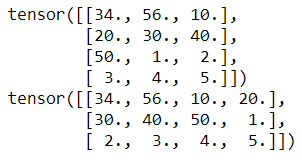
a = torch.FloatTensor([34, 56, 10, 20, 30, 40, 50, 1, 2, 3, 4, 5])
# view tensor in 4 rows and 3 columns
print(a.view(4, 3))
# view tensor in 3 rows and 4 columns
print(a.view(3, 4))输出:
示例 2:将张量的视图更改为 4 行 3 列,反之亦然
蟒蛇3
# importing torch module
import torch

# create one dimensional tensor 12 elements
a = torch.FloatTensor([34, 56, 10, 20, 30, 40, 50, 1, 2, 3, 4, 5])

# view tensor in 4 rows and 3 columns
print(a.view(4, 3))

# view tensor in 3 rows and 4 columns
print(a.view(3, 4))
输出: