Flutter振 - 冲洗条
Flutter加载了一些库,用更少的代码和更多的功能使开发更容易。今天我们带着另一个惊人的Flutter包回来了。
在应用程序中显示快餐栏是当今应用程序的共同特征。在出现问题时显示错误消息或不时向用户发送重要通知对于与用户保持联系并让他们及时了解信息非常重要。虽然有一个简单的snackbar包可用于在应用程序上显示snackbars ,但它的功能非常有限,但现在我们有了它的升级版本。
冲洗条不仅限于小吃条功能,我们还可以对其进行定制,使其尽可能实用和美观。要使用flushbar ,我们将使用很棒的 another_flushbar 包,它支持Flutter中的 null 安全性。在本文中,我们将学习如何轻松快速地创建不同类型的小吃店。
执行:
第一步:添加包。
要首先使用该软件包,我们需要安装它,为此在pubspec.yaml文件中添加依赖项。
Dart
dependencies:
  another_flushbar: ^1.10.28
Dart
import 'package:flushbar/flushbar.dart';
import 'package:flushbar/flushbar_helper.dart';
Dart
void show_Simple_Snackbar(BuildContext context) {
    Flushbar(
      duration: Duration(seconds: 3),
      title: "This is simple flushbar",
      message: "Hey, you are a registered user now.",
    )..show(context);
  }
Dart
void show_Icon_Flushbar(BuildContext context) {
    Flushbar(
      icon: Icon(
        Icons.email_outlined,
        color: Colors.white,
        size: 30,
      ),
      backgroundColor: Color(0xFF0277BD),
      duration: Duration(seconds: 4),
      message: "This email is already registered.",
      messageSize: 18,
      titleText: Text("Flushbar with Icon.",
          style: TextStyle(
              fontSize: 16, fontWeight: FontWeight.bold,
            color: Colors.white)),
    )..show(context);
  }
Dart
void show_Custom_Flushbar(BuildContext context) {
    Flushbar(
      duration: Duration(seconds: 3),
      margin: EdgeInsets.all(8),
      padding: EdgeInsets.all(10),

      backgroundGradient: LinearGradient(
        colors: [
          Colors.pink.shade500,
          Colors.pink.shade300,
          Colors.pink.shade100
        ],
        stops: [0.4, 0.7, 1],
      ),
      boxShadows: [
        BoxShadow(
          color: Colors.black45,
          offset: Offset(3, 3),
          blurRadius: 3,
        ),
      ],
      dismissDirection: FlushbarDismissDirection.HORIZONTAL,
      forwardAnimationCurve: Curves.fastLinearToSlowEaseIn,
      title: 'This is a floating Flushbar',
      message: 'Welcome to Flutter community.',
      messageSize: 17,
    )..show(context);
  }
Dart
void show_FlushbarHelper(BuildContext context) {
    FlushbarHelper.createInformation(
        title: "Flushbar Helper",
      message: "This is illegal action.")
      ..show(context);
  }
Dart
void show_Button_Flushbar(BuildContext context) {
    Flushbar(
      mainButton: ButtonBar(
        children: [
          GestureDetector(
            onTap: () {
              print("You clicked me!");
            },
            child: Text(
              "Click me",
              style: TextStyle(color: Colors.white),
            ),
          )
        ],
      ),
      backgroundColor: Colors.black,
      title: "Flushbar with Button",
      message: "We require additional information.",
      messageSize: 17,
      duration: Duration(seconds: 4),
    )..show(context);
  }
}
Dart
import 'package:flutter/material.dart';
import 'package:another_flushbar/flushbar.dart';
import 'package:another_flushbar/flushbar_helper.dart';

void main() {
  runApp(const MyApp());
}

class MyApp extends StatelessWidget {
  const MyApp({Key? key}) : super(key: key);
  @override
  Widget build(BuildContext context) {
    return MaterialApp(
      debugShowCheckedModeBanner: false,
      title: 'Flutter Flushbar Tutorial',
      theme: ThemeData(
        primarySwatch: Colors.green,
      ),
      home: MyHomePage(),
    );
  }
}

class MyHomePage extends StatefulWidget {
  @override
  State createState() => _MyHomePageState();
}

class _MyHomePageState extends State {
  @override
  Widget build(BuildContext context) {
    return Scaffold(
      appBar: AppBar(title: Text("GeeksForGeeks"), centerTitle: true),
      body: Center(
        child: Column(
          children: [
            SizedBox(
              height: 40,
            ),
            ElevatedButton(
                onPressed: () {

                  // invoking show_Simple_Snackbar function
                  show_Simple_Snackbar(context);
                },
                child: Text("Simple Snackbar with Flushbar")),
            ElevatedButton(
                onPressed: () {

                  // calling function to show flushbar with icon
                  show_Icon_Flushbar(context);
                },
                child: Text("Flushbar with Icon")),
            ElevatedButton(
                onPressed: () {
                  //calling show Customized Flushbar
                  show_Custom_Flushbar(context);
                },
                child: Text("Flushbar with gradient colors")),
            ElevatedButton(
                onPressed: () {

                  // calling function to FlushbarHelper
                  show_FlushbarHelper(context);
                },
                child: Text("Flushbar Helper")),
            ElevatedButton(
                onPressed: () {

                  // calling function to show flushbar with button
                  show_Button_Flushbar(context);
                },
                child: Text("Flushbar with Button"))
          ],
        ),
      ),
    );
  }

  void show_Simple_Snackbar(BuildContext context) {
    Flushbar(
      duration: Duration(seconds: 3),
      title: "This is simple flushbar",
      message: "Hey, you are a registered user now.",
    )..show(context);
  }

  void show_Icon_Flushbar(BuildContext context) {
    Flushbar(
      icon: Icon(
        Icons.email_outlined,
        color: Colors.white,
        size: 30,
      ),
      backgroundColor: Color(0xFF0277BD),
      duration: Duration(seconds: 4),
      message: "This email is already registered.",
      messageSize: 18,
      titleText: Text("Flushbar with Icon.",
          style: TextStyle(
              fontSize: 16,
            fontWeight: FontWeight.bold,
            color: Colors.white)),
    )..show(context);
  }

  void show_Custom_Flushbar(BuildContext context) {
    Flushbar(
      duration: Duration(seconds: 3),
      margin: EdgeInsets.all(8),
      padding: EdgeInsets.all(10),

      backgroundGradient: LinearGradient(
        colors: [
          Colors.pink.shade500,
          Colors.pink.shade300,
          Colors.pink.shade100
        ],
        stops: [0.4, 0.7, 1],
      ),
      boxShadows: [
        BoxShadow(
          color: Colors.black45,
          offset: Offset(3, 3),
          blurRadius: 3,
        ),
      ],

      // All of the previous Flushbars could be dismissed
      // by swiping to any direction
      dismissDirection: FlushbarDismissDirection.HORIZONTAL,

      // The default curve is Curves.easeOut
      forwardAnimationCurve: Curves.fastLinearToSlowEaseIn,
      title: 'This is a floating Flushbar',
      message: 'Welcome to Flutter community.',
      messageSize: 17,
    )..show(context);
  }

  void show_FlushbarHelper(BuildContext context) {
    FlushbarHelper.createInformation(
        title: "Flushbar Helper", message: "This is illegal action.")
      ..show(context);
  }

  void show_Button_Flushbar(BuildContext context) {
    Flushbar(
      mainButton: ButtonBar(
        children: [
          GestureDetector(
            onTap: () {
              print("You clicked me!");
            },
            child: Text(
              "Click me",
              style: TextStyle(color: Colors.white),
            ),
          )
        ],
      ),
      backgroundColor: Colors.black,
      title: "Flushbar with Button",
      message: "We require additional information.",
      messageSize: 17,
      duration: Duration(seconds: 4),
    )..show(context);
  }
} 然后,在终端中运行pub get进行安装。
第 2 步:导入库。
将库导入到您必须在其中添加快餐栏功能的文件中:
Dart
import 'package:flushbar/flushbar.dart';
import 'package:flushbar/flushbar_helper.dart';
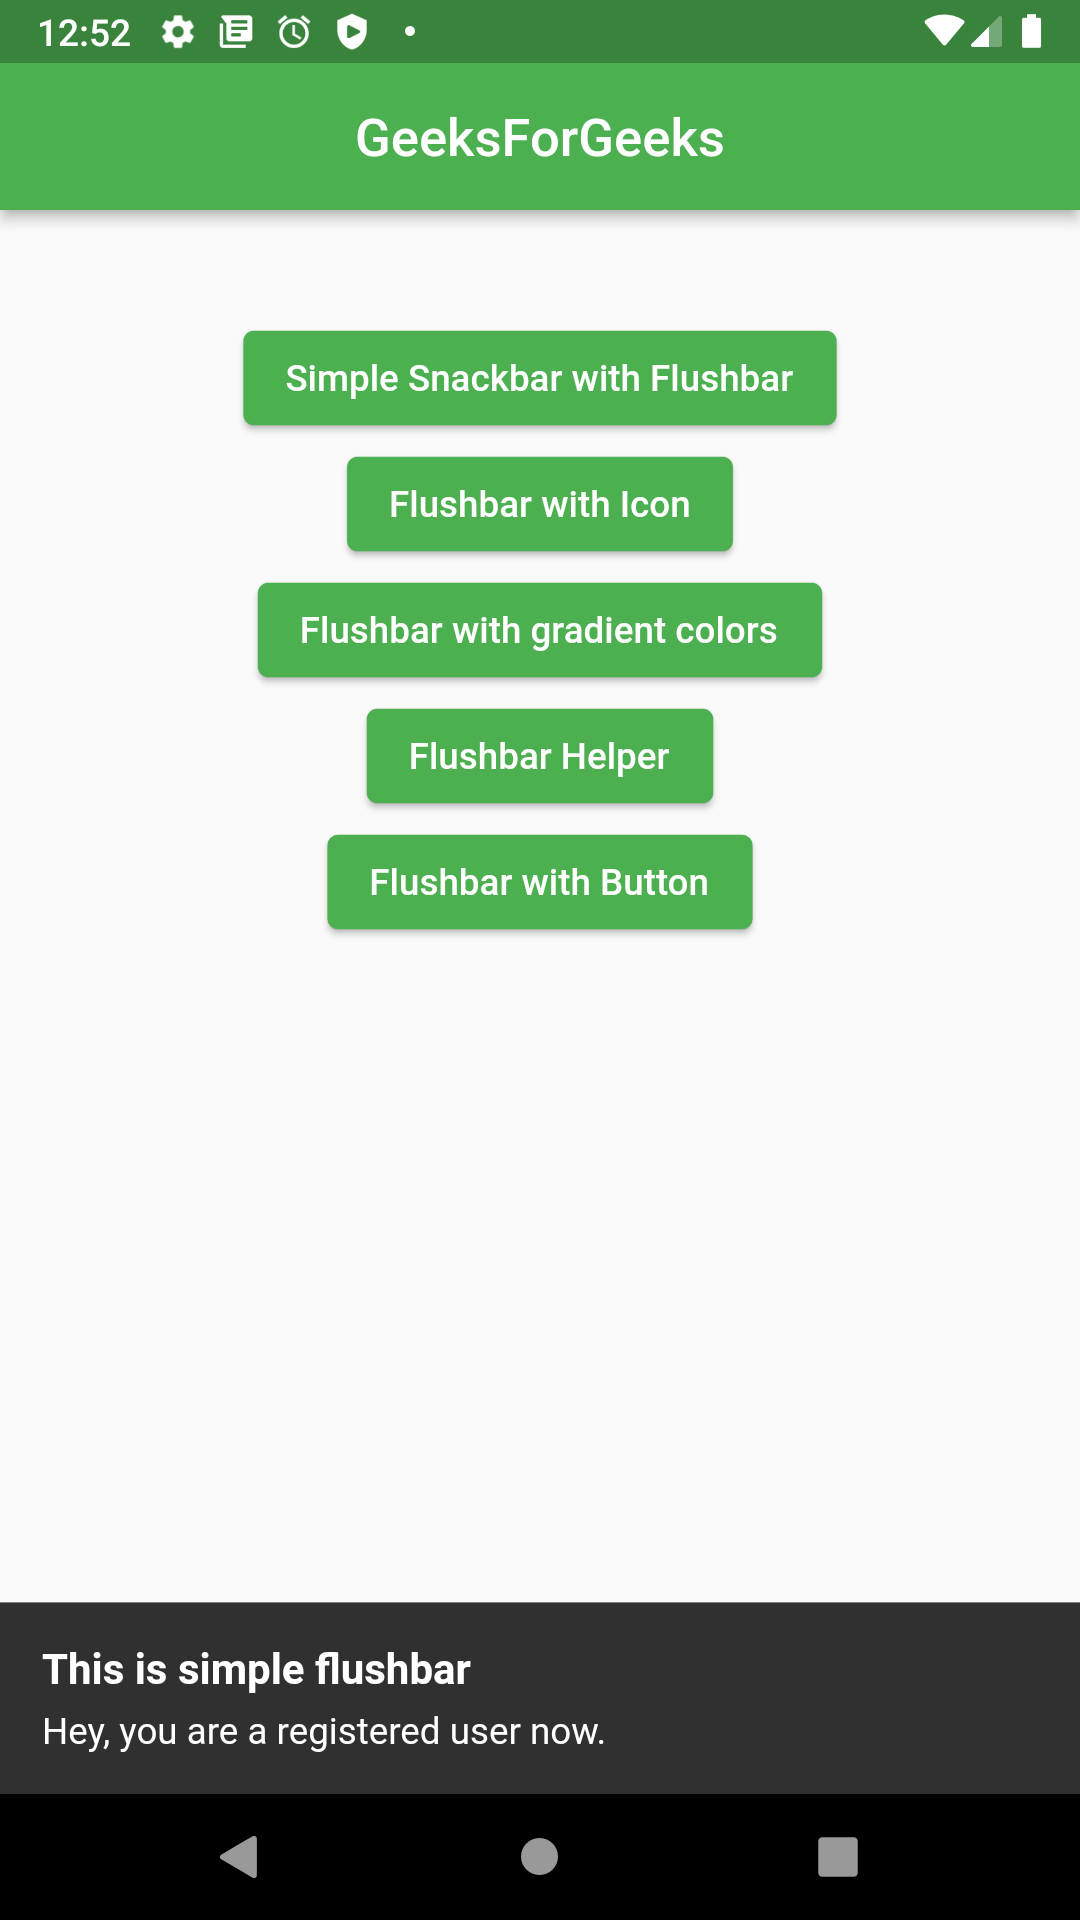
带有 Flushbar 的简单 Snackbar:
简单的flushbar只是一个带有信息消息和标题的小吃吧。正如您在下面的简单flushbar代码中看到的那样,它的代码有多简单?我们创建了一个简单的show_Simple_Snackbar函数,它显示了内部定义的小部件 Flushbar。在这里,我们添加了简单的消息和文本。您可以自定义文本,为其指定大小、重量、样式等。Flushbar 还包含 titleText 和 message text 属性,它们是小部件,但在下面的代码中,我们使用了 String title 和 String message,使其持续时间为 3 秒屏幕。
Dart
void show_Simple_Snackbar(BuildContext context) {
    Flushbar(
      duration: Duration(seconds: 3),
      title: "This is simple flushbar",
      message: "Hey, you are a registered user now.",
    )..show(context);
  }
输出:
带有图标的小吃店:
有时只显示文本看起来不太好。你想说更多。它可以通过图标来完成,它为文本增加了更多的意义,并使 UI 更好。有时,我们还需要在snackbar上显示不同类型的信息,如警告、错误消息以及它们各自的图标。使用 Flushbar 非常简单,您可以添加任何图标并根据您的选择进行自定义,只需几行代码。
Dart
void show_Icon_Flushbar(BuildContext context) {
    Flushbar(
      icon: Icon(
        Icons.email_outlined,
        color: Colors.white,
        size: 30,
      ),
      backgroundColor: Color(0xFF0277BD),
      duration: Duration(seconds: 4),
      message: "This email is already registered.",
      messageSize: 18,
      titleText: Text("Flushbar with Icon.",
          style: TextStyle(
              fontSize: 16, fontWeight: FontWeight.bold,
            color: Colors.white)),
    )..show(context);
  }
输出:

定制的冲洗条:
好吧,显示小吃店现在已经到了不同的水平。这不仅仅是一个简单的小吃店,而是现在的创意问题。您可以使用Flushbar库自定义小吃吧,其中可能包括浮动小吃吧、具有不同颜色、样式等的小吃吧。您不仅限于使用创意。您可以使用 Flushbar 的参数,例如提供圆形边框、为其添加动画等等。在下面的示例中,我设计了带有渐变颜色的小吃店并给出了盒子阴影。添加动画以使其平滑,并为其提供可关闭的水平方向。
Dart
void show_Custom_Flushbar(BuildContext context) {
    Flushbar(
      duration: Duration(seconds: 3),
      margin: EdgeInsets.all(8),
      padding: EdgeInsets.all(10),

      backgroundGradient: LinearGradient(
        colors: [
          Colors.pink.shade500,
          Colors.pink.shade300,
          Colors.pink.shade100
        ],
        stops: [0.4, 0.7, 1],
      ),
      boxShadows: [
        BoxShadow(
          color: Colors.black45,
          offset: Offset(3, 3),
          blurRadius: 3,
        ),
      ],
      dismissDirection: FlushbarDismissDirection.HORIZONTAL,
      forwardAnimationCurve: Curves.fastLinearToSlowEaseIn,
      title: 'This is a floating Flushbar',
      message: 'Welcome to Flutter community.',
      messageSize: 17,
    )..show(context);
  }
输出:

然而,Flushbar 的创造力并不止于此。如果你想更疯狂,你可以探索它的更多属性。
使用 Flushbar 助手:
以前显示错误或成功消息是一项艰巨的任务和耗时的过程。因此,Flushbar 小部件包含帮助程序。这是一个简单的函数,可以创建一个很酷的小吃店来节省您的时间。让我们看看使用助手创建快餐栏“Information Flushbar ”有多短。
Dart
void show_FlushbarHelper(BuildContext context) {
    FlushbarHelper.createInformation(
        title: "Flushbar Helper",
      message: "This is illegal action.")
      ..show(context);
  }
输出:

带按钮的 Flushbar:
有时,在显示错误消息后,您希望根据错误将用户重定向到不同的页面。因此,可能有任何按钮可以点击错误。如果您可以显示带有快餐栏的按钮怎么办?是否可以?是的,您可以使用Flushbar 的 mainButton属性执行此操作。就像在下面显示的代码中一样,我将文本“Click me”包装在 GestureDetector 中,它是 ButtonBar 小部件的子小部件,分配给Flushbar的 mainButton 属性。当显示此快餐栏时,用户可以单击文本,它会执行您在 onTap 或onPressed 中的任何一个属性中提供的任何操作。
Dart
void show_Button_Flushbar(BuildContext context) {
    Flushbar(
      mainButton: ButtonBar(
        children: [
          GestureDetector(
            onTap: () {
              print("You clicked me!");
            },
            child: Text(
              "Click me",
              style: TextStyle(color: Colors.white),
            ),
          )
        ],
      ),
      backgroundColor: Colors.black,
      title: "Flushbar with Button",
      message: "We require additional information.",
      messageSize: 17,
      duration: Duration(seconds: 4),
    )..show(context);
  }
}
输出:

即使Flutter包含其默认的 Snackbar,也应该首选使用 Flushbar。 Flushbar 涉及的样板代码更少,并且包含无限的功能可以添加。您可以为 Flushbar 小部件的每个参数设置样式,它的易用性会让您大吃一惊。每当您想显示的不仅仅是错误消息或成功消息时,请使用 Flushbar 库。
完整的 Flushbar 教程代码:
Dart
import 'package:flutter/material.dart';
import 'package:another_flushbar/flushbar.dart';
import 'package:another_flushbar/flushbar_helper.dart';

void main() {
  runApp(const MyApp());
}

class MyApp extends StatelessWidget {
  const MyApp({Key? key}) : super(key: key);
  @override
  Widget build(BuildContext context) {
    return MaterialApp(
      debugShowCheckedModeBanner: false,
      title: 'Flutter Flushbar Tutorial',
      theme: ThemeData(
        primarySwatch: Colors.green,
      ),
      home: MyHomePage(),
    );
  }
}

class MyHomePage extends StatefulWidget {
  @override
  State createState() => _MyHomePageState();
}

class _MyHomePageState extends State {
  @override
  Widget build(BuildContext context) {
    return Scaffold(
      appBar: AppBar(title: Text("GeeksForGeeks"), centerTitle: true),
      body: Center(
        child: Column(
          children: [
            SizedBox(
              height: 40,
            ),
            ElevatedButton(
                onPressed: () {

                  // invoking show_Simple_Snackbar function
                  show_Simple_Snackbar(context);
                },
                child: Text("Simple Snackbar with Flushbar")),
            ElevatedButton(
                onPressed: () {

                  // calling function to show flushbar with icon
                  show_Icon_Flushbar(context);
                },
                child: Text("Flushbar with Icon")),
            ElevatedButton(
                onPressed: () {
                  //calling show Customized Flushbar
                  show_Custom_Flushbar(context);
                },
                child: Text("Flushbar with gradient colors")),
            ElevatedButton(
                onPressed: () {

                  // calling function to FlushbarHelper
                  show_FlushbarHelper(context);
                },
                child: Text("Flushbar Helper")),
            ElevatedButton(
                onPressed: () {

                  // calling function to show flushbar with button
                  show_Button_Flushbar(context);
                },
                child: Text("Flushbar with Button"))
          ],
        ),
      ),
    );
  }

  void show_Simple_Snackbar(BuildContext context) {
    Flushbar(
      duration: Duration(seconds: 3),
      title: "This is simple flushbar",
      message: "Hey, you are a registered user now.",
    )..show(context);
  }

  void show_Icon_Flushbar(BuildContext context) {
    Flushbar(
      icon: Icon(
        Icons.email_outlined,
        color: Colors.white,
        size: 30,
      ),
      backgroundColor: Color(0xFF0277BD),
      duration: Duration(seconds: 4),
      message: "This email is already registered.",
      messageSize: 18,
      titleText: Text("Flushbar with Icon.",
          style: TextStyle(
              fontSize: 16,
            fontWeight: FontWeight.bold,
            color: Colors.white)),
    )..show(context);
  }

  void show_Custom_Flushbar(BuildContext context) {
    Flushbar(
      duration: Duration(seconds: 3),
      margin: EdgeInsets.all(8),
      padding: EdgeInsets.all(10),

      backgroundGradient: LinearGradient(
        colors: [
          Colors.pink.shade500,
          Colors.pink.shade300,
          Colors.pink.shade100
        ],
        stops: [0.4, 0.7, 1],
      ),
      boxShadows: [
        BoxShadow(
          color: Colors.black45,
          offset: Offset(3, 3),
          blurRadius: 3,
        ),
      ],

      // All of the previous Flushbars could be dismissed
      // by swiping to any direction
      dismissDirection: FlushbarDismissDirection.HORIZONTAL,

      // The default curve is Curves.easeOut
      forwardAnimationCurve: Curves.fastLinearToSlowEaseIn,
      title: 'This is a floating Flushbar',
      message: 'Welcome to Flutter community.',
      messageSize: 17,
    )..show(context);
  }

  void show_FlushbarHelper(BuildContext context) {
    FlushbarHelper.createInformation(
        title: "Flushbar Helper", message: "This is illegal action.")
      ..show(context);
  }

  void show_Button_Flushbar(BuildContext context) {
    Flushbar(
      mainButton: ButtonBar(
        children: [
          GestureDetector(
            onTap: () {
              print("You clicked me!");
            },
            child: Text(
              "Click me",
              style: TextStyle(color: Colors.white),
            ),
          )
        ],
      ),
      backgroundColor: Colors.black,
      title: "Flushbar with Button",
      message: "We require additional information.",
      messageSize: 17,
      duration: Duration(seconds: 4),
    )..show(context);
  }
}
输出: