在本文中,我们将了解如何在Angular应用中生成和显示QR代码。 QR码是黑白正方形的矩阵,可以由相机或智能手机读取。 QR码可以存储信息和URL,从而使机器人或智能手机用户易于阅读。在业务场景中,QR码可用于共享联系人信息,发送电子邮件,下载应用程序,共享URL和位置。因此,我们需要知道如何为我们的应用生成应用,以跟上市场的发展。
先决条件:必须安装NPM
环境设置:
安装角度CLI并创建一个新的角度项目。
npm i -g @angular/cli
ng new
cd
现在,通过在本地主机上提供应用程序来验证安装:
ng serve -o您应该会看到angular的登录页面,并且一切顺利。现在,我们需要安装并注册其他软件包:
npm install @techiediaries/ngx-qrcode在app.module.ts中注册。进行更改或将以下代码复制到app文件夹中的app.module.ts文件中。
app.module.ts
import { NgModule } from '@angular/core';
import { BrowserModule } from '@angular/platform-browser';
import { AppRoutingModule } from './app-routing.module';
import { AppComponent } from './app.component';

// Import this module
import {NgxQRCodeModule} from '@techiediaries/ngx-qrcode'

@NgModule({
  declarations: [
    AppComponent,
  ],
  imports: [
    BrowserModule,
    AppRoutingModule,
    NgxQRCodeModule    // Register the module
  ],
  providers: [],
  bootstrap: [AppComponent]
})
export class AppModule { }
qrcode.component.ts
import { Component, OnInit } from '@angular/core';
@Component({
  selector: 'app-qrcode',
  templateUrl: './qrcode.component.html',
  styleUrls: ['./qrcode.component.css']
})
export class QrcodeComponent{
  elementType = 'url';
  data = 'https://geeksforgeeks.org/';
}
qrcode.component.html
app.component.html
qrcode.component.ts
import { Component, OnInit } from '@angular/core';
@Component({
  selector: 'app-qrcode',
  templateUrl: './qrcode.component.html',
  styleUrls: ['./qrcode.component.css']
})
export class QrcodeComponent{
  elementType = 'url';
  obj = {
    cellTowers: [
      {
        cellId: 170402199,
        locationAreaCode: 35632,
        mobileCountryCode: 310,
        mobileNetworkCode: 410,
        age: 0,
        signalStrength: -60,
        timingAdvance: 15
      }
    ]
  }
  data = JSON.stringify(this.obj);
}
现在,让我们创建一个新组件以显示带有所需数据的QR码。
ng generate component qrcode这将生成4个新文件。此外,它将通过自动注册组件来更新文件app.module.ts。现在在qrcode.component.ts中添加以下代码:
qrcode.component.ts
import { Component, OnInit } from '@angular/core';
@Component({
  selector: 'app-qrcode',
  templateUrl: './qrcode.component.html',
  styleUrls: ['./qrcode.component.css']
})
export class QrcodeComponent{
  elementType = 'url';
  data = 'https://geeksforgeeks.org/';
}
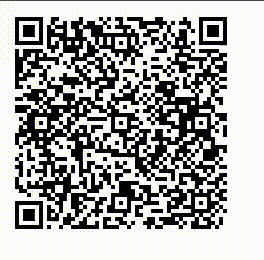
在这里,elementType可以是“ url”,“ img”或“ canvas”。 url类型可以编码字符串类型数据。数据变量存储我们要编码的数据。现在,将以下代码添加到qrcode.component.html :
qrcode.component.html
我们使用了ngx-qrcode标记来放置组件。它以先前的数据作为输入。现在,在app.component.html中添加此组件:
app.component.html
我们可以通过启动应用程序来检查它:
ng serve -o在浏览器上打开http:// localhost:4200 /。您应该看到以下输出。您可以通过使用任何应用程序扫描代码来验证它。
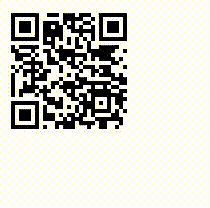
编码JSON数据:我们还可以将JSON数据嵌入QR码中。首先,我们需要创建要嵌入的对象。请注意,只有在使用’url’elementType时,我们才能嵌入字符串数据。因此,我们可以使用JSON.stringify()创建此对象的字符串。请参见下面的qrcode.component.ts代码以更好地理解:
qrcode.component.ts
import { Component, OnInit } from '@angular/core';
@Component({
  selector: 'app-qrcode',
  templateUrl: './qrcode.component.html',
  styleUrls: ['./qrcode.component.css']
})
export class QrcodeComponent{
  elementType = 'url';
  obj = {
    cellTowers: [
      {
        cellId: 170402199,
        locationAreaCode: 35632,
        mobileCountryCode: 310,
        mobileNetworkCode: 410,
        age: 0,
        signalStrength: -60,
        timingAdvance: 15
      }
    ]
  }
  data = JSON.stringify(this.obj);
}
输出: