在Android中,片段是Activity的一部分,代表屏幕上用户界面(UI)的一部分。这是android活动的模块化部分,它对于创建本质上灵活且可根据设备屏幕尺寸自动调整的UI设计非常有帮助。所有设备上的UI灵活性都可以改善用户体验和应用程序的适应性。片段只能存在于活动内部,因为其生命周期取决于宿主活动的生命周期。例如,如果主机活动被暂停,则与该活动相关的片段的所有方法和操作将停止运行,因此该片段也称为子活动。可以动态添加(即在活动运行时)添加,删除或替换片段。
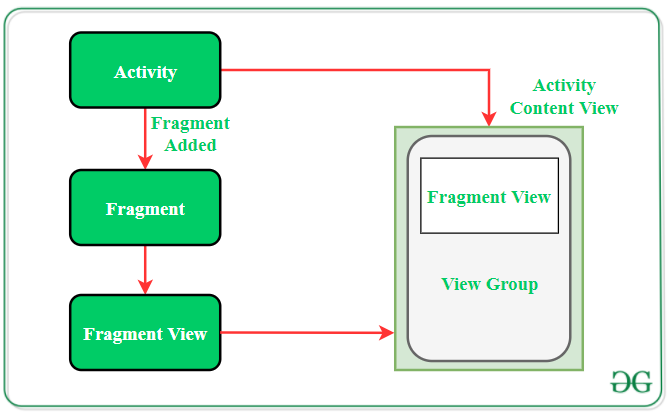
以下是片段与活动交互的图形表示:
Android片段的类型
- 单个片段:在设备屏幕上仅显示一个单一视图。这种片段主要用于手机。
- 列表片段:此片段用于显示列表视图,用户可以从中选择所需的子活动。 Gmail之类的应用程序的菜单抽屉就是此类片段的最佳示例。
- 片段事务:这种片段支持在运行时从一个片段过渡到另一个片段。用户可以在多个片段之间切换,例如切换选项卡。
片段生命周期
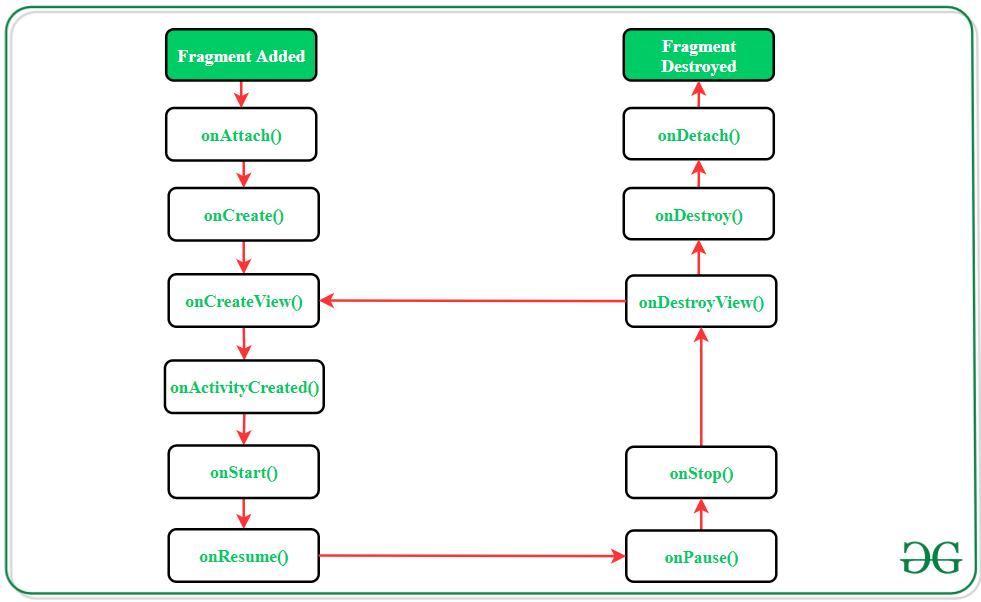
Each fragment has it’s own lifecycle but due to the connection with the Activity it belongs to, the fragment lifecycle is infulenced by the activity’s lifecycle.
Android Fragment的方法
| Methods |
Description |
|---|---|
| onAttach() | The very first method to be called when the fragment has been associated with the activity. This method executes only once during the lifetime of a fragment. |
| onCreate() | This method initializes the fragment by adding all the required attributes and components. |
| onCreateView() | System calls this method to create the user interface of the fragment. The root of the fragment’s layout is returned as the View component by this method to draw the UI. |
| onActivityCreated() | It indicates that the activity has been created in which the fragment exists. View hierarchy of the fragment also instantiated before this function call. |
| onStart() | The system invokes this method to make the fragment visible on the user’s device. |
| onResume() | This method is called to make the visible fragment interactive. |
| onPause() | It indicates that the user is leaving the fragment. System call this method to commit the changes made to the fragment. |
| onStop() | Method to terminate the functioning and visibility of fragment from the user’s screen. |
| onDestroyView() | System calls this method to clean up all kinds of resources as well as view hierarchy associated with the fragment. |
| onDestroy() | It is called to perform the final clean up of fragment’s state and its lifecycle. |
| onDetach() | The system executes this method to disassociate the fragment from its host activity. |
Android片段示例
片段始终嵌入在“活动”中,即,它们被添加到它们所驻留的活动的布局中。可以将多个片段添加到一个活动中。该任务可以通过两种方式执行:
- 静态:在活动的XML文件中明确提及该片段。这种类型的片段在运行期间无法替换。
- 动态地: FragmentManager用于将片段嵌入活动,这些活动允许在运行时添加,删除或替换片段。
几乎所有的android应用都使用动态添加片段,以改善用户体验。以下是在一个活动中添加2个片段的分步实现。当活动出现在屏幕上时,默认片段将可见,并且用户可以在运行时在这两个片段之间切换。
Note: Following steps are performed on Android Studio version 4.0
步骤1:创建一个新项目
- 单击文件,然后单击新建=>新建项目。
- 选择清空活动
- 选择语言作为Java
- 根据需要选择最小的SDK。
步骤2:修改字符串.xml文件
此文件中列出了活动中使用的所有字符串
XML
    GfG | Fragment in Android
    Two Fragments in One Activity
    Display First Fragment
    Display Second Fragment
    Displaying contents of the First Fragment
    Displaying contents of the Second Fragment
XML
Java
import android.app.Fragment;
import android.os.Bundle;
import android.view.LayoutInflater;
import android.view.View;
import android.view.ViewGroup;

public class FragmentOne extends Fragment {
    @Override
    public View onCreateView(LayoutInflater inflater, ViewGroup container, Bundle savedInstanceState) {

        // inflating the layout of the fragment
        // and returning the view component
        return inflater.inflate(R.layout.fragment_one, container, false);
    }
}
Java
import android.app.Fragment;
import android.os.Bundle;
import android.view.LayoutInflater;
import android.view.View;
import android.view.ViewGroup;

public class FragmentTwo extends Fragment{
    @Override
    public View onCreateView(LayoutInflater inflater, ViewGroup container, Bundle savedInstanceState) {

        // inflating the layout of the fragment
        // and returning the view component
        return inflater.inflate(R.layout.fragment_two, container, false);
    }
}
XML
XML
Java
import android.os.Bundle;
import android.view.View;
import android.app.Fragment;
import android.app.FragmentManager;
import android.app.FragmentTransaction;
import androidx.appcompat.app.AppCompatActivity;

public class MainActivity extends AppCompatActivity {

    @Override
    protected void onCreate(Bundle savedInstanceState) {
        super.onCreate(savedInstanceState);

        setContentView(R.layout.activity_main);
    }

    // method for displaying the appropriate
    // fragment according to the clicked button
    public void selectFragment(View view) {

        // creating object for Fragment
        Fragment fr;

        // displaying first fragment
        // if button1 is clicked
        if(view == findViewById(R.id.button1)) {
            fr = new FragmentOne();
        }

        // displaying second fragment
        // if button2 is clicked
        else {
            fr = new FragmentTwo();
        }

        FragmentManager fm = getFragmentManager();

        // fragment transaction to add or replace
        // fragments while activity is running
        FragmentTransaction fragmentTransaction = fm.beginTransaction();
        fragmentTransaction.replace(R.id.fragment_section, fr);

        // making a commit after the transaction
        // to assure that the change is effective
        fragmentTransaction.commit();
    }
}
步骤3:使用activity_main.xml文件
打开activity_main.xml文件,并向其中添加2个按钮,这些按钮将用于在2个片段之间进行切换。此外,在活动布局中添加fragment元素。这是将显示片段的区域。
XML格式
The android:name tag under the
步骤4:创建两个片段类
这些文件仅包含onCreateView()方法来增加片段的UI并返回片段布局的根。如果该片段没有任何UI,它将返回null。
1.第一片段类:
Java
import android.app.Fragment;
import android.os.Bundle;
import android.view.LayoutInflater;
import android.view.View;
import android.view.ViewGroup;

public class FragmentOne extends Fragment {
    @Override
    public View onCreateView(LayoutInflater inflater, ViewGroup container, Bundle savedInstanceState) {

        // inflating the layout of the fragment
        // and returning the view component
        return inflater.inflate(R.layout.fragment_one, container, false);
    }
}
2.第二片段类:
Java
import android.app.Fragment;
import android.os.Bundle;
import android.view.LayoutInflater;
import android.view.View;
import android.view.ViewGroup;

public class FragmentTwo extends Fragment{
    @Override
    public View onCreateView(LayoutInflater inflater, ViewGroup container, Bundle savedInstanceState) {

        // inflating the layout of the fragment
        // and returning the view component
        return inflater.inflate(R.layout.fragment_two, container, false);
    }
}
步骤5:为两个片段创建布局
为两个片段创建两个布局资源文件。 Fragment在屏幕上显示文本,并具有背景色以区分其在“活动”布局中的区域。下面是实现此布局的代码。
1.fragment_one.xml文件:
XML格式
2.fragment_two.xml文件:
XML格式
步骤6:使用MainActivity。 Java文件
现在,将在MainActivity类中定义用于执行单击操作的按钮的功能。此外,此文件中还提到了在运行时替换片段的代码。下面是实现此步骤的代码。
Java
import android.os.Bundle;
import android.view.View;
import android.app.Fragment;
import android.app.FragmentManager;
import android.app.FragmentTransaction;
import androidx.appcompat.app.AppCompatActivity;

public class MainActivity extends AppCompatActivity {

    @Override
    protected void onCreate(Bundle savedInstanceState) {
        super.onCreate(savedInstanceState);

        setContentView(R.layout.activity_main);
    }

    // method for displaying the appropriate
    // fragment according to the clicked button
    public void selectFragment(View view) {

        // creating object for Fragment
        Fragment fr;

        // displaying first fragment
        // if button1 is clicked
        if(view == findViewById(R.id.button1)) {
            fr = new FragmentOne();
        }

        // displaying second fragment
        // if button2 is clicked
        else {
            fr = new FragmentTwo();
        }

        FragmentManager fm = getFragmentManager();

        // fragment transaction to add or replace
        // fragments while activity is running
        FragmentTransaction fragmentTransaction = fm.beginTransaction();
        fragmentTransaction.replace(R.id.fragment_section, fr);

        // making a commit after the transaction
        // to assure that the change is effective
        fragmentTransaction.commit();
    }
}