用flutter填充小部件的功能恰如其名,它在小部件或一堆小部件周围增加了填充或空白。我们可以通过将其放置为Padding小部件的子代来对任何小部件应用padding。填充内的子小部件的大小受周围添加空白空间后剩余多少空间的限制。填充小部件通过使用抽象的EdgeInsetsGeometry类在任何小部件周围添加空白区域。
填充类的构造函数:
const Padding(
{Key key,
@required EdgeInsetsGeometry padding,
Widget child}
)
填充小部件的属性:
- child:此属性仅使用一个小部件,因为要显示的对象在屏幕上的Padding小部件内。
- padding:此属性将EdgeInsetsGeometry类保留为对象,以在小部件周围添加空白空间。
范例1:
Dart
import 'package:flutter/material.dart';

//Imported matrial design libery
void main() {
  runApp(
    //App widget tree starts from here
    MaterialApp(
      home: Scaffold(
        appBar: AppBar(
          title: Text('GeeksforGeeks'),
          centerTitle: true,
          backgroundColor: Colors.greenAccent[400],
        ), //AppBar
        body: Center(
          child: Row(
            children: [
              Container(
                width: 200,
                height: 200,
                color: Colors.red,
              ), //Container
              /*Padding widget*/
              Padding(
                padding: EdgeInsets.fromLTRB(20, 0, 20, 0),
                child: Container(
                  padding: const EdgeInsets.all(0.0),
                  color: Colors.green,
                  width: 80.0,
                  height: 80.0,
                ), //Container
              ), //Padding
              Container(
                width: 100,
                height: 100,
                color: Colors.red,
              ) //Container
            ], //[]
          ), //Row
        ), //Column
      ), //Scaffols
    ), //MaterialApp
  );
}
Dart
import 'package:flutter/material.dart';

//Importing material design liberary
void main() {
  runApp(
    //Widget tree starts here
    MaterialApp(
      home: Scaffold(
        appBar: AppBar(
          title: Text('GeeksforGeeks'),
          centerTitle: true,
          backgroundColor: Colors.greenAccent[400],
        ), //AppBar
        //Padding is the parent widget in the app body
        body: Padding(
          padding: EdgeInsets.all(120),
          child: Container(
            padding: const EdgeInsets.fromLTRB(50, 120, 10, 10),
            color: Colors.blue,
            width: 200.0,
            height: 200.0,
            child: Text(
              'GeeksforGeeks',
              style: TextStyle(color: Colors.white),
            ), //Text
          ), //Container
        ), //Padding
      ), //Scaffold
    ), //MaterialApp
  );
}
输出:
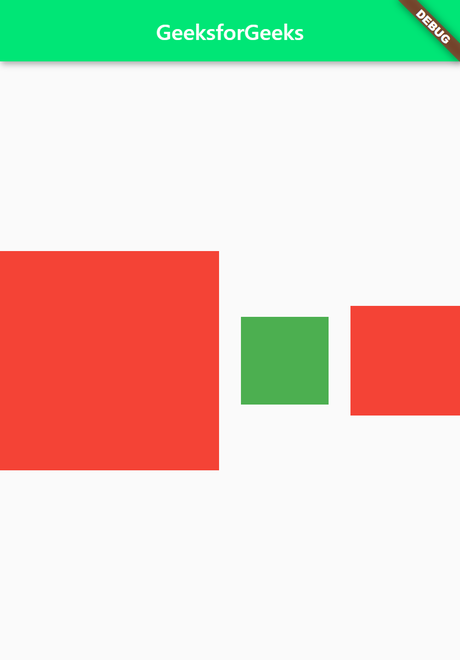
说明:应用程序主体中的顶级父级小部件是Center ,它将Row作为子级。在“行”窗口小部件中,我们有两个红色的容器,第一个容器的高度和宽度分别为200,第二个容器的高度和宽度分别为100像素。在这两个容器之间,我们有一个Padding小部件,其padding属性使用EdgeInsets.fromLTRB(20,0,20,0)为其从左侧和右侧填充20个像素。内部的子项是尺寸为80X80的绿色Container窗口小部件,内部没有填充。
范例2:
Dart
import 'package:flutter/material.dart';

//Importing material design liberary
void main() {
  runApp(
    //Widget tree starts here
    MaterialApp(
      home: Scaffold(
        appBar: AppBar(
          title: Text('GeeksforGeeks'),
          centerTitle: true,
          backgroundColor: Colors.greenAccent[400],
        ), //AppBar
        //Padding is the parent widget in the app body
        body: Padding(
          padding: EdgeInsets.all(120),
          child: Container(
            padding: const EdgeInsets.fromLTRB(50, 120, 10, 10),
            color: Colors.blue,
            width: 200.0,
            height: 200.0,
            child: Text(
              'GeeksforGeeks',
              style: TextStyle(color: Colors.white),
            ), //Text
          ), //Container
        ), //Padding
      ), //Scaffold
    ), //MaterialApp
  );
}
输出:

说明:在此应用程序中,该应用程序正文包含的所有内容均为Padding小部件。内部的Padding属性使用EdgeInsets.all(120) ,它将在所有方向上增加120像素的空白空间。孩子的财产拿着一个蓝色的容器。 Container的高度和宽度分别为200像素,其填充属性包含const EdgeInsets.fromLTRB(50,120,10,10) ,它提供了50 px,120 px,10 px和10 px的空白空间。分别为左,上,右和下方向。周围的填充物将“ GeeksforGeeks”保持在其所在的容器内。
想要一个节奏更快,更具竞争性的环境来学习Android的基础知识吗?
单击此处,前往由我们的专家精心策划的指南,以使您立即做好行业准备!