在上一篇文章Android Jetpack中的View Binding中,已经讨论了为什么在Android项目中获得ViewBinding功能会带来很多好处。但是,当涉及到带有片段的ViewBinding时,情况就会发生变化。因为Fragment的生命周期不同,而Activity的生命周期也不同,所以这里的内容也与上述文章中讨论的相同,片段布局的命名约定更改为Pascal大小写,而片段布局的属性更改为驼峰大小写。例如, fragment1.xml-> Fragment1Binding和片段布局下的edit_text (id)更改为eEditText (驼峰式),因此在本文中,我们将使用Fragments讨论ViewBinding。下面提供了一个示例视频,以使您对我们在本文中将要做的事情有个大概的了解。请注意,我们将使用Kotlin语言实施此项目。
分步实施
步骤1:创建一个新的空活动项目
- 使用Android Studio创建一个空的Activity Android Studio项目。参考Android |如何在Android Studio中创建/启动新项目?
步骤2:启用ViewBinding功能
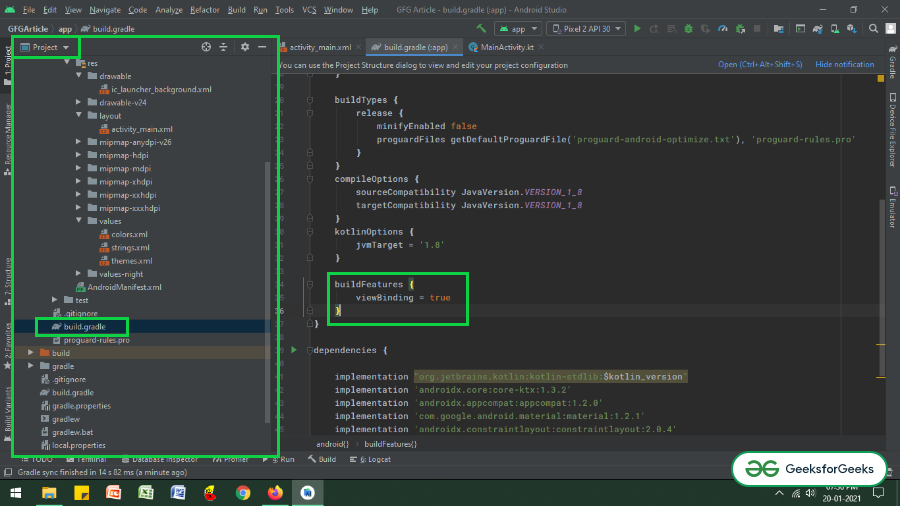
- 通过在应用程序级别的build.gradle文件中调用以下代码段来启用ViewBinding功能,然后单击右上角出现的“立即同步”按钮。
buildFeatures {
viewBinding = true
}
- 如果无法找到应用程序级build.gradle文件,则请参考下图。调用上述构建功能。
步骤3:使用activity_main.xml文件
- 活动的主要布局包含两个按钮,用于切换片段1和片段2,以及一个Framelayout,用于将片段保存在CardView中。还有一个“提交”按钮,用于检查何时按下时提交了其片段的数据。
- 要实现相同的功能,请在activity_main.xml文件中调用以下代码。
XML
XML
XML
Kotlin
import android.os.Bundle
import android.view.LayoutInflater
import android.view.View
import android.view.ViewGroup
import android.widget.Button
import android.widget.Toast
import androidx.fragment.app.Fragment

// Enter your package name here
import com.adityamshidlyali.gfgarticle.databinding.Fragment1Binding

class ExampleFragment1 : Fragment() {

    // assign the _binding variable initially to null and
    // also when the view is destroyed again it has to be set to null
    private var _binding: Fragment1Binding? = null

    // with the backing property of the kotlin we extract
    // the non null value of the _binding
    private val binding get() = _binding!!

    override fun onCreateView(
            inflater: LayoutInflater, container: ViewGroup?,
            savedInstanceState: Bundle?
    ): View {

        // inflate the layout and bind to the _binding
        _binding = Fragment1Binding.inflate(inflater, container, false)

        // retrieve the entered data by the user
        binding.doneButton1.setOnClickListener {
            val str: String = binding.editText1.text.toString()
            if (str.isNotEmpty()) {
                Toast.makeText(activity, str, Toast.LENGTH_SHORT).show()
            } else {
                Toast.makeText(activity, "Please Enter Data", Toast.LENGTH_SHORT).show()
            }
        }

        // handle the button from the host activity using findViewById method
        val submitButton: Button = activity!!.findViewById(R.id.submit_button)
        submitButton.setOnClickListener {
            Toast.makeText(activity, "Host Activity Element Clicked from Fragment 1", Toast.LENGTH_SHORT).show()
        }

        // Inflate the layout for this fragment
        return binding.root
    }

    override fun onDestroyView() {
        super.onDestroyView()
        _binding = null
    }
}
Kotlin
import android.os.Bundle
import android.view.LayoutInflater
import android.view.View
import android.view.ViewGroup
import android.widget.Button
import android.widget.Toast
import androidx.fragment.app.Fragment

// Enter your package name here
import com.adityamshidlyali.gfgarticle.databinding.Fragment2Binding

class ExampleFragment2 : Fragment() {

    // assign the _binding variable initially to null and
    // also when the view is destroyed again it has to be
    // set to null
    private var _binding: Fragment2Binding? = null

    // with the backing property of the kotlin
    // we extract
    // the non null value of the _binding
    private val binding get() = _binding!!

    override fun onCreateView(
            inflater: LayoutInflater, container: ViewGroup?,
            savedInstanceState: Bundle?
    ): View {

        // inflate the layout and bind to the _binding
        _binding = Fragment2Binding.inflate(inflater, container, false)

        // retrieve the entered data by the user
        binding.doneButton2.setOnClickListener {
            val str: String = binding.editText2.text.toString()
            if (str.isNotEmpty()) {
                Toast.makeText(activity, str, Toast.LENGTH_SHORT).show()
            } else {
                Toast.makeText(activity, "Please Enter Data", Toast.LENGTH_SHORT).show()
            }
        }

        // handle the button from the host activity using findViewById method
        val submitButton: Button = activity!!.findViewById(R.id.submit_button)
        submitButton.setOnClickListener {
            Toast.makeText(activity, "Host Activity Element Clicked from Fragment 2", Toast.LENGTH_SHORT).show()
        }

        // Inflate the layout for this fragment
        return binding.root
    }

    override fun onDestroyView() {
        super.onDestroyView()
        _binding = null
    }
}
Kotlin
import androidx.appcompat.app.AppCompatActivity
import android.os.Bundle
import androidx.fragment.app.Fragment
import com.adityamshidlyali.gfgarticle.databinding.ActivityMainBinding

class MainActivity : AppCompatActivity() {

    // create binding instance for the activity_main.xml
    private lateinit var binding: ActivityMainBinding

    override fun onCreate(savedInstanceState: Bundle?) {
        super.onCreate(savedInstanceState)
        binding = ActivityMainBinding.inflate(layoutInflater)
        setContentView(binding.root)

        // when app is initially opened the Fragment 1 should be visible
        supportFragmentManager.beginTransaction().apply {
            replace(binding.fragmentHolder.id, ExampleFragment1())
            addToBackStack(null)
            commit()
        }

        // handle the fragment 2 button to toggle the fragment 2
        binding.fragment1B.setOnClickListener {
            changeFragment(ExampleFragment1())
        }

        // handle the fragment 2 button to toggle the fragment 2
        binding.fragment2B.setOnClickListener {
            changeFragment(ExampleFragment1())
        }
    }

    // function to change the fragment which is used to reduce the lines of code
    private fun changeFragment(fragmentToChange: Fragment): Unit {
        supportFragmentManager.beginTransaction().apply {
            replace(binding.fragmentHolder.id, fragmentToChange)
            addToBackStack(null)
            commit()
        }
    }
}
输出界面:

步骤4:创建两个片段
- 创建两个片段,其中包括表示片段编号编辑文本的文本视图和一个按钮。要实现每个片段的UI,您可以参考以下代码。
- 片段1:
XML格式
- 片段2:
XML格式
步骤5:使用Fragments.kt文件
- 首先,可为空的绑定变量最初被分配为null,并且当片段的视图被破坏时,必须再次将其设置为null(在本例中为_binding )。
- 为了避免对可为空的绑定对象进行null检查,通过使用kotlin的backing属性,我们制作了绑定变量的另一个副本(在本例中为binding )。
- 但是,如果该片段想从主机活动访问视图,则可以使用findViewById()方法来完成。
- 在每个片段的.kt文件中调用以下代码。添加了注释以便更好地理解。
- 片段1:
科特林
import android.os.Bundle
import android.view.LayoutInflater
import android.view.View
import android.view.ViewGroup
import android.widget.Button
import android.widget.Toast
import androidx.fragment.app.Fragment

// Enter your package name here
import com.adityamshidlyali.gfgarticle.databinding.Fragment1Binding

class ExampleFragment1 : Fragment() {

    // assign the _binding variable initially to null and
    // also when the view is destroyed again it has to be set to null
    private var _binding: Fragment1Binding? = null

    // with the backing property of the kotlin we extract
    // the non null value of the _binding
    private val binding get() = _binding!!

    override fun onCreateView(
            inflater: LayoutInflater, container: ViewGroup?,
            savedInstanceState: Bundle?
    ): View {

        // inflate the layout and bind to the _binding
        _binding = Fragment1Binding.inflate(inflater, container, false)

        // retrieve the entered data by the user
        binding.doneButton1.setOnClickListener {
            val str: String = binding.editText1.text.toString()
            if (str.isNotEmpty()) {
                Toast.makeText(activity, str, Toast.LENGTH_SHORT).show()
            } else {
                Toast.makeText(activity, "Please Enter Data", Toast.LENGTH_SHORT).show()
            }
        }

        // handle the button from the host activity using findViewById method
        val submitButton: Button = activity!!.findViewById(R.id.submit_button)
        submitButton.setOnClickListener {
            Toast.makeText(activity, "Host Activity Element Clicked from Fragment 1", Toast.LENGTH_SHORT).show()
        }

        // Inflate the layout for this fragment
        return binding.root
    }

    override fun onDestroyView() {
        super.onDestroyView()
        _binding = null
    }
}
- 片段2:
科特林
import android.os.Bundle
import android.view.LayoutInflater
import android.view.View
import android.view.ViewGroup
import android.widget.Button
import android.widget.Toast
import androidx.fragment.app.Fragment

// Enter your package name here
import com.adityamshidlyali.gfgarticle.databinding.Fragment2Binding

class ExampleFragment2 : Fragment() {

    // assign the _binding variable initially to null and
    // also when the view is destroyed again it has to be
    // set to null
    private var _binding: Fragment2Binding? = null

    // with the backing property of the kotlin
    // we extract
    // the non null value of the _binding
    private val binding get() = _binding!!

    override fun onCreateView(
            inflater: LayoutInflater, container: ViewGroup?,
            savedInstanceState: Bundle?
    ): View {

        // inflate the layout and bind to the _binding
        _binding = Fragment2Binding.inflate(inflater, container, false)

        // retrieve the entered data by the user
        binding.doneButton2.setOnClickListener {
            val str: String = binding.editText2.text.toString()
            if (str.isNotEmpty()) {
                Toast.makeText(activity, str, Toast.LENGTH_SHORT).show()
            } else {
                Toast.makeText(activity, "Please Enter Data", Toast.LENGTH_SHORT).show()
            }
        }

        // handle the button from the host activity using findViewById method
        val submitButton: Button = activity!!.findViewById(R.id.submit_button)
        submitButton.setOnClickListener {
            Toast.makeText(activity, "Host Activity Element Clicked from Fragment 2", Toast.LENGTH_SHORT).show()
        }

        // Inflate the layout for this fragment
        return binding.root
    }

    override fun onDestroyView() {
        super.onDestroyView()
        _binding = null
    }
}
步骤6:使用MainActivity.kt文件
- 在MainActivity.kt文件中,仅实现了片段的事务功能。请参阅以下代码及其输出,以更好地理解。
科特林
import androidx.appcompat.app.AppCompatActivity
import android.os.Bundle
import androidx.fragment.app.Fragment
import com.adityamshidlyali.gfgarticle.databinding.ActivityMainBinding

class MainActivity : AppCompatActivity() {

    // create binding instance for the activity_main.xml
    private lateinit var binding: ActivityMainBinding

    override fun onCreate(savedInstanceState: Bundle?) {
        super.onCreate(savedInstanceState)
        binding = ActivityMainBinding.inflate(layoutInflater)
        setContentView(binding.root)

        // when app is initially opened the Fragment 1 should be visible
        supportFragmentManager.beginTransaction().apply {
            replace(binding.fragmentHolder.id, ExampleFragment1())
            addToBackStack(null)
            commit()
        }

        // handle the fragment 2 button to toggle the fragment 2
        binding.fragment1B.setOnClickListener {
            changeFragment(ExampleFragment1())
        }

        // handle the fragment 2 button to toggle the fragment 2
        binding.fragment2B.setOnClickListener {
            changeFragment(ExampleFragment1())
        }
    }

    // function to change the fragment which is used to reduce the lines of code
    private fun changeFragment(fragmentToChange: Fragment): Unit {
        supportFragmentManager.beginTransaction().apply {
            replace(binding.fragmentHolder.id, fragmentToChange)
            addToBackStack(null)
            commit()
        }
    }
}
输出:
想要一个节奏更快,更具竞争性的环境来学习Android的基础知识吗?
单击此处前往由我们的专家精心策划的指南,以使您立即做好行业准备!