在 Tensorflow 中保存和加载模型
在测试之前和之后都可以保存模型的开发。因此,模型将从停止的地方开始,以消除冗长的训练时间。如果您保存它,您仍然可以共享您的模型并让其他人复制它。大多数机器学习专业人士在发布测试模型和技术时都会分享以下内容:
- 创建模型的代码
- 模型的训练权重
共享此信息可让其他人更好地了解模型的运作方式并使用新数据对其进行测试。
除此之外,教授机器学习模型将花费大量时间和精力。但是,关闭笔记本电脑或机器会导致所有这些重量和更多重量随着内存的刷新而消失。保存模型以优化可重用性以充分利用您的时间非常重要。

一旦我们完成对模型的评估,我们就可以继续保存它。
我们可以保存和加载机器学习模型的方法如下:
- 使用内置函数model.save()
- 使用内置函数model.save_weights()
使用 save() 方法
现在我们可以通过调用 save() 方法并传入文件路径作为参数来保存我们的模型。这将保存模型的
- 模型架构
- 模型权重
- 模型优化器状态(从我们停止的地方恢复)
Syntax: tensorflow.keras.X.save(location/model_name)
- Here X refers to Sequential, Functional Model, or Model subclass. All of them have the save() method.
- The location along with the model name is passed as a parameter in this method. If only the model name is passed then the model is saved in the same location as that of the Python file.
我们可以加载使用 tensorflow 模块中存在的load_method()保存的模型。
Syntax: tensorflow.keras.models.load_model(location/model_name)
The location along with the model name is passed as a parameter in this method.
注意:如果我们指定“.h5”,模型将以hdf5格式保存;如果没有指定扩展名,模型将以 TensorFlow 原生格式保存。
使用 save_weights() 方法
现在您可以使用 save_weights() 方法简单地保存所有层的权重。它保存模型中包含的层的权重。建议使用 save() 方法保存 h5 模型,而不是 save_weights() 方法使用 tensorflow 保存模型。但是,也可以使用 save_weights() 方法保存 h5 模型。
Syntax: tensorflow.keras.Model.save_weights(location/weights_name)
The location along with the weights name is passed as a parameter in this method. If only the weights name is passed then it is saved in the same location as that of the Python file.
下面是我们保存初始模型权重的程序:
Python3
# import module
import tensorflow

# create object
model=tensorflow.keras.Model()

# assign location
path='Weights_folder/Weights'

# save
model.save_weights(path)
Python3
# import required modules
import tensorflow as tf
import numpy as np
import matplotlib.pyplot as plt
from tensorflow.keras.layers import Input, Conv2D, Dense, Flatten, Dropout
from tensorflow.keras.layers import GlobalMaxPooling2D, MaxPooling2D
from tensorflow.keras.layers import BatchNormalization
from tensorflow.keras.models import Model
from tensorflow.keras.models import load_model
Python3
# Load in the data
cifar10 = tf.keras.datasets.cifar10

# Distribute it to train and test set
(x_train, y_train), (x_test, y_test) = cifar10.load_data()
print(x_train.shape, y_train.shape, x_test.shape, y_test.shape)

# Reduce pixel values
x_train, x_test = x_train / 255.0, x_test / 255.0

# flatten the label values
y_train, y_test = y_train.flatten(), y_test.flatten()
Python3
# number of classes
K = len(set(y_train))
# calculate total number of classes for output layer
print("number of classes:", K)

# Build the model using the functional API
# input layer
i = Input(shape=x_train[0].shape)
x = Conv2D(32, (3, 3), activation='relu', padding='same')(i)
x = BatchNormalization()(x)
x = Conv2D(32, (3, 3), activation='relu', padding='same')(x)
x = BatchNormalization()(x)
x = MaxPooling2D((2, 2))(x)

x = Conv2D(64, (3, 3), activation='relu', padding='same')(x)
x = BatchNormalization()(x)
x = Conv2D(64, (3, 3), activation='relu', padding='same')(x)
x = BatchNormalization()(x)
x = MaxPooling2D((2, 2))(x)

x = Conv2D(128, (3, 3), activation='relu', padding='same')(x)
x = BatchNormalization()(x)
x = Conv2D(128, (3, 3), activation='relu', padding='same')(x)
x = BatchNormalization()(x)
x = MaxPooling2D((2, 2))(x)

x = Flatten()(x)
x = Dropout(0.2)(x)

# Hidden layer
x = Dense(1024, activation='relu')(x)
x = Dropout(0.2)(x)

# last hidden layer i.e.. output layer
x = Dense(K, activation='softmax')(x)

model = Model(i, x)
model.summary()
Python3
# saving and loading the .h5 model

# save model
model.save('gfgModel.h5')
print('Model Saved!')

# load model
savedModel=load_model('gfgModel.h5')
savedModel.summary()
Python3
# saving and loading the model weights

# save model
model.save_weights('gfgModelWeights')
print('Model Saved!')

# load model
savedModel = model.load_weights('gfgModelWeights')
print('Model Loaded!')
Python3
# saving and loading the .h5 model

# save model
model.save_weights('gfgModelWeights.h5')
print('Model Saved!')

# load model
savedModel = model.load_weights('gfgModelWeights.h5')
print('Model Loaded!')
它将创建一个名为权重文件夹的新文件夹,并将所有权重以 Tensorflow 原生格式保存为我的权重。总共会有三个文件夹。
- 检查点:这是一个具有以下文本的人类可读文件,
model_checkpoint_path: "Weights"
all_model_checkpoint_paths: "Weights"- data-00000-of-00001:此文件包含模型的实际权重。
- index:这个文件告诉 TensorFlow 哪些权重存储在哪里。
我们可以加载使用 load_weights() 方法保存的模型。
句法:
tensorflow.keras.Model.load_weights(location/weights_name)
The location along with the weights name is passed as a parameter in this method.
注意:在为模型加载权重时,首先要确保模型的设计是正确的。我们不能将模型(具有 2 个密集层)的权重加载到具有 1 个密集层的序列模型中,因为两者不一致。
下面是一个示例,描述了上述所有保存和加载模型的方法。在这里,我们开发一个模型并使用内置数据集对其进行训练,最后以各种方式再次保存和加载模型。
导入模块。
蟒蛇3
# import required modules
import tensorflow as tf
import numpy as np
import matplotlib.pyplot as plt
from tensorflow.keras.layers import Input, Conv2D, Dense, Flatten, Dropout
from tensorflow.keras.layers import GlobalMaxPooling2D, MaxPooling2D
from tensorflow.keras.layers import BatchNormalization
from tensorflow.keras.models import Model
from tensorflow.keras.models import load_model
加载和拆分数据集,然后更改数据的某些属性。
蟒蛇3
# Load in the data
cifar10 = tf.keras.datasets.cifar10

# Distribute it to train and test set
(x_train, y_train), (x_test, y_test) = cifar10.load_data()
print(x_train.shape, y_train.shape, x_test.shape, y_test.shape)

# Reduce pixel values
x_train, x_test = x_train / 255.0, x_test / 255.0

# flatten the label values
y_train, y_test = y_train.flatten(), y_test.flatten()
输出:

通过添加层来开发模型。
蟒蛇3
# number of classes
K = len(set(y_train))
# calculate total number of classes for output layer
print("number of classes:", K)

# Build the model using the functional API
# input layer
i = Input(shape=x_train[0].shape)
x = Conv2D(32, (3, 3), activation='relu', padding='same')(i)
x = BatchNormalization()(x)
x = Conv2D(32, (3, 3), activation='relu', padding='same')(x)
x = BatchNormalization()(x)
x = MaxPooling2D((2, 2))(x)

x = Conv2D(64, (3, 3), activation='relu', padding='same')(x)
x = BatchNormalization()(x)
x = Conv2D(64, (3, 3), activation='relu', padding='same')(x)
x = BatchNormalization()(x)
x = MaxPooling2D((2, 2))(x)

x = Conv2D(128, (3, 3), activation='relu', padding='same')(x)
x = BatchNormalization()(x)
x = Conv2D(128, (3, 3), activation='relu', padding='same')(x)
x = BatchNormalization()(x)
x = MaxPooling2D((2, 2))(x)

x = Flatten()(x)
x = Dropout(0.2)(x)

# Hidden layer
x = Dense(1024, activation='relu')(x)
x = Dropout(0.2)(x)

# last hidden layer i.e.. output layer
x = Dense(K, activation='softmax')(x)

model = Model(i, x)
model.summary()
输出:

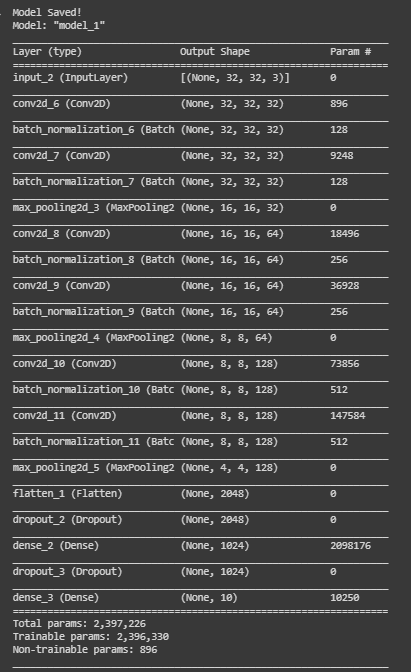
使用 save() 方法以 h5 格式保存模型。
蟒蛇3
# saving and loading the .h5 model

# save model
model.save('gfgModel.h5')
print('Model Saved!')

# load model
savedModel=load_model('gfgModel.h5')
savedModel.summary()
输出:
使用 save_weights() 方法保存模型权重。
蟒蛇3
# saving and loading the model weights

# save model
model.save_weights('gfgModelWeights')
print('Model Saved!')

# load model
savedModel = model.load_weights('gfgModelWeights')
print('Model Loaded!')
输出:

使用 save_weights() 方法将模型保存为 h5 格式模型。
蟒蛇3
# saving and loading the .h5 model

# save model
model.save_weights('gfgModelWeights.h5')
print('Model Saved!')

# load model
savedModel = model.load_weights('gfgModelWeights.h5')
print('Model Loaded!')
输出:
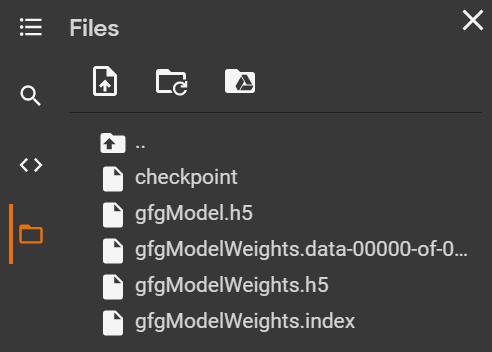
上述模型是在 Google colab 中开发的。因此,在保存模型时,它们会被临时存储并可以下载。以下是保存的模型和权重: