Python OpenCV – 形态学运算
Python OpenCV 形态学运算是基于形状处理图像的图像处理技术之一。这种处理策略通常在二值图像上执行。
基于OpenCV的形态学运算如下:
- 侵蚀
- 扩张
- 开幕式
- 结束
- 形态梯度
- 礼帽
- 黑帽
对于所有上述技术,两个重要的要求是二进制图像和用于在图像上滑动的内核结构元素。
用于演示的图像:

使用的图像
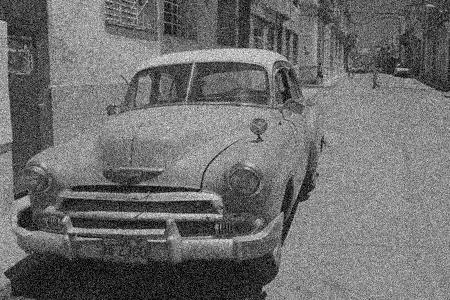
使用的图像
侵蚀
侵蚀主要涉及侵蚀图像的外表面(前景)。由于二值图像仅包含 0 和 255 两个像素,因此主要涉及侵蚀图像的前景,建议将前景设为白色。侵蚀的厚度取决于定义的内核的大小和形状。我们可以利用 NumPy 的 one()函数来定义内核。还有许多其他函数,例如 NumPy zeros、自定义内核以及其他可用于根据手头问题定义内核的函数。
代码:
- 如图所示导入必要的包
- 阅读图片
- 将图像二值化。
- 由于建议将前景保持为白色,因此我们正在对二值化图像执行 OpenCV 的反转操作以使前景为白色。
- 我们正在定义一个 5×5 的内核,其中填充了 1
- 然后我们可以利用 Opencv erode()函数来侵蚀图像的边界。
Python3
# import the necessary packages
import cv2
import numpy as np
import matplotlib.pyplot as plt

# read the image
img = cv2.imread(r"Downloads\test (2).png", 0)

# binarize the image
binr = cv2.threshold(img, 0, 255, cv2.THRESH_BINARY+cv2.THRESH_OTSU)[1]

# define the kernel
kernel = np.ones((5, 5), np.uint8)

# invert the image
invert = cv2.bitwise_not(binr)

# erode the image
erosion = cv2.erode(invert, kernel,
                    iterations=1)

# print the output
plt.imshow(erosion, cmap='gray')
Python3
import cv2

# read the image
img = cv2.imread(r"path to image", 0)

# binarize the image
binr = cv2.threshold(img, 0, 255, cv.THRESH_BINARY+cv.THRESH_OTSU)[1]

# define the kernel
kernel = np.ones((3, 3), np.uint8)

# invert the image
invert = cv2.bitwise_not(binr)

# dilate the image
dilation = cv2.dilate(invert, kernel, iterations=1)

# print the output
plt.imshow(dilation, cmap='gray')
Python3
# import the necessary packages
import cv2

# read the image
img = cv2.imread(r"\noise.png", 0)

# binarize the image
binr = cv2.threshold(img, 0, 255,
                     cv2.THRESH_BINARY+cv2.THRESH_OTSU)[1]

# define the kernel
kernel = np.ones((3, 3), np.uint8)

# opening the image
opening = cv2.morphologyEx(binr, cv2.MORPH_OPEN,
                           kernel, iterations=1)
# print the output
plt.imshow(opening, cmap='gray')
Python3
# import the necessary packages
import cv2

# read the image
img = cv2.imread(r"\Images\noise.png", 0)

# binarize the image
binr = cv2.threshold(img, 0, 255, cv2.THRESH_BINARY+cv2.THRESH_OTSU)[1]

# define the kernel
kernel = np.ones((3, 3), np.uint8)

# opening the image
closing = cv2.morphologyEx(binr, cv2.MORPH_CLOSE, kernel, iterations=1)

# print the output
plt.imshow(closing, cmap='gray')
Python3
# import the necessary packages
import cv2

# read the image
img = cv2.imread(r"path to your image", 0)

# binarize the image
binr = cv2.threshold(img, 0, 255, cv2.THRESH_BINARY+cv2.THRESH_OTSU)[1]

# define the kernel
kernel = np.ones((3, 3), np.uint8)

# invert the image
invert = cv2.bitwise_not(binr)

# use morph gradient
morph_gradient = cv2.morphologyEx(invert,
                                  cv2.MORPH_GRADIENT,
                                  kernel)

# print the output
plt.imshow(morph_gradient, cmap='gray')
Python3
# import the necessary packages
import cv2

# read the image
img = cv2.imread("your image path", 0)

# binarize the image
binr = cv2.threshold(img, 0, 255, cv2.THRESH_BINARY+cv2.THRESH_OTSU)[1]

# define the kernel
kernel = np.ones((13, 13), np.uint8)

# use morph gradient
morph_gradient = cv2.morphologyEx(binr,
                                  cv2.MORPH_TOPHAT,
                                  kernel)
# print the output
plt.imshow(morph_gradient, cmap='gray')
Python3
# import the necessary packages
import cv2

# read the image
img = cv2.imread("your image path", 0)

# binarize the image
binr = cv2.threshold(img, 0, 255, cv2.THRESH_BINARY+cv2.THRESH_OTSU)[1]

# define the kernel
kernel = np.ones((5, 5), np.uint8)

# invert the image
invert = cv2.bitwise_not(binr)

# use morph gradient
morph_gradient = cv2.morphologyEx(invert,
                                  cv2.MORPH_BLACKHAT,
                                  kernel)
# print the output
plt.imshow(morph_gradient, cmap='gray')
输出:
输出应该是比原始图像更薄的图像。
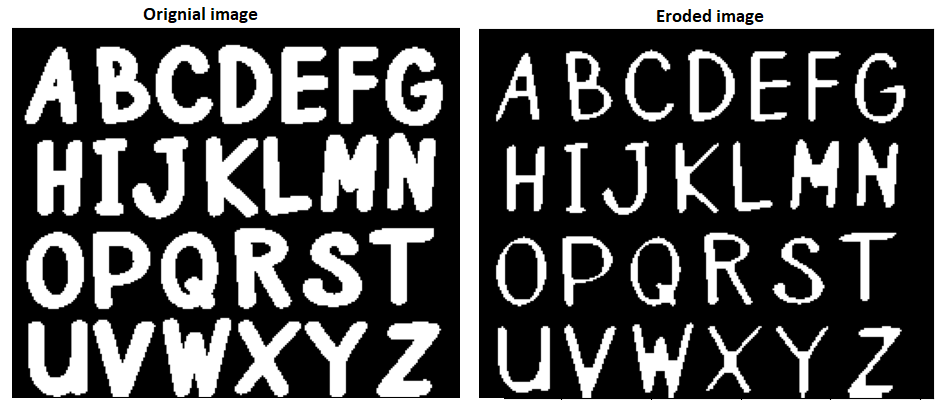
侵蚀
扩张
膨胀涉及膨胀图像的外表面(前景)。由于二值图像仅包含 0 和 255 两个像素,因此主要涉及扩展图像的前景,建议将前景设为白色。侵蚀的厚度取决于定义的内核的大小和形状。我们可以利用 NumPy 的 one()函数来定义内核。还有许多其他函数,例如 NumPy zeros、自定义内核以及其他可用于根据手头问题定义内核的函数。它与腐蚀操作完全相反
代码:
- 如图所示导入必要的包
- 阅读图片
- 将图像二值化。
- 由于建议将前景保持为白色,因此我们正在对二值化图像执行 OpenCV 的反转操作以使前景为白色。
- 我们正在定义一个 3×3 的内核,其中填充了 1
- 然后我们可以利用 Opencv dilate()函数来扩大图像的边界。
Python3
import cv2

# read the image
img = cv2.imread(r"path to image", 0)

# binarize the image
binr = cv2.threshold(img, 0, 255, cv.THRESH_BINARY+cv.THRESH_OTSU)[1]

# define the kernel
kernel = np.ones((3, 3), np.uint8)

# invert the image
invert = cv2.bitwise_not(binr)

# dilate the image
dilation = cv2.dilate(invert, kernel, iterations=1)

# print the output
plt.imshow(dilation, cmap='gray')
输出:
输出应该是比原始图像更厚的图像。
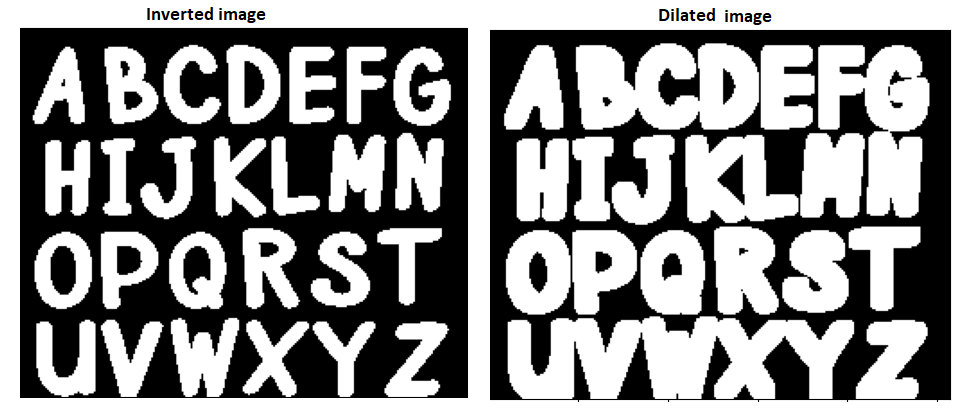
放大图像
开幕式
打开涉及图像外表面(前景)的腐蚀和膨胀。所有上述腐蚀和膨胀的约束都适用于此。它是两种主要方法的混合。它通常用于去除图像中的噪声。
代码:
- 如图所示导入必要的包
- 阅读图片
- 将图像二值化。
- 我们正在定义一个 3×3 的内核,其中填充了 1
- 然后我们可以利用 Opencv 的 cv.morphologyEx()函数对图像进行打开操作。
Python3
# import the necessary packages
import cv2

# read the image
img = cv2.imread(r"\noise.png", 0)

# binarize the image
binr = cv2.threshold(img, 0, 255,
                     cv2.THRESH_BINARY+cv2.THRESH_OTSU)[1]

# define the kernel
kernel = np.ones((3, 3), np.uint8)

# opening the image
opening = cv2.morphologyEx(binr, cv2.MORPH_OPEN,
                           kernel, iterations=1)
# print the output
plt.imshow(opening, cmap='gray')
输出:
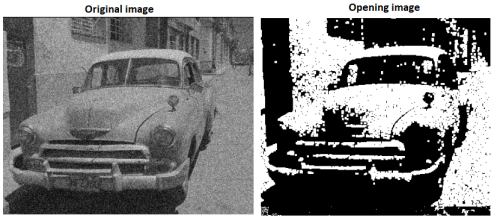
打开图像
结束
关闭涉及膨胀,然后是图像外表面(前景)的腐蚀。所有上述腐蚀和膨胀的约束都适用于此。它是两种主要方法的混合。它通常用于去除图像中的噪声。
代码:
- 如图所示导入必要的包
- 阅读图片
- 将图像二值化。
- 我们正在定义一个 3×3 的内核,其中填充了 1
- 然后我们可以利用 Opencv 的 cv.morphologyEx()函数对图像进行 Closing 操作。
Python3
# import the necessary packages
import cv2

# read the image
img = cv2.imread(r"\Images\noise.png", 0)

# binarize the image
binr = cv2.threshold(img, 0, 255, cv2.THRESH_BINARY+cv2.THRESH_OTSU)[1]

# define the kernel
kernel = np.ones((3, 3), np.uint8)

# opening the image
closing = cv2.morphologyEx(binr, cv2.MORPH_CLOSE, kernel, iterations=1)

# print the output
plt.imshow(closing, cmap='gray')
输出:
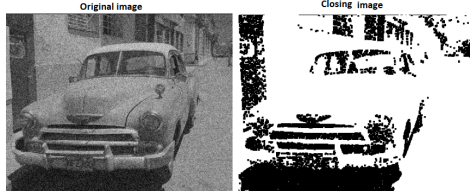
关闭图像
形态梯度
形态梯度与其他操作略有不同,因为形态梯度首先对图像单独应用腐蚀和膨胀,然后计算腐蚀和膨胀图像之间的差异。输出将是给定图像的轮廓。
代码:
- 如图所示导入必要的包
- 阅读图片
- 将图像二值化。
- 由于建议将前景保持为白色,因此我们正在对二值化图像执行 OpenCV 的反转操作以使前景为白色。
- 我们正在定义一个 3×3 的内核,其中填充了 1
- 然后我们可以利用 Opencv 的 cv.morphologyEx()函数对图像执行形态梯度。
Python3
# import the necessary packages
import cv2

# read the image
img = cv2.imread(r"path to your image", 0)

# binarize the image
binr = cv2.threshold(img, 0, 255, cv2.THRESH_BINARY+cv2.THRESH_OTSU)[1]

# define the kernel
kernel = np.ones((3, 3), np.uint8)

# invert the image
invert = cv2.bitwise_not(binr)

# use morph gradient
morph_gradient = cv2.morphologyEx(invert,
                                  cv2.MORPH_GRADIENT,
                                  kernel)

# print the output
plt.imshow(morph_gradient, cmap='gray')
输出:
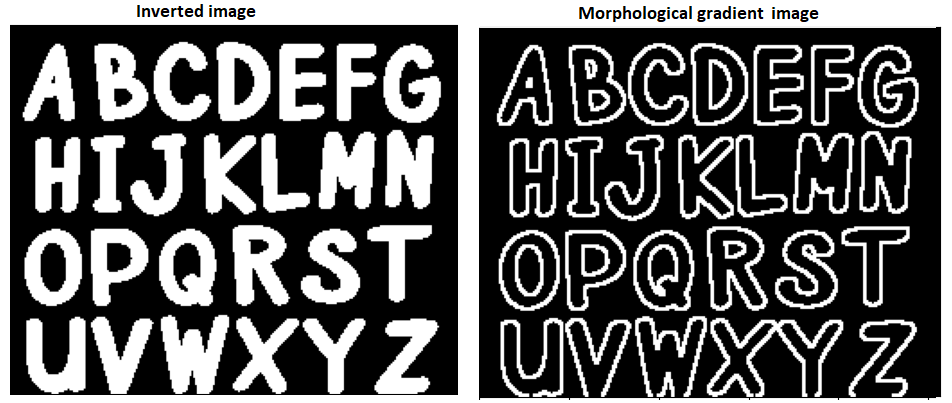
形态梯度图像
礼帽
Top Hat 是另一种形态学操作,其中对二值图像执行打开操作,此操作的输出是输入图像和打开图像之间的差异。
代码:
- 如图所示导入必要的包。
- 阅读图像。
- 将图像二值化。
- 我们正在定义一个 13×13 的内核,其中填充了 1。
- 然后我们可以利用 Opencv 的 cv.morphologyEx()函数对图像执行 Top Hat 操作。
Python3
# import the necessary packages
import cv2

# read the image
img = cv2.imread("your image path", 0)

# binarize the image
binr = cv2.threshold(img, 0, 255, cv2.THRESH_BINARY+cv2.THRESH_OTSU)[1]

# define the kernel
kernel = np.ones((13, 13), np.uint8)

# use morph gradient
morph_gradient = cv2.morphologyEx(binr,
                                  cv2.MORPH_TOPHAT,
                                  kernel)
# print the output
plt.imshow(morph_gradient, cmap='gray')
输出:
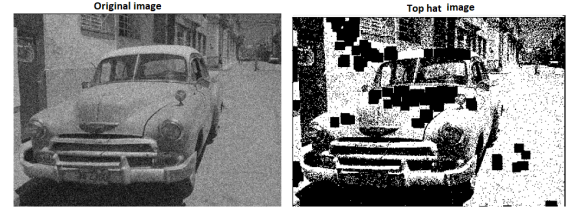
礼帽形象
黑帽
Top Hat 是另一种形态学操作,其中对二值图像执行打开操作,此操作的输出是输入图像和打开图像之间的差异。
代码:
- 如图所示导入必要的包。
- 阅读图像。
- 将图像二值化。
- 由于建议将前景保持为白色,因此我们正在对二值化图像执行 OpenCV 的反转操作以使前景为白色。
- 我们定义了一个 5×5 的内核,里面装满了 1。
- 然后我们可以利用 Opencv 的 cv.morphologyEx()函数对图像执行 Top Hat 操作。
Python3
# import the necessary packages
import cv2

# read the image
img = cv2.imread("your image path", 0)

# binarize the image
binr = cv2.threshold(img, 0, 255, cv2.THRESH_BINARY+cv2.THRESH_OTSU)[1]

# define the kernel
kernel = np.ones((5, 5), np.uint8)

# invert the image
invert = cv2.bitwise_not(binr)

# use morph gradient
morph_gradient = cv2.morphologyEx(invert,
                                  cv2.MORPH_BLACKHAT,
                                  kernel)
# print the output
plt.imshow(morph_gradient, cmap='gray')
输出:
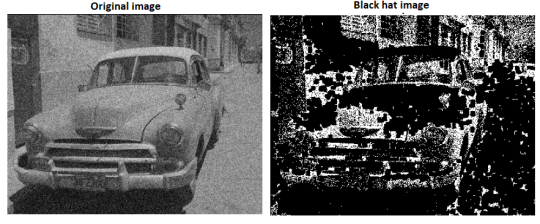
黑帽形象