ReactJS UI Ant Design Transfer 组件
Ant Design Library 已经预先构建了这个组件,并且它也很容易集成。 Transfer Component 用于双列传输选择框。它用于有效地在两列之间传输项目。我们可以在 ReactJS 中使用以下方法来使用 Ant Design Transfer 组件。
转移道具:
- dataSource:用于设置源数据。
- disabled:用于指示是否禁用传输。
- filterOption:检查项目是否应显示在搜索结果列表中的函数。
- 页脚:这是一个用于渲染页脚的函数。
- listStyle:用于传递用于渲染传输列的自定义 CSS 样式。
- locale:用于表示i18n文本,包括 filter、empty-text、item-unit 等。
- oneWay:用于显示为单向样式。
- 操作:用于表示从上到下排序的一组操作。
- operationStyle:用于传递用于渲染操作列的自定义 CSS 样式。
- pagination:用于分页。
- render:它是一个生成列上显示的项目的函数。
- selectAllLabels:用于表示一组自定义标签,用于选择标题上的所有复选框。
- selectedKeys:用于表示选定项的一组键。
- showSearch:用于指示是否在每一列上显示搜索框。
- showSelectAll:用于在表头显示选中所有复选框。
- targetKeys:用于表示列在右列的一组元素的键。
- 标题:用于表示从左到右排序的一组标题。
- onChange:是一个回调函数,当列之间的传输完成时触发。
- onScroll:滚动选项列表时触发的回调函数。
- onSearch:当搜索字段改变时触发的回调函数。
- OnSelectChange:它是在更改所选项目时触发的回调函数。
渲染道具:
- 方向:用于表示列表渲染方向。
- disabled:用于指示是否禁用列表。
- filtersItems:用于表示已过滤的项目。
- selectedKeys:用于表示选中的项目。
- onItemSelect:用于表示选中项。
- onItemSelectAll:用于选择
ct 一组项目。
创建 React 应用程序并安装模块:
第 1 步:使用以下命令创建一个 React 应用程序:
npx create-react-app foldername第 2 步:创建项目文件夹(即文件夹名称)后,使用以下命令移动到该文件夹:
cd foldername第 3 步:创建 ReactJS 应用程序后,安装 必需的 模块使用以下命令:
npm install antd
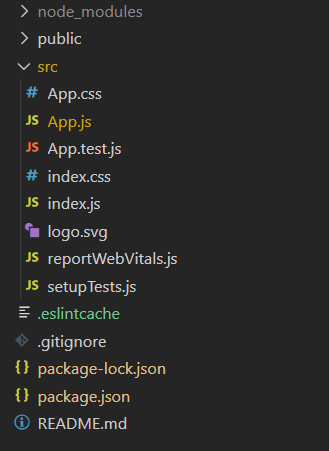
项目结构:它将如下所示。

项目结构
示例:现在在App.js文件中写下以下代码。在这里,App 是我们编写代码的默认组件。
App.js
import React, { useState } from 'react';
import "antd/dist/antd.css";
import { Transfer } from 'antd';

// Our sample Mock Data
const mockData = [
  {key: "0", title: "Title 0", description: "Sample Description 0"},
  {key: "1", title: "Title 1", description: "Sample Description 1"},
  {key: "2", title: "Title 2", description: "Sample Description 2"},
  {key: "3", title: "Title 3", description: "Sample Description 3"},
  {key: "4", title: "Title 4", description: "Sample Description 4"},
  {key: "5", title: "Title 5", description: "Sample Description 5"},
];

export default function App() {

  // To set target keys
  const [targetKeys, setTargetKeys] = useState(mockData);

  // Contains the selected keys
  const [selectedKeys, setSelectedKeys] = useState([]);

  return (

      ReactJS Ant-Design Transfer Component
       item.title}
        selectedKeys={selectedKeys}
        targetKeys={targetKeys}
        onChange={(nextTargetKeys) => {
          setTargetKeys(nextTargetKeys);
        }}
        onSelectChange={(sourceSelectedKeys, targetSelectedKeys) => {
          setSelectedKeys([...sourceSelectedKeys, ...targetSelectedKeys]);
        }}
      />

  );
}运行应用程序的步骤:从项目的根目录使用以下命令运行应用程序:
npm start输出:现在打开浏览器并转到http://localhost:3000/ ,您将看到以下输出:

参考: https://ant.design/components/transfer/