Python – 眨眼检测项目
在本教程中,您将了解如何使用称为haar cascades的特征映射器检测人眼的眨眼。在项目中,我们将使用Python语言和 OpenCV 库分别进行算法执行和图像处理。我们将在项目中使用的 haar 级联经过预训练并与 OpenCV 库一起存储为 haarcascade_frontalface_default.xml 和 haarcascade_eye_tree_eyeglasses.xml 文件。该项目开发了对系统的基本了解,例如驾驶员睡意检测、眨眼锁定、眼睛检测、面部检测以及使用 OpenCV 库的 haar 级联使用。
关于 Haar Cascades:
Haar 基于特征的级联分类器是 Paul Viola 和 Michael Jones 在其 2001 年的论文“Rapid Object Detection using a Boosted Cascade of Simple Features”中提出的一种有效的对象检测方法。它是一种基于机器学习的方法,其中级联函数是从很多正面和负面的图像中训练出来的。这里正图像是包含目标对象的样本,负图像是不包含目标对象的样本。训练分类器需要大量的正样本和负样本。
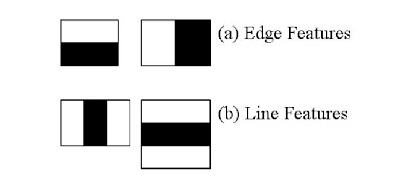
Haar 特性,源代码 – OpenCV 文档
现在,我们使用上图所示的 haar 特征从给定的输入图像中提取特征。它们就像卷积核。每个特征都是通过从黑色矩形下的像素总和中减去白色矩形下的像素总和而获得的单个值。
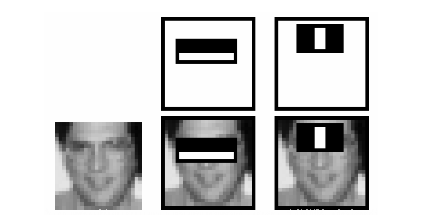
haarcascades 的应用,源码 – OpenCV Docs
过度计算:
使用所有可能大小的分类器计算特征,但是计算特征所需的计算量,一个24×24的窗口会产生超过 160000 个特征。同样对于每个特征计算,还需要像素的总和。为了降低计算成本,haar 级联的创建者引入了积分图像,这意味着无论您的图像多么大,它将给定像素的计算减少为仅涉及四个像素的操作。
虚假的特征
现在计算出来的特征中,大部分特征都是假的和不相关的。现在,应用于图像区域的窗口可能会看到一个不同的区域,该区域看起来与窗口具有相同的特征,但实际上并非如此。因此,需要删除由AdaBoost完成的错误特征,这有助于从 160000 多个特征中选择最佳特征。自适应提升的 Adaboost 缩写形式是一种机器学习算法,用于此唯一任务。
算法 :
The frame is captured and converted to grayscale.
Bilateral Filtering is applied to remove impurities.
Face is detected with the haarcascade.
The ROI (Region Of Image) of Face is fed to eye detection part of algorithm.
Eyes are detected and resulting list is passed to if-else contruct.
If the length of list is more than two, means that the eyes are there.
Else the program is marked to be eye blinked and restarted.
代码:
haarcascade_frontalface_default.xml和haarcascade_eye_tree_eyeglasses.xml是与Python脚本存储在同一目录中的 xml 文件。
Python3
#All the imports go here
import numpy as np
import cv2

#Initializing the face and eye cascade classifiers from xml files
face_cascade = cv2.CascadeClassifier('haarcascade_frontalface_default.xml')
eye_cascade = cv2.CascadeClassifier('haarcascade_eye_tree_eyeglasses.xml')

#Variable store execution state
first_read = True

#Starting the video capture
cap = cv2.VideoCapture(0)
ret,img = cap.read()

while(ret):
    ret,img = cap.read()
    #Converting the recorded image to grayscale
    gray = cv2.cvtColor(img, cv2.COLOR_BGR2GRAY)
    #Applying filter to remove impurities
    gray = cv2.bilateralFilter(gray,5,1,1)

    #Detecting the face for region of image to be fed to eye classifier
    faces = face_cascade.detectMultiScale(gray, 1.3, 5,minSize=(200,200))
    if(len(faces)>0):
        for (x,y,w,h) in faces:
            img = cv2.rectangle(img,(x,y),(x+w,y+h),(0,255,0),2)

            #roi_face is face which is input to eye classifier
            roi_face = gray[y:y+h,x:x+w]
            roi_face_clr = img[y:y+h,x:x+w]
            eyes = eye_cascade.detectMultiScale(roi_face,1.3,5,minSize=(50,50))

            #Examining the length of eyes object for eyes
            if(len(eyes)>=2):
                #Check if program is running for detection
                if(first_read):
                    cv2.putText(img,
                    "Eye detected press s to begin",
                    (70,70),
                    cv2.FONT_HERSHEY_PLAIN, 3,
                    (0,255,0),2)
                else:
                    cv2.putText(img,
                    "Eyes open!", (70,70),
                    cv2.FONT_HERSHEY_PLAIN, 2,
                    (255,255,255),2)
            else:
                if(first_read):
                    #To ensure if the eyes are present before starting
                    cv2.putText(img,
                    "No eyes detected", (70,70),
                    cv2.FONT_HERSHEY_PLAIN, 3,
                    (0,0,255),2)
                else:
                    #This will print on console and restart the algorithm
                    print("Blink detected--------------")
                    cv2.waitKey(3000)
                    first_read=True

    else:
        cv2.putText(img,
        "No face detected",(100,100),
        cv2.FONT_HERSHEY_PLAIN, 3,
        (0,255,0),2)

    #Controlling the algorithm with keys
    cv2.imshow('img',img)
    a = cv2.waitKey(1)
    if(a==ord('q')):
        break
    elif(a==ord('s') and first_read):
        #This will start the detection
        first_read = False

cap.release()
cv2.destroyAllWindows()
样本输出:
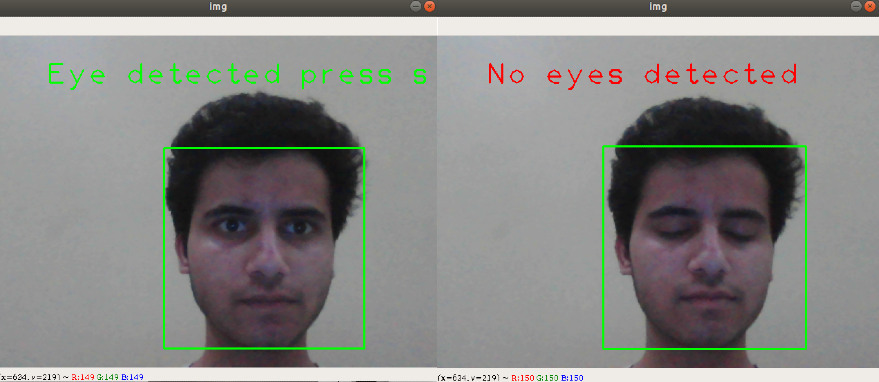
上述代码的示例运行
源代码和级联分类器可以在这里找到。