使用 SendGrid API 在 Node.js 中发送批量电子邮件
什么是 SendGrid API?
SendGrid 是一个向客户发送交易和营销电子邮件的平台。它提供了可扩展性、可靠性和可交付性,这对组织来说是一个重要问题。
使用 SendGrid API 的好处:
- 如果您将 Nodemailer 与 Gmail 一起使用,那么您每天只能发送一定数量的电子邮件。
- 此外,无需设置您自己的 SMTP 服务器。
- SMTP 不提供可传递性,即电子邮件可能发送也可能不发送。
使用 SendGrid API 发送电子邮件的步骤:
- 设置 API 密钥:
- 转到 sendgrid 仪表板并单击创建 api 密钥按钮。

- 根据需要命名 API-key,对于本教程,我们将其命名为node-mail

复制 API 密钥,出于安全原因,您可能无法再次看到它。
- 转到 sendgrid 仪表板并单击创建 api 密钥按钮。
- 设置 node.js 应用程序:
- 使用命令创建一个空的NPM包。 (传递的-y标志用于使用生成器中的默认值而不是提问)
npm init -y - 创建一个名为 index.js 的文件并添加样板代码。
index.js
// Importing http library const http = require("http"); const PORT = 3000; // Defining PORT http.createServer((req, res) => { // Output Hello World on HTML page res.write("Hello World!
"); res.end(); }) // Initializing server .listen(PORT,() => console.log(`Server running on PORT : ${PORT}`));javascript
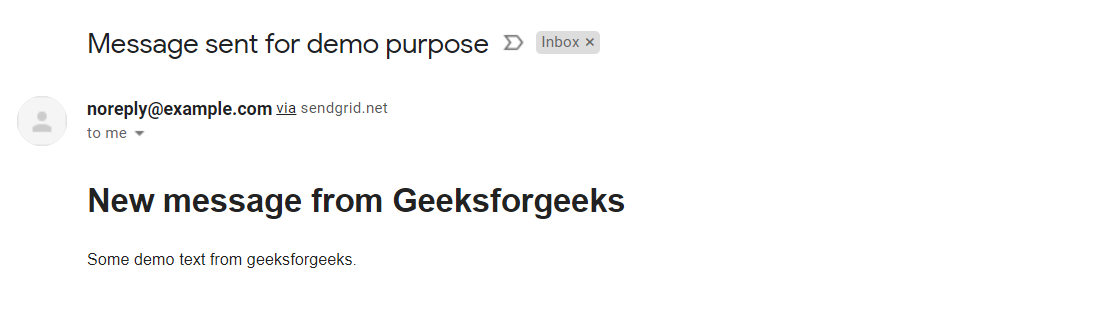
const http = require("http"); const PORT = 3000; http.createServer((req, res) => { // Initializing sendgrid object const mailer = require("@sendgrid/mail"); // Insert your API key here mailer.setApiKey(""); // Setting configurations const msg = { to: ["youremail@gmail.com", "your.second.email@gmail.com"], from: "noreply@example.com", subject: "Message sent for demo purpose", html: " New message from Geeksforgeeks
Some demo text from geeksforgeeks.
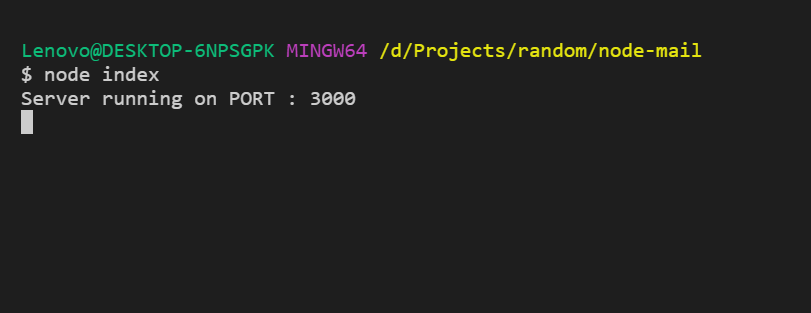
" }; // Sending mail mailer.send(msg, function(err, json) { if (err) { console.log(err); // Writing error message res.write("Can't send message sent"); } else { // Writing success message res.write("Message sent"); } }); res.end(); }) .listen(PORT, () => console.log(`Server running on PORT : ${PORT}`)); - 现在使用 node index 命令运行代码并转到 127.0.0.1:3000 链接。您将看到输出。

- 在控制台中
- 使用命令创建一个空的NPM包。 (传递的-y标志用于使用生成器中的默认值而不是提问)
- 安装 SendGrid 库:通过运行以下命令安装 SendGrid 库
npm i @sendgrid/mail - 使用库发送电子邮件:
javascript
const http = require("http"); const PORT = 3000; http.createServer((req, res) => { // Initializing sendgrid object const mailer = require("@sendgrid/mail"); // Insert your API key here mailer.setApiKey(""); // Setting configurations const msg = { to: ["youremail@gmail.com", "your.second.email@gmail.com"], from: "noreply@example.com", subject: "Message sent for demo purpose", html: " New message from Geeksforgeeks
Some demo text from geeksforgeeks.
" }; // Sending mail mailer.send(msg, function(err, json) { if (err) { console.log(err); // Writing error message res.write("Can't send message sent"); } else { // Writing success message res.write("Message sent"); } }); res.end(); }) .listen(PORT, () => console.log(`Server running on PORT : ${PORT}`));
现在使用节点索引再次运行应用程序并在浏览器中转到 127.0.0.1:3000 并检查您的两封电子邮件,您将看到如下输出。