使用 Pix2Pix 的图像到图像转换
pix2pix 由加州大学伯克利分校的研究人员于 2017 年提出。它使用条件生成对抗网络来执行图像到图像的转换任务(即将一个图像转换为另一个图像,例如将立面转换为建筑物,将谷歌地图转换为谷歌地球等。

架构:
pix2pix 在其架构中使用条件生成对抗网络(conditional-GAN)。这样做的原因是,即使我们使用简单的 L1/L2 损失函数为特定的图像到图像转换任务训练模型,也可能无法理解图像的细微差别。
发电机:
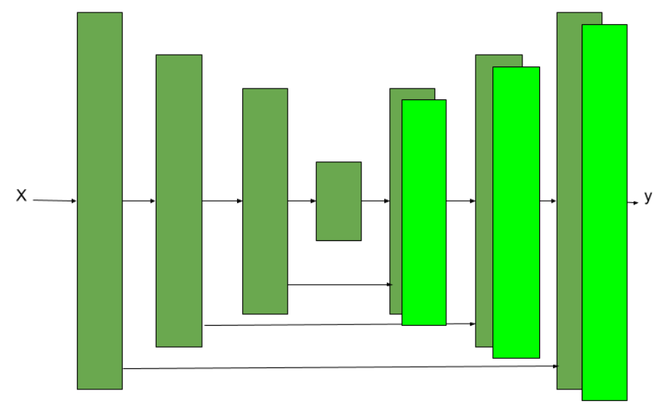
U-Net架构
生成器中使用的架构是 U-Net 架构。除了在编码器-解码器架构中使用跳过连接之外,它类似于编码器-解码器架构。跳过连接的使用使这
- 编码器架构:编码器 生成器网络 网络有七个卷积块。每个卷积块都有一个卷积层,后面跟着一个 LeakyRelu 激活函数(论文中的斜率为 0.2)。除了第一个卷积层之外,每个卷积块还有一个批量归一化层。
- 解码器架构:解码器 生成器网络 网络有七个转置卷积块。每个上采样卷积块 (Dconv) 都有一个上采样层,然后是一个卷积层、一个批量归一化层和一个 ReLU 激活函数。
- 生成器架构包含每个层i和层n − i之间的跳过连接,其中 n 是层的总数。每个跳过连接简单地将第i层的所有通道与第n - i 层的通道连接起来。
鉴别器:
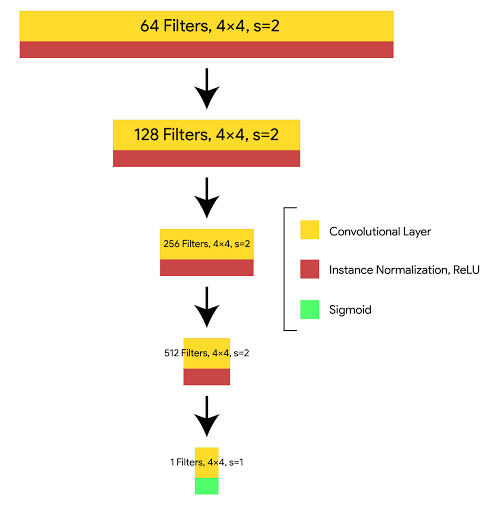
补丁 GAN 鉴别器
鉴别器使用 Patch GAN 架构,也使用 Style GAN 架构。这个 PatchGAN 架构包含许多转置卷积块。这种 PatchGAN 架构采用图像的 NxN 部分,并试图找出它的真假。该鉴别器在整个图像上卷积应用,对其求平均以生成鉴别器 D 的结果。
鉴别器的每个块都包含一个卷积层、批范数层和 LeakyReLU。该鉴别器接收两个输入:
- 输入图像和目标图像(鉴别器应将其分类为真实图像)
- 输入图像和生成的图像(鉴别器应将其归类为假图像)。
使用 PatchGAN 是因为作者认为它能够保留图像中的高频细节,低频细节可以通过 L1-loss 聚焦。
发电机损耗:
论文中使用的生成器损失是我们上面定义的生成图像、目标图像和 GAN 损失之间的 L1-损失的线性组合。
我们产生的损失将是:
因此,我们的发电机总损失
鉴别器损失
鉴别器损失需要两个输入真实图像和生成图像:
- real_loss 是真实图像和一组图像的 sigmoid 交叉熵损失(因为这些是真实图像)。
- generate_loss 是生成图像的 sigmoid交叉熵损失和零数组(因为这些是假图像)
- 总损失是 real_loss 和 generated_loss 的总和。
执行:
- 首先,我们下载并预处理图像数据集。我们将使用捷克技术大学提供并由 pix2pix 论文的作者处理的 CMP Facade 数据集。我们将在训练前对数据集进行预处理。
代码:
# import necessary packages
import tensorflow as tf

import os
import time

from matplotlib import pyplot as plt
from IPython import display
# install tenosrboard ! pip install -U tensorboard

# download dataset
URL = "https://people.eecs.berkeley.edu/~tinghuiz / projects / pix2pix / datasets / facades.tar.gz"

path_to_zip = tf.keras.utils.get_file('facades.tar.gz',
                                      origin = URL,
                                      extract = True)

PATH = os.path.join(os.path.dirname(path_to_zip), 'facades/')

# Define Training variable
BUFFER_SIZE = 400
BATCH_SIZE = 1
IMG_WIDTH = 256
IMG_HEIGHT = 256

# load the images from dataset
def load(image_file):
  image = tf.io.read_file(image_file)
  image = tf.image.decode_jpeg(image)

  w = tf.shape(image)[1]

  w = w // 2
  real_image = image[:, :w, :]
  input_image = image[:, w:, :]

  input_image = tf.cast(input_image, tf.float32)
  real_image = tf.cast(real_image, tf.float32)
  return input_image, real_image

# resize the images to provided width and hight
def resize(input_image, real_image, height, width):
  input_image = tf.image.resize(input_image, [height, width],
                                method = tf.image.ResizeMethod.NEAREST_NEIGHBOR)
  real_image = tf.image.resize(real_image, [height, width],
                               method = tf.image.ResizeMethod.NEAREST_NEIGHBOR)

  return input_image, real_image

"""
function to stack (input, real) images and apply random crop on them to crop
to (256, 256)
"""
def random_crop(input_image, real_image):
  stacked_image = tf.stack([input_image, real_image], axis = 0)
  cropped_image = tf.image.random_crop(
      stacked_image, size =[2, IMG_HEIGHT, IMG_WIDTH, 3])

  return cropped_image[0], cropped_image[1]

"""
Before training, we need to perform random jittering on the dataset
According to the paper, this random jittering contains 3 steps
 --> Resize the image to bigger size
 --> Random crop the image to target size of model
 --> Random Flip on the images

"""

@tf.function()
def random_jitter(input_image, real_image):
  # resizing to 286 x 286 x 3
  input_image, real_image = resize(input_image, real_image, 286, 286)

  # randomly cropping to 256 x 256 x 3
  input_image, real_image = random_crop(input_image, real_image)

  if tf.random.uniform(()) > 0.5:
    # random mirroring
    input_image = tf.image.flip_left_right(input_image)
    real_image = tf.image.flip_left_right(real_image)

  return input_image, real_image
- 现在,我们使用上面定义的函数加载训练和测试数据。
代码:
# function to Load image from train data
"""
On train data, we performed random jitter and normalize,
but since we don't need any augmentation on test_data, we just resize it
"""
def load_image_train(image_file):
  input_image, real_image = load(image_file)
  input_image, real_image = random_jitter(input_image, real_image)
  input_image, real_image = normalize(input_image, real_image)

  return input_image, real_image
# function to Load images from test data
def load_image_test(image_file):
  input_image, real_image = load(image_file)
  input_image, real_image = resize(input_image, real_image,
                                   IMG_HEIGHT, IMG_WIDTH)
  input_image, real_image = normalize(input_image, real_image)

  return input_image, real_image

# apply the above load_images_train function on train data
train_dataset = tf.data.Dataset.list_files(PATH+'train/*.jpg')
train_dataset = train_dataset.map(load_image_train,
                                  num_parallel_calls = tf.data.experimental.AUTOTUNE)
train_dataset = train_dataset.shuffle(BUFFER_SIZE)
train_dataset = train_dataset.batch(BATCH_SIZE)

# apply the above load_images_test function on test data
test_dataset = tf.data.Dataset.list_files(PATH+'test/*.jpg')
test_dataset = test_dataset.map(load_image_test)
test_dataset = test_dataset.batch(BATCH_SIZE)
- 进行数据处理后,现在,我们编写生成器架构的代码。该生成器块包含 2 部分编码器块和解码器块。编码器块包含一个下采样卷积块,解码器块包含一个上采样转置卷积块。
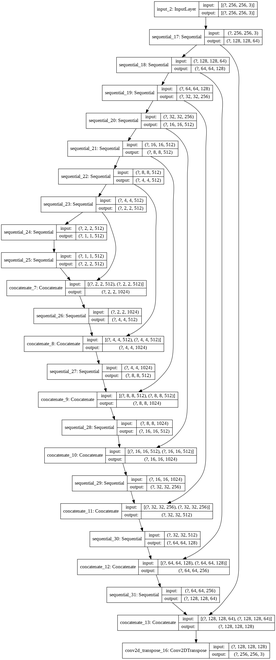
生成器架构
- 现在我们为鉴别器定义我们的架构。鉴别器架构使用 PatchGAN 模型。对于这种架构,我们可以使用上面我们定义的下采样卷积块。鉴别器的损失是实际损失(sigmoid 交叉熵 b/w 真实图像和 1 数组)和生成损失(sigmoid 交叉熵 b/w 生成图像和 0 数组)的总和。
代码:
# code for discriminator architecture
"""
FOr more details look into architecture section
"""
def Discriminator():
  initializer = tf.random_normal_initializer(0., 0.02)

  inp = tf.keras.layers.Input(shape =[256, 256, 3], name ='input_image')
  tar = tf.keras.layers.Input(shape =[256, 256, 3], name ='target_image')

  x = tf.keras.layers.concatenate([inp, tar]) # (batch_size, 256, 256, channels * 2)

  down1 = downsample(64, 4, False)(x) # (batch_size, 128, 128, 64)
  down2 = downsample(128, 4)(down1) # (batch_size, 64, 64, 128)
  down3 = downsample(256, 4)(down2) # (batch_size, 32, 32, 256)

  zero_pad1 = tf.keras.layers.ZeroPadding2D()(down3) # (batch_size, 34, 34, 256)
  conv = tf.keras.layers.Conv2D(512, 4, strides = 1,
                                kernel_initializer = initializer,
                                use_bias = False)(zero_pad1) # (batch_size, 31, 31, 512)

  batchnorm1 = tf.keras.layers.BatchNormalization()(conv)

  leaky_relu = tf.keras.layers.LeakyReLU()(batchnorm1)

  zero_pad2 = tf.keras.layers.ZeroPadding2D()(leaky_relu) # (batch_size, 33, 33, 512)

  last = tf.keras.layers.Conv2D(1, 4, strides = 1,
                                kernel_initializer = initializer)(zero_pad2) # (batch_size, 30, 30, 1)

  return tf.keras.Model(inputs =[inp, tar], outputs = last)

# define discriminator loss function
disc_ce_loss = tf.keras.losses.BinaryCrossentropy(from_logits = True)
def discriminator_loss(disc_real_output, disc_generated_output):
  real_loss = disc_ce_loss(tf.ones_like(disc_real_output), disc_real_output)

  generated_loss = disc_ce_loss(tf.zeros_like(disc_generated_output), disc_generated_output)

  total_disc_loss = real_loss + generated_loss

  return total_disc_loss

discriminator = Discriminator()
tf.keras.utils.plot_model(discriminator, show_shapes = True)
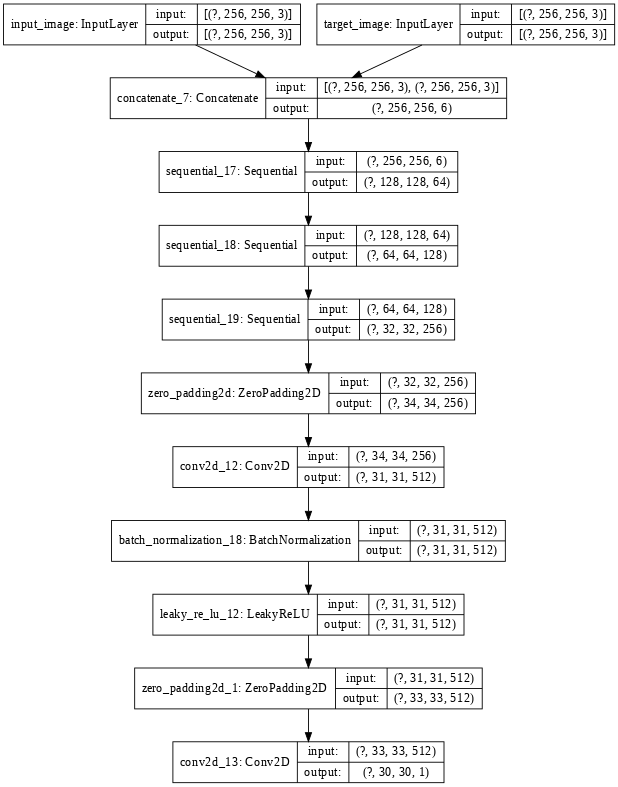
鉴别器架构
- 在这一步中,我们定义优化器和检查点。我们将在两个生成器鉴别器中使用 Adam 优化器。
代码:
# define generator and discriminator architecture
generator_optimizer = tf.keras.optimizers.Adam(2e-4, beta_1 = 0.5)
discriminator_optimizer = tf.keras.optimizers.Adam(2e-4, beta_1 = 0.5)

# Create the model checkpoint
checkpoint_dir = './train_checkpoints'
checkpoint_prefix = os.path.join(checkpoint_dir, "ckpt")
checkpoint = tf.train.Checkpoint(generator_optimizer = generator_optimizer,
                                 discriminator_optimizer = discriminator_optimizer,
                                 generator = generator,
                                 discriminator = discriminator)
- 现在,我们定义训练程序。训练过程包括以下步骤:
- 对于每个示例输入,我们将图像作为输入传递给生成器以获取生成的图像。
- 鉴别器接收 input_image 和生成的图像作为第一个输入。第二个输入是 input_image 和 target_image。
- 接下来,我们计算生成器和鉴别器的损失。
- 然后,我们计算关于生成器和鉴别器变量(输入)的损失梯度,并将其应用于优化器。
代码:
# Define training procedure
EPOCHS = 30

import datetime
log_dir ="logs/"

summary_writer = tf.summary.create_file_writer(
  log_dir + "fit/" + datetime.datetime.now().strftime("% Y % m % d-% H % M % S"))

@tf.function
def train_step(input_image, target, epoch):
  with tf.GradientTape() as gen_tape, tf.GradientTape() as disc_tape:
    gen_output = generator(input_image, training = True)

    disc_real_output = discriminator([input_image, target], training = True)
    disc_generated_output = discriminator([input_image, gen_output], training = True)

    gen_total_loss, gen_gan_loss, gen_l1_loss = generator_loss(disc_generated_output, gen_output, target)
    disc_loss = discriminator_loss(disc_real_output, disc_generated_output)

  generator_gradients = gen_tape.gradient(gen_total_loss,
                                          generator.trainable_variables)
  discriminator_gradients = disc_tape.gradient(disc_loss,
                                               discriminator.trainable_variables)

  generator_optimizer.apply_gradients(zip(generator_gradients,
                                          generator.trainable_variables))
  discriminator_optimizer.apply_gradients(zip(discriminator_gradients,
                                              discriminator.trainable_variables))

  with summary_writer.as_default():
    tf.summary.scalar('gen_total_loss', gen_total_loss, step = epoch)
    tf.summary.scalar('gen_gan_loss', gen_gan_loss, step = epoch)
    tf.summary.scalar('gen_l1_loss', gen_l1_loss, step = epoch)
    tf.summary.scalar('disc_loss', disc_loss, step = epoch)

def fit(train_ds, epochs, test_ds):
  for epoch in range(epochs):
    % time

    for example_input, example_target in test_ds.take(1):
      generate_images(generator, example_input, example_target)
    print("Epoch: ", epoch)
    # Train
    for n, (input_image, target) in train_ds.enumerate():

      train_step(input_image, target, epoch)
    print()
    # saving (checkpoint) the model every 10 epochs
    if (epoch + 1) % 10 == 0:
      checkpoint.save(file_prefix = checkpoint_prefix)
  checkpoint.save(file_prefix = checkpoint_prefix)
fit(train_dataset, EPOCHS, test_dataset)
- 现在,我们在测试数据上使用训练模型的生成器来生成图像。
代码:
# code to plot results
def generate_images(model, test_input, tar):
  prediction = model(test_input, training = True)
  plt.figure(figsize =(15, 15))

  display_list = [test_input[0], tar[0], prediction[0]]
  title = ['Input Image', 'Ground Truth', 'Predicted Image']

  for i in range(3):
    plt.subplot(1, 3, i + 1)
    plt.title(title[i])
    # getting the pixel values between [0, 1] to plot it.
    plt.imshow(display_list[i] * 0.5 + 0.5)
    plt.axis('off')
  plt.show()

for inputs, tar in test_dataset.take(5):
  generate_images(generator, inputs, tar)
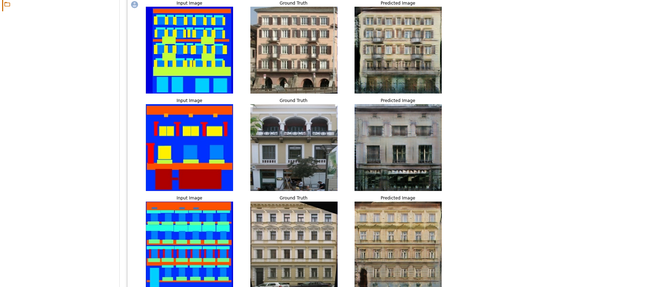

结果
参考:
- Pix2Pix 纸
- Pix2pix 上的 TensorFlow 实现