- Wi-Fi教程(1)
- Wi-Fi教程
- 讨论Wi-Fi
- 讨论Wi-Fi(1)
- Wi-Fi-安全(1)
- Wi-Fi-安全
- Android Wi-Fi通话
- Android Wi-Fi通话(1)
- Wi-Fi-摘要(1)
- Wi-Fi-摘要
- Wi-Fi 基础知识(1)
- Wi-Fi 基础知识
- Wi-Fi-有用的资源
- Wi-Fi-有用的资源(1)
- Wi-Fi-访问协议(1)
- Wi-Fi-访问协议
- 蓝牙和Wi-Fi的区别
- 蓝牙和Wi-Fi的区别(1)
- Wi-Fi-工作概念(1)
- Wi-Fi-工作概念
- Wi-Fi-网络服务(1)
- Wi-Fi-网络服务
- Wi-Fi标准介绍
- Wi-Fi标准介绍
- Wi-Fi标准介绍(1)
- Wi-Fi-快速指南(1)
- Wi-Fi-快速指南
- 什么是Wi-Fi? -指导点(1)
- 什么是Wi-Fi? -指导点
📅 最后修改于: 2021-01-05 05:40:20 🧑 作者: Mango
Android允许应用程序访问以非常低的级别查看无线连接的访问状态。应用程序可以访问wifi连接的几乎所有信息。
应用程序可以访问的信息包括连接的网络的链接速度,IP地址,协商状态,其他网络信息。应用程序还可以扫描,添加,保存,终止和启动Wi-Fi连接。
Android提供了WifiManager API来管理WIFI连接的各个方面。我们可以通过调用getSystemService方法来实例化此类。其语法如下-
WifiManager mainWifiObj;
mainWifiObj = (WifiManager) getSystemService(Context.WIFI_SERVICE);
为了扫描无线网络列表,您还需要注册BroadcastReceiver。可以使用registerReceiver方法将其注册为您的接收器类对象的参数。其语法如下-
class WifiScanReceiver extends BroadcastReceiver {
   public void onReceive(Context c, Intent intent) {
   }
}

WifiScanReceiver wifiReciever = new WifiScanReceiver();
registerReceiver(wifiReciever, new IntentFilter(WifiManager.SCAN_RESULTS_AVAILABLE_ACTION));
可以通过调用WifiManager类的startScan方法来启动wifi扫描。此方法返回ScanResult对象的列表。您可以通过调用list的get方法来访问任何对象。其语法如下-
List wifiScanList = mainWifiObj.getScanResults();
String data = wifiScanList.get(0).toString();
除了扫描外,您还可以使用WifiManager类中定义的方法来更好地控制WIFI。它们列出如下-
| Sr.No | Method & Description |
|---|---|
| 1 |
addNetwork(WifiConfiguration config) This method add a new network description to the set of configured networks. |
| 2 |
createWifiLock(String tag) This method creates a new WifiLock. |
| 3 |
disconnect() This method disassociate from the currently active access point. |
| 4 |
enableNetwork(int netId, boolean disableOthers) This method allow a previously configured network to be associated with. |
| 5 |
getWifiState() This method gets the Wi-Fi enabled state |
| 6 |
isWifiEnabled() This method return whether Wi-Fi is enabled or disabled. |
| 7 |
setWifiEnabled(boolean enabled) This method enable or disable Wi-Fi. |
| 8 |
updateNetwork(WifiConfiguration config) This method update the network description of an existing configured network. |
例
这是一个演示使用WIFI的示例。它创建了一个基本的应用程序,可以打开您的wifi,然后关闭您的wifi
要试验此示例,您需要在打开了wifi的实际设备上运行此示例。
| Steps | Description |
|---|---|
| 1 | You will use Android studio to create an Android application under a package com.example.sairamkrishna.myapplication. |
| 2 | Modify src/MainActivity.java file to add WebView code. |
| 3 | Modify the res/layout/activity_main to add respective XML components |
| 4 | Modify the AndroidManifest.xml to add the necessary permissions |
| 5 | Run the application and choose a running android device and install the application on it and verify the results. |
以下是修改后的主要活动文件src / MainActivity.java的内容。
package com.example.sairamkrishna.myapplication;

import android.net.wifi.WifiManager;
import android.os.Bundle;
import android.app.Activity;
import android.content.Context;
import android.view.View;
import android.view.View.OnClickListener;
import android.widget.Button;

public class MainActivity extends Activity {
   Button enableButton,disableButton;
   @Override
   protected void onCreate(Bundle savedInstanceState) {
      super.onCreate(savedInstanceState);
      setContentView(R.layout.activity_main);

      enableButton=(Button)findViewById(R.id.button1);
      disableButton=(Button)findViewById(R.id.button2);

      enableButton.setOnClickListener(new OnClickListener(){
         public void onClick(View v){
            WifiManager wifi = (WifiManager) getSystemService(Context.WIFI_SERVICE);
            wifi.setWifiEnabled(true);
         }
      });

      disableButton.setOnClickListener(new OnClickListener(){
         public void onClick(View v){
            WifiManager wifi = (WifiManager) getSystemService(Context.WIFI_SERVICE);
            wifi.setWifiEnabled(false);
         }
      });
   }
}
以下是xml res / layout / activity_main.xml的修改内容。
以下是AndroidManifest.xml文件的内容。
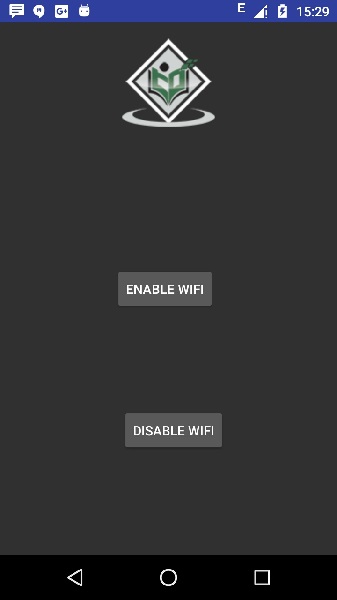
让我们尝试运行您的应用程序。我假设您已将实际的Android Mobile设备与计算机连接。要从Android Studio运行该应用,请打开您项目的活动文件之一,然后点击运行 工具栏中的图标。在启动应用程序之前,Android Studio将显示以下窗口,以选择要在其中运行Android应用程序的选项。
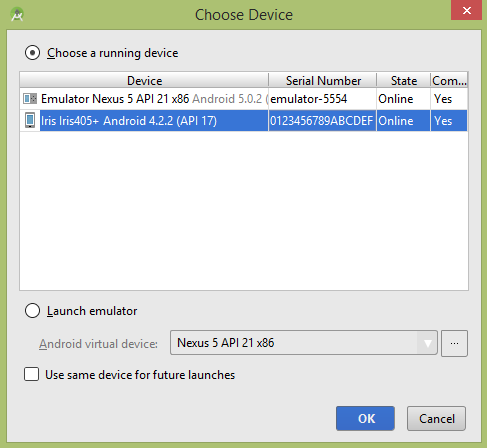
选择您的移动设备作为选项,它将显示以下图像-
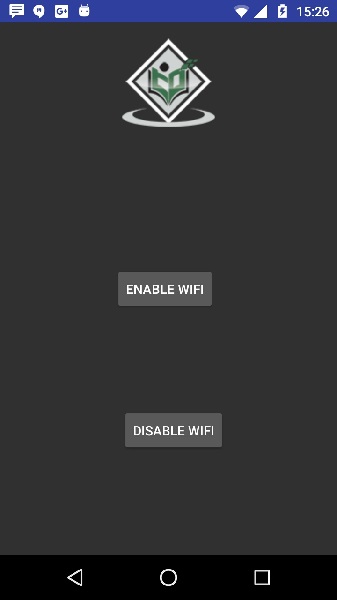
现在单击禁用wifi按钮。然后示例输出应该是这样的-