- Android 以图片搜索图片
- Android 以图片搜索图片(1)
- 在Android中对图片进行微光效果
- 在Android中对图片进行微光效果(1)
- 图片 (1)
- 水效果 (1)
- 图片上的图片php(1)
- 图片上的图片php代码示例
- 图片太大 html (1)
- 图片 - Html (1)
- 图片代码 - Html (1)
- 图片 - 任何代码示例
- 图片 - Html 代码示例
- 图片太大 html 代码示例
- 如何在图片中使用之前的图片 - CSS 代码示例
- jQuery效果
- jQuery-效果
- jQuery-效果(1)
- jQuery效果(1)
- 水效果 - 任何代码示例
- Android-图片切换器(1)
- Android-图片切换器
- 图片标签 (1)
- 图片 laravel 8 上的图片水印 - PHP 代码示例
- Android 中的视差效果示例(1)
- Android 中的视差效果示例
- 在android中的图像按钮上单击效果 (1)
- Docker-图片
- Docker-图片(1)
📅 最后修改于: 2021-01-05 05:16:24 🧑 作者: Mango
Android允许您通过在图像上添加不同种类的效果来操纵图像。您可以轻松地应用图像处理技术在图像上添加某些种类的效果。效果可能是亮度,暗度,灰度转换等
Android提供了Bitmap类来处理图像。可以在android.graphics.bitmap下找到。您可以通过多种方式实例化位图。我们正在从imageView创建图像的位图。
private Bitmap bmp;
private ImageView img;
img = (ImageView)findViewById(R.id.imageView1);
BitmapDrawable  abmp = (BitmapDrawable)img.getDrawable();
现在,我们将通过调用BitmapDrawable类的getBitmap()函数来创建位图。其语法如下-
bmp = abmp.getBitmap();
图像不过是二维矩阵。用同样的方式处理位图。图像由像素组成。因此,您将从该位图中获取像素并对其进行处理。它的语法如下-
for(int i=0; igetWidth()和getHeight()函数返回矩阵的高度和宽度。 getPixel()方法返回指定索引处的像素。一旦获得像素,就可以根据需要轻松地对其进行操作。
除了这些方法之外,还有其他方法可以帮助我们更好地处理图像。
| Sr.No | Method & description |
|---|---|
| 1 |
copy(Bitmap.Config config, boolean isMutable) This method copy this bitmap’s pixels into the new bitmap |
| 2 |
createBitmap(DisplayMetrics display, int width, int height, Bitmap.Config config) Returns a mutable bitmap with the specified width and height |
| 3 |
createBitmap(int width, int height, Bitmap.Config config) Returns a mutable bitmap with the specified width and height |
| 4 |
createBitmap(Bitmap src) Returns an immutable bitmap from the source bitmap |
| 5 |
extractAlpha() Returns a new bitmap that captures the alpha values of the original |
| 6 |
getConfig() This mehtod eturn that config, otherwise return null |
| 7 |
getDensity() Returns the density for this bitmap |
| 8 |
getRowBytes() Return the number of bytes between rows in the bitmap’s pixels |
| 9 |
setPixel(int x, int y, int color) Write the specified Color into the bitmap (assuming it is mutable) at the x,y coordinate |
| 10 |
setDensity(int density) This method specifies the density for this bitmap |
例
下面的示例演示了位图上的某些图像效果。它创建了一个基本应用程序,可让您将图片转换为灰度图像等等。
要尝试使用此示例,您需要在实际设备上运行它。
| Steps | Description |
|---|---|
| 1 | You will use Android studio to create an Android application under a package com.example.sairamkrishna.myapplication. |
| 2 | Modify src/MainActivity.java file to add necessary code. |
| 3 | Modify the res/layout/activity_main to add respective XML components |
| 4 | Run the application and choose a running android device and install the application on it and verify the results |
以下是修改后的MainActivity.java的内容。
package com.example.sairamkrishna.myapplication;

import android.graphics.Bitmap;
import android.graphics.Color;
import android.graphics.drawable.BitmapDrawable;
import android.support.v7.app.ActionBarActivity;

import android.os.Bundle;
import android.view.View;
import android.widget.Button;
import android.widget.ImageView;

public class MainActivity extends ActionBarActivity {
   Button b1, b2, b3;
   ImageView im;

   private Bitmap bmp;
   private Bitmap operation;

   @Override
   protected void onCreate(Bundle savedInstanceState) {
      super.onCreate(savedInstanceState);
      setContentView(R.layout.activity_main);

      b1 = (Button) findViewById(R.id.button);
      b2 = (Button) findViewById(R.id.button2);
      b3 = (Button) findViewById(R.id.button3);
      im = (ImageView) findViewById(R.id.imageView);

      BitmapDrawable abmp = (BitmapDrawable) im.getDrawable();
      bmp = abmp.getBitmap();
   }

   public void gray(View view) {
      operation = Bitmap.createBitmap(bmp.getWidth(),bmp.getHeight(), bmp.getConfig());
      double red = 0.33;
      double green = 0.59;
      double blue = 0.11;

      for (int i = 0; i < bmp.getWidth(); i++) {
         for (int j = 0; j < bmp.getHeight(); j++) {
            int p = bmp.getPixel(i, j);
            int r = Color.red(p);
            int g = Color.green(p);
            int b = Color.blue(p);

            r = (int) red * r;
            g = (int) green * g;
            b = (int) blue * b;
            operation.setPixel(i, j, Color.argb(Color.alpha(p), r, g, b));
         }
      }
      im.setImageBitmap(operation);
   }

   public void bright(View view){
      operation= Bitmap.createBitmap(bmp.getWidth(), bmp.getHeight(),bmp.getConfig());

      for(int i=0; i
以下是xml res / layout / activity_main.xml的修改内容。
abc表示关于tutorialspoint.com的徽标
以下是AndroidManifest.xml文件的内容。
让我们尝试运行刚刚修改的应用程序。我假设您在进行环境设置时已创建了AVD 。要从Android Studio运行该应用,请打开您项目的活动文件之一,然后点击运行 工具栏中的图标。 Android studio将应用安装在您的AVD上并启动它,如果设置和应用程序一切正常,它将显示在“模拟器”窗口下方-
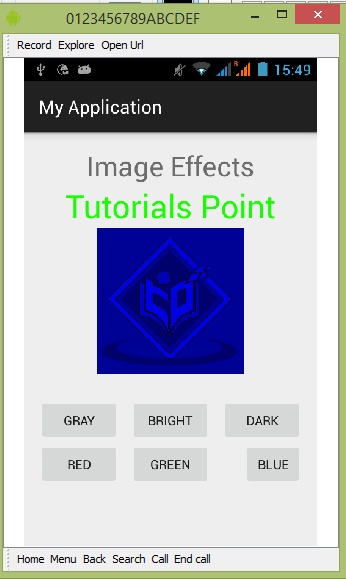
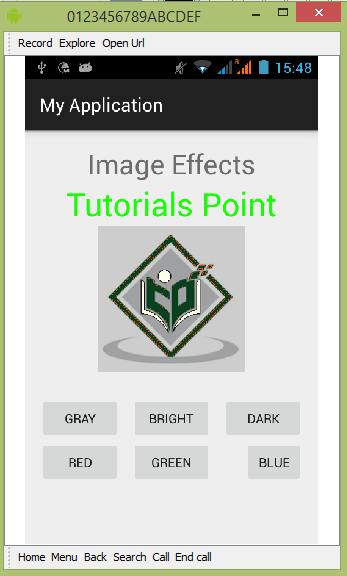
现在,如果您查看设备屏幕,将看到android的图像以及三个按钮。
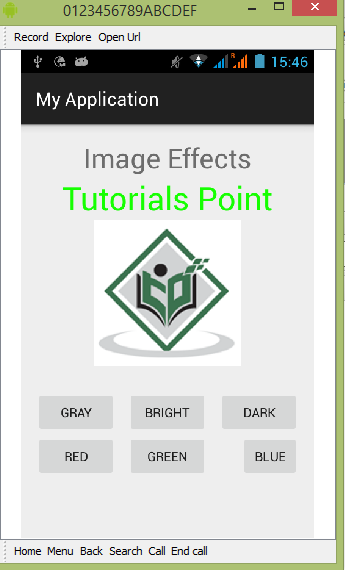
现在,只需选择“灰色”按钮即可将图像转换为灰度并更新UI。它显示如下-
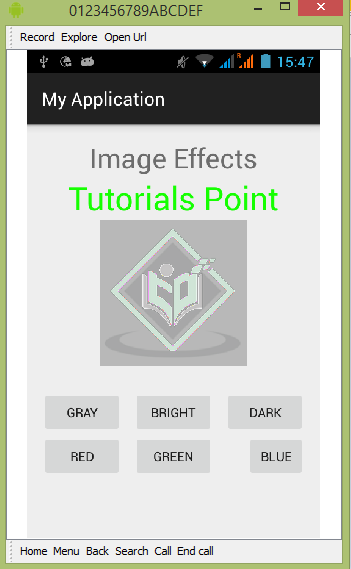
现在点击明亮的按钮,这将为图像的每个像素添加一些值,从而使亮度产生幻觉。它显示如下-
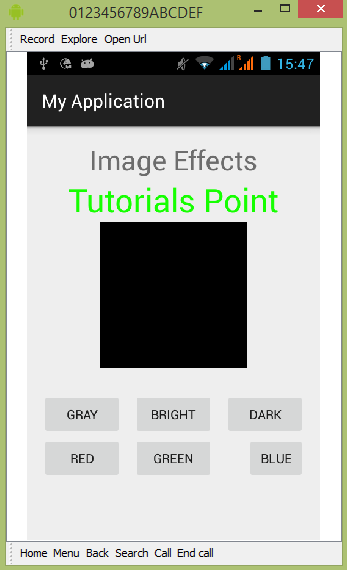
现在点击暗按钮,这将为图像的每个像素减去一些值,从而产生暗幻。它显示如下-
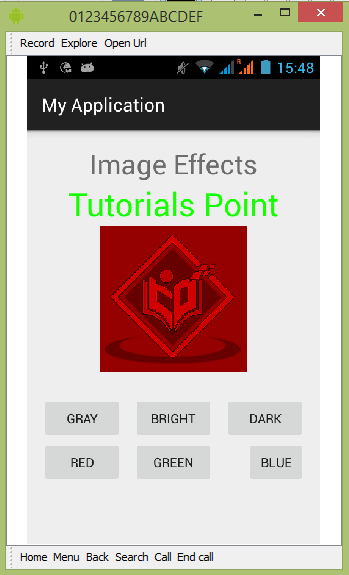
现在点击红色按钮,这将为图像的每个像素减去一些值,从而产生黑暗的幻觉。它显示如下-
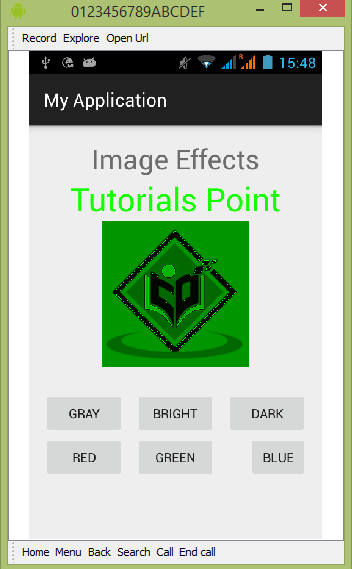
现在点击绿色按钮,这将为图像的每个像素减去一些值,从而产生黑暗的幻觉。它显示如下-
现在点击蓝色按钮,这将为图像的每个像素减去一些值,从而产生黑暗的幻觉。它显示如下-