- Android 发送短信示例(1)
- Android 发送短信示例
- 以编程方式发送短信 android (1)
- python 发送短信 - Python (1)
- python 发送短信 - Python 代码示例
- 以编程方式发送短信 android - 无论代码示例
- 获取短信 android (1)
- curl 发送短信 (1)
- codeigniter 短信发送 - PHP (1)
- codeigniter 短信发送 - PHP 代码示例
- curl 发送短信 - 任何代码示例
- 获取短信 android - 任何代码示例
- 如何在html代码示例中发送带有标签的短信
- 使用Python使用 REST 发送短信
- Python|使用 Twilio 发送短信(1)
- Python|使用 Twilio 发送短信
- 使用Python向手机发送短信更新
- 使用Python向手机发送短信更新(1)
- bd 短信网关,laravel 短信网关,短信发送库,bd 短信,短信网关 (1)
- bd 短信网关,laravel 短信网关,短信发送库,bd 短信,短信网关 - 任何代码示例
- Android 最佳短信应用
- Android 最佳短信应用(1)
- 在Android中使用SmsManager通过电话发送短信
- 在Android中使用SmsManager通过电话发送短信(1)
- 短信 laravel - PHP (1)
- html 短信链接 android - Html (1)
- android studio 选择 sim 插槽发送短信 - Javascript (1)
- android studio 选择 sim 插槽发送短信 - Javascript 代码示例
- html 短信链接 android - Html 代码示例
📅 最后修改于: 2021-01-05 05:02:55 🧑 作者: Mango
在Android中,您可以使用SmsManager API或设备内置的SMS应用程序来发送SMS。在本教程中,我们向您展示了两个发送SMS消息的基本示例-
SmsManager API
SmsManager smsManager = SmsManager.getDefault();
smsManager.sendTextMessage("phoneNo", null, "sms message", null, null);
内置短信应用
Intent sendIntent = new Intent(Intent.ACTION_VIEW);
sendIntent.putExtra("sms_body", "default content");
sendIntent.setType("vnd.android-dir/mms-sms");
startActivity(sendIntent);
当然,两者都需要SEND_SMS权限。
除了上述方法外,SmsManager类中还有其他几个重要功能。这些方法在下面列出-
| Sr.No. | Method & Description |
|---|---|
| 1 |
ArrayList This method divides a message text into several fragments, none bigger than the maximum SMS message size. |
| 2 |
static SmsManager getDefault() This method is used to get the default instance of the SmsManager |
| 3 |
void sendDataMessage(String destinationAddress, String scAddress, short destinationPort, byte[] data, PendingIntent sentIntent, PendingIntent deliveryIntent) This method is used to send a data based SMS to a specific application port. |
| 4 |
void sendMultipartTextMessage(String destinationAddress, String scAddress, ArrayList Send a multi-part text based SMS. |
| 5 |
void sendTextMessage(String destinationAddress, String scAddress, String text, PendingIntent sentIntent, PendingIntent deliveryIntent) Send a text based SMS. |
例
下面的示例实际向您展示如何使用SmsManager对象将SMS发送到给定的手机号码。
要试验此示例,您将需要配备最新的Android OS的实际移动设备,否则,您将不得不使用可能无法正常工作的仿真器。
| Step | Description |
|---|---|
| 1 | You will use Android Studio IDE to create an Android application and name it as tutorialspoint under a package com.example.tutorialspoint. |
| 2 | Modify src/MainActivity.java file and add required code to take care of sending sms. |
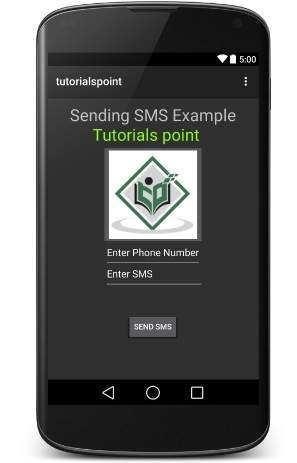
| 3 | Modify layout XML file res/layout/activity_main.xml add any GUI component if required. I’m adding a simple GUI to take mobile number and SMS text to be sent and a simple button to send SMS. |
| 4 | No need to define default string constants at res/values/strings.xml. Android studio takes care of default constants. |
| 5 | Modify AndroidManifest.xml as shown below |
| 6 | Run the application to launch Android emulator and verify the result of the changes done in the application. |
以下是修改后的主要活动文件src / com.example.tutorialspoint / MainActivity.java的内容。
package com.example.tutorialspoint;

import android.Manifest;
import android.content.pm.PackageManager;
import android.os.Bundle;
import android.app.Activity;

import android.support.v4.app.ActivityCompat;
import android.support.v4.content.ContextCompat;
import android.telephony.SmsManager;

import android.util.Log;
import android.view.Menu;
import android.view.View;

import android.widget.Button;
import android.widget.EditText;
import android.widget.Toast;

public class MainActivity extends Activity {
   private static final int MY_PERMISSIONS_REQUEST_SEND_SMS =0 ;
   Button sendBtn;
   EditText txtphoneNo;
   EditText txtMessage;
   String phoneNo;
   String message;

   @Override
   protected void onCreate(Bundle savedInstanceState) {
      super.onCreate(savedInstanceState);
      setContentView(R.layout.activity_main);

      sendBtn = (Button) findViewById(R.id.btnSendSMS);
      txtphoneNo = (EditText) findViewById(R.id.editText);
      txtMessage = (EditText) findViewById(R.id.editText2);

      sendBtn.setOnClickListener(new View.OnClickListener() {
         public void onClick(View view) {
            sendSMSMessage();
         }
      });
   }

   protected void sendSMSMessage() {
      phoneNo = txtphoneNo.getText().toString();
      message = txtMessage.getText().toString();

      if (ContextCompat.checkSelfPermission(this,
         Manifest.permission.SEND_SMS)
         != PackageManager.PERMISSION_GRANTED) {
            if (ActivityCompat.shouldShowRequestPermissionRationale(this,
               Manifest.permission.SEND_SMS)) {
            } else {
               ActivityCompat.requestPermissions(this,
                  new String[]{Manifest.permission.SEND_SMS},
                  MY_PERMISSIONS_REQUEST_SEND_SMS);
            }
      }
   }

   @Override
   public void onRequestPermissionsResult(int requestCode,String permissions[], int[] grantResults) {
      switch (requestCode) {
         case MY_PERMISSIONS_REQUEST_SEND_SMS: {
            if (grantResults.length > 0
               && grantResults[0] == PackageManager.PERMISSION_GRANTED) {
                  SmsManager smsManager = SmsManager.getDefault();
                  smsManager.sendTextMessage(phoneNo, null, message, null, null);
                  Toast.makeText(getApplicationContext(), "SMS sent.",
                     Toast.LENGTH_LONG).show();
            } else {
               Toast.makeText(getApplicationContext(),
                  "SMS faild, please try again.", Toast.LENGTH_LONG).show();
               return;
            }
         }
      }

   }
}
以下是res / layout / activity_main.xml文件的内容-
这里abc表示关于tutorialspoint徽标
下面将RES /值的内容/字符串.XML定义两个新常量-
tutorialspoint
以下是AndroidManifest.xml的默认内容-
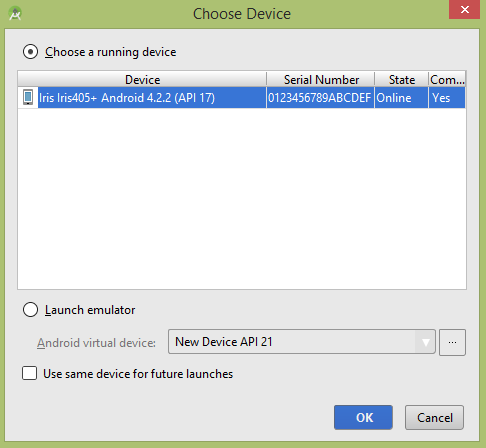
让我们尝试运行您的tutorialspoint应用程序。我假设您已将实际的Android Mobile设备与计算机连接。要从Android Studio运行该应用,请打开您项目的活动文件之一,然后点击运行 工具栏中的图标。在启动应用程序之前,Android Studio安装程序将显示以下窗口,以选择要在其中运行Android应用程序的选项。
现在,您可以输入所需的手机号码,并在该号码上发送短信。最后单击“发送短信”按钮发送您的短信。确保您的GSM / CDMA连接正常,可以将SMS传送给接收者。
您可以使用逗号分隔多个SMS,然后在程序内部将它们解析为数组字符串,最后可以使用循环将消息发送给所有给定数字。这样便可以编写自己的SMS客户端。下一部分将向您展示如何使用现有的SMS客户端发送SMS。
使用内置意图发送短信
您可以通过调用Android的内置SMS功能,使用Android Intent发送SMS。下一节说明了发送SMS所需的Intent对象的不同部分。
意图对象-发送短信的动作
您将使用ACTION_VIEW操作启动安装在Android设备上的SMS客户端。以下是使用ACTION_VIEW操作创建意图的简单语法。
Intent smsIntent = new Intent(Intent.ACTION_VIEW);
意图对象-发送短信的数据/类型
要发送短信,您需要使用setData()方法将smsto :指定为URI,并且使用setType()方法将数据类型设置为vnd.android-dir / mms-sms ,如下所示-
smsIntent.setData(Uri.parse("smsto:"));
smsIntent.setType("vnd.android-dir/mms-sms");
目的对象-额外发送短信
Android内置支持添加电话号码和短信以发送短信,如下所示:
smsIntent.putExtra("address"  , new String("0123456789;3393993300"));
smsIntent.putExtra("sms_body"  , "Test SMS to Angilla");
这里的address和sms_body区分大小写,并且只能以小写字符指定。您可以在单个字符串指定多个数字,但以分号(;)分隔。
例
下面的示例向您实际展示如何使用Intent对象启动SMS客户端,以将SMS发送给给定的收件人。
要试验此示例,您将需要配备最新的Android OS的实际移动设备,否则,您将不得不使用可能无法正常工作的仿真器。
| Step | Description |
|---|---|
| 1 | You will use Android studio IDE to create an Android application and name it as tutorialspoint under a package com.example.tutorialspoint. |
| 2 | Modify src/MainActivity.java file and add required code to take care of sending SMS. |
| 3 | Modify layout XML file res/layout/activity_main.xml add any GUI component if required. I’m adding a simple button to launch SMS Client. |
| 4 | No need to define default constants.Android studio takes care of default constants. |
| 5 | Modify AndroidManifest.xml as shown below |
| 6 | Run the application to launch Android emulator and verify the result of the changes done in the application. |
以下是修改后的主要活动文件src / com.example.tutorialspoint / MainActivity.java的内容。
package com.example.tutorialspoint;

import android.net.Uri;
import android.os.Bundle;
import android.app.Activity;
import android.content.Intent;
import android.util.Log;
import android.view.Menu;
import android.view.View;
import android.widget.Button;
import android.widget.Toast;

public class MainActivity extends Activity {
   @Override
   protected void onCreate(Bundle savedInstanceState) {
      super.onCreate(savedInstanceState);
      setContentView(R.layout.activity_main);

      Button startBtn = (Button) findViewById(R.id.button);
      startBtn.setOnClickListener(new View.OnClickListener() {
         public void onClick(View view) {
            sendSMS();
         }
      });
   }

   protected void sendSMS() {
      Log.i("Send SMS", "");
      Intent smsIntent = new Intent(Intent.ACTION_VIEW);

      smsIntent.setData(Uri.parse("smsto:"));
      smsIntent.setType("vnd.android-dir/mms-sms");
      smsIntent.putExtra("address"  , new String ("01234"));
      smsIntent.putExtra("sms_body"  , "Test ");

      try {
         startActivity(smsIntent);
         finish();
         Log.i("Finished sending SMS...", "");
      } catch (android.content.ActivityNotFoundException ex) {
         Toast.makeText(MainActivity.this,
         "SMS faild, please try again later.", Toast.LENGTH_SHORT).show();
      }
   }

   @Override
   public boolean onCreateOptionsMenu(Menu menu) {
      // Inflate the menu; this adds items to the action bar if it is present.
      getMenuInflater().inflate(R.menu.main, menu);
      return true;
   }
}
以下是res / layout / activity_main.xml文件的内容-
这里abc表示关于tutorialspoint徽标
下面将RES /值的内容/字符串.XML定义两个新常量-
tutorialspoint
以下是AndroidManifest.xml的默认内容-
让我们尝试运行您的tutorialspoint应用程序。我假设您已将实际的Android Mobile设备与计算机连接。要从Android Studio运行该应用,请打开您项目的活动文件之一,然后点击运行 工具栏中的图标。在启动应用程序之前,Android Studio将显示以下窗口,以选择要在其中运行Android应用程序的选项。
选择您的移动设备作为选项,然后检查将显示以下屏幕的移动设备-
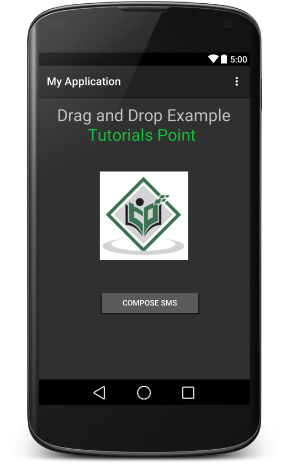
现在使用Compose SMS按钮启动Android内置的SMS客户端,如下所示-
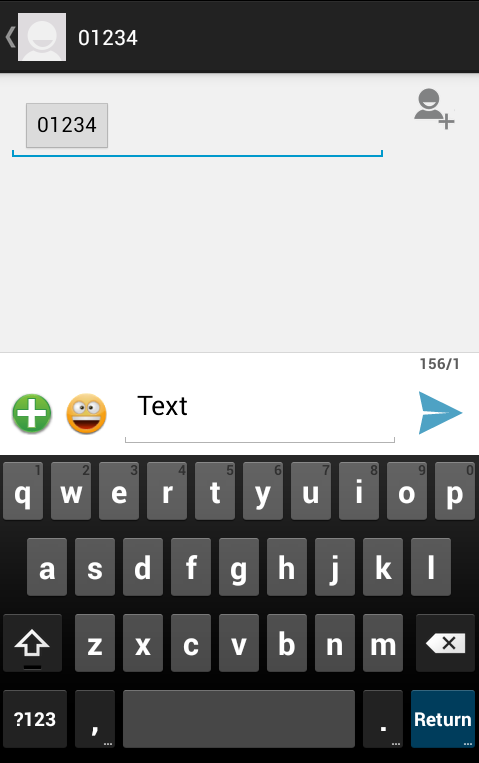
您可以修改任何给定的默认字段,最后使用发送SMS按钮将您的SMS发送给提到的收件人。