- 如何拖放 (1)
- HTML |拖放
- 拖放html(1)
- HTML |拖放
- HTML |拖放(1)
- HTML |拖放(1)
- 拖放html代码示例
- 拖放区 js - Javascript (1)
- 如何拖放 - 任何代码示例
- 拖放区 js - Javascript 代码示例
- 如何在 Android 应用中使用拖放功能?
- 在 selenium 中拖放 (1)
- HTML5-拖放(1)
- HTML5-拖放
- HTML5-拖放
- HTML 拖放事件
- HTML 拖放事件(1)
- wxPython-拖放
- wxPython-拖放(1)
- 拖放角度 - Html (1)
- javascript 文件拖放 - Javascript (1)
- angularJs 拖放 - Javascript (1)
- 在 selenium 中拖放 - 任何代码示例
- 拖放角度 - Html 代码示例
- javascript 文件拖放 - Javascript 代码示例
- angularJs 拖放 - Javascript 代码示例
- PyQt-拖放
- PyQt-拖放(1)
- 文本字段拖放 reactjs - Javascript (1)
📅 最后修改于: 2021-01-05 04:58:28 🧑 作者: Mango
Android拖放框架允许您的用户使用图形化的拖放手势将数据从当前布局中的一个视图移动到另一视图。从API 11开始,支持将视图拖放到其他视图或视图组上。该框架包括以下三个重要组件以支持拖放功能-
-
拖动事件类。
-
拖动听众。
-
辅助方法和类。
拖放过程
拖放过程中基本上有四个步骤或状态-
-
已开始-当您开始在布局中拖动项目时,此事件发生,您的应用程序调用startDrag()方法告诉系统开始拖动。 startDrag()方法中的参数提供要拖动的数据,该数据的元数据,以及用于绘制拖动阴影的回调。
系统首先通过回呼您的应用程序来获得拖动阴影作为响应。然后,它将在设备上显示拖动阴影。
接下来,系统将动作类型为ACTION_DRAG_STARTED的拖动事件发送到当前布局中所有View对象的已注册拖动事件侦听器。
要继续接收拖动事件(包括可能的放置事件),拖动事件侦听器必须返回true ,如果拖动事件侦听器返回false,则直到系统发送动作类型的拖动事件,它才会接收当前操作的拖动事件。 ACTION_DRAG_ENDED。
-
继续-用户继续拖动。系统发送ACTION_DRAG_ENTERED操作,然后将ACTION_DRAG_LOCATION操作发送到已注册的拖动事件侦听器,以供输入拖动点的View使用。侦听器可以选择响应事件而更改其View对象的外观,也可以通过突出显示其View做出反应。
用户将拖动阴影移到视图的边界框之外之后,拖动事件侦听器将收到ACTION_DRAG_EXITED动作。
-
下降-用户释放一个视图的边框内拖曳的项目。系统向View对象的侦听器发送操作类型为ACTION_DROP的拖动事件。
-
已结束-在动作类型ACTION_DROP之后,系统会发出动作类型为ACTION_DRAG_ENDED的拖动事件,以指示拖动操作已结束。
DragEvent类
DragEvent表示在拖放操作期间系统在不同时间发出的事件。此类提供了一些常量和在拖放过程中使用的重要方法。
常数
以下是可作为DragEvent类的一部分使用的所有常量整数。
| Sr.No. | Constants & Description |
|---|---|
| 1 |
ACTION_DRAG_STARTED Signals the start of a drag and drop operation. |
| 2 |
ACTION_DRAG_ENTERED Signals to a View that the drag point has entered the bounding box of the View. |
| 3 |
ACTION_DRAG_LOCATION Sent to a View after ACTION_DRAG_ENTERED if the drag shadow is still within the View object’s bounding box. |
| 4 |
ACTION_DRAG_EXITED Signals that the user has moved the drag shadow outside the bounding box of the View. |
| 5 |
ACTION_DROP Signals to a View that the user has released the drag shadow, and the drag point is within the bounding box of the View. |
| 6 |
ACTION_DRAG_ENDED Signals to a View that the drag and drop operation has concluded. |
方法
以下是DragEvent类中可用的一些重要且最常用的方法。
| Sr.No. | Constants & Description |
|---|---|
| 1 |
int getAction() Inspect the action value of this event.. |
| 2 |
ClipData getClipData() Returns the ClipData object sent to the system as part of the call to startDrag(). |
| 3 |
ClipDescription getClipDescription() Returns the ClipDescription object contained in the ClipData. |
| 4 |
boolean getResult() Returns an indication of the result of the drag and drop operation. |
| 5 |
floatgetX() Gets the X coordinate of the drag point. |
| 6 |
float getY() Gets the Y coordinate of the drag point. |
| 7 |
String toString() Returns a string representation of this DragEvent object. |
聆听阻力事件
如果您希望Layout中的任何视图都应响应Drag事件,则您的视图将实现View.OnDragListener或设置onDragEvent(DragEvent)回调方法。当系统调用该方法或侦听器时,系统会将上述的DragEvent对象传递给他们。您可以同时具有View对象的侦听器和回调方法。如果发生这种情况,系统将首先调用侦听器,然后在侦听器返回true时定义回调。
onDragEvent(DragEvent)方法和View.OnDragListener的组合类似于旧版本Android中与触摸事件一起使用的onTouchEvent()和View.OnTouchListener的组合。
开始拖动事件
首先,为要移动的数据创建一个ClipData和ClipData.Item 。作为ClipData对象的一部分,提供存储在ClipData中的ClipDescription对象中的元数据。对于不代表数据移动的拖放操作,您可能需要使用null而不是实际对象。
接下来,您可以扩展extend View.DragShadowBuilder以创建用于拖动视图的拖动阴影,也可以简单地使用View.DragShadowBuilder(View)来创建默认的拖动阴影,该拖动阴影的大小与传递给它的View参数相同,并带有触摸点位于拖动阴影的中心。
例
下面的示例显示了使用View.setOnLongClickListener() , View.setOnTouchListener()和View.OnDragEventListener()进行简单拖放的功能。
| Step | Description |
|---|---|
| 1 | You will use Android studio IDE to create an Android application and name it as My Application under a package com.example.saira_000.myapplication. |
| 2 | Modify src/MainActivity.java file and add the code to define event listeners as well as a call back methods for the logo image used in the example. |
| 3 | Copy image abc.png in res/drawable-* folders. You can use images with different resolution in case you want to provide them for different devices. |
| 4 | Modify layout XML file res/layout/activity_main.xml to define default view of the logo images. |
| 5 | Run the application to launch Android emulator and verify the result of the changes done in the application. |
以下是修改后的主要活动文件src / MainActivity.java的内容。该文件可以包括每个基本生命周期方法。
package com.example.saira_000.myapplication;

import android.app.Activity;

import android.content.ClipData;
import android.content.ClipDescription;

import android.support.v7.app.ActionBarActivity;
import android.os.Bundle;
import android.util.Log;

import android.view.DragEvent;
import android.view.Menu;
import android.view.MenuItem;
import android.view.MotionEvent;
import android.view.View;

import android.widget.ImageView;
import android.widget.RelativeLayout;


public class MainActivity extends Activity {
   ImageView img;
   String msg;
   private android.widget.RelativeLayout.LayoutParams layoutParams;

   @Override
   protected void onCreate(Bundle savedInstanceState) {
      super.onCreate(savedInstanceState);
      setContentView(R.layout.activity_main);
      img=(ImageView)findViewById(R.id.imageView);

      img.setOnLongClickListener(new View.OnLongClickListener() {
         @Override
         public boolean onLongClick(View v) {
            ClipData.Item item = new ClipData.Item((CharSequence)v.getTag());
            String[] mimeTypes = {ClipDescription.MIMETYPE_TEXT_PLAIN};

            ClipData dragData = new ClipData(v.getTag().toString(),mimeTypes, item);
            View.DragShadowBuilder myShadow = new View.DragShadowBuilder(img);

            v.startDrag(dragData,myShadow,null,0);
            return true;
         }
      });

      img.setOnDragListener(new View.OnDragListener() {
         @Override
         public boolean onDrag(View v, DragEvent event) {
            switch(event.getAction()) {
               case DragEvent.ACTION_DRAG_STARTED:
               layoutParams = (RelativeLayout.LayoutParams)v.getLayoutParams();
               Log.d(msg, "Action is DragEvent.ACTION_DRAG_STARTED");

               // Do nothing
               break;

               case DragEvent.ACTION_DRAG_ENTERED:
               Log.d(msg, "Action is DragEvent.ACTION_DRAG_ENTERED");
               int x_cord = (int) event.getX();
               int y_cord = (int) event.getY();
               break;

               case DragEvent.ACTION_DRAG_EXITED :
               Log.d(msg, "Action is DragEvent.ACTION_DRAG_EXITED");
               x_cord = (int) event.getX();
               y_cord = (int) event.getY();
               layoutParams.leftMargin = x_cord;
               layoutParams.topMargin = y_cord;
               v.setLayoutParams(layoutParams);
               break;

               case DragEvent.ACTION_DRAG_LOCATION  :
               Log.d(msg, "Action is DragEvent.ACTION_DRAG_LOCATION");
               x_cord = (int) event.getX();
               y_cord = (int) event.getY();
               break;

               case DragEvent.ACTION_DRAG_ENDED   :
               Log.d(msg, "Action is DragEvent.ACTION_DRAG_ENDED");

               // Do nothing
               break;

               case DragEvent.ACTION_DROP:
               Log.d(msg, "ACTION_DROP event");

               // Do nothing
               break;
               default: break;
            }
            return true;
         }
      });

      img.setOnTouchListener(new View.OnTouchListener() {
         @Override
         public boolean onTouch(View v, MotionEvent event) {
            if (event.getAction() == MotionEvent.ACTION_DOWN) {
               ClipData data = ClipData.newPlainText("", "");
               View.DragShadowBuilder shadowBuilder = new View.DragShadowBuilder(img);

               img.startDrag(data, shadowBuilder, img, 0);
               img.setVisibility(View.INVISIBLE);
               return true;
            } else {
               return false;
            }
         }
      });
   }
}
以下是res / layout / activity_main.xml文件的内容-
在下面的代码中,abc指示tutorialspoint.com的徽标
下面将RES /值的内容/字符串.XML定义两个新常量-
My Application
以下是AndroidManifest.xml的默认内容-
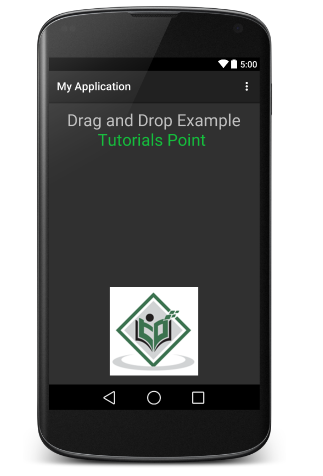
让我们尝试运行您的“我的应用程序”应用程序。我假设您在进行环境设置时已创建了AVD 。要从Android Studio运行该应用,请打开您项目的活动文件之一,然后点击运行 工具栏中的图标。 Android studio将应用安装在您的AVD上并启动它,如果设置和应用程序一切正常,它将显示在“模拟器”窗口下方-
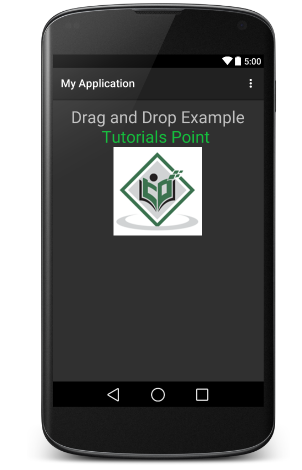
现在,长按一下显示的TutorialsPoint徽标,您将看到徽标图像从其位置长按1秒后稍微移动一点,这是您应该开始拖动图像的时间。您可以将其拖动到屏幕周围并将其放置在新位置。