📌 相关文章
- 自定义 android (1)
- 自定义 android - 任何代码示例
- 自定义背景 android (1)
- 自定义库 (1)
- Android-自定义字体
- Android-自定义字体(1)
- Android-应用程序组件
- Android应用程序的组件(1)
- Android应用程序的组件
- Android中的自定义复选框(1)
- Android中的自定义复选框
- 纯组件 (1)
- 可压组件 (1)
- 自定义背景 android - 任何代码示例
- Apache Ant自定义组件(1)
- Apache Ant自定义组件
- 在自定义组件中使用 v-model - Html (1)
- Android 自定义CheckBox
- Android 自定义CheckBox(1)
- 如何在 Android 中添加自定义字体
- 如何在 Android 中添加自定义字体(1)
- Android自定义Toast示例(1)
- Android自定义Toast示例
- 在自定义组件中使用 v-model - Html 代码示例
- r 中的自定义函数 (1)
- 如何在 Android 中添加自定义选项卡?
- 如何在 Android 中添加自定义选项卡?(1)
- Android自定义RadioButton(1)
- Android自定义RadioButton
📜 Android-自定义组件
📅 最后修改于: 2021-01-05 04:57:32 🧑 作者: Mango
在预内置组件中实现自己的组件,并使用自己定义的类扩展子类
Android提供了很多预构建的小部件列表,例如Button,TextView,EditText,ListView,CheckBox,RadioButton,Gallery,Spinner,AutoCompleteTextView等。您可以直接在Android应用程序开发中使用这些小部件,但是当您对任何可用小部件的现有功能不满意。 Android为您提供了创建自己的自定义组件的方法,您可以对其进行自定义以满足自己的需求。
如果您只需要对现有窗口小部件或布局进行少量调整,则可以简单地对窗口小部件或布局进行子类化并覆盖其方法,从而可以精确控制屏幕元素的外观和函数。
本教程说明了如何创建自定义视图,并通过简单的步骤在应用程序中使用它们。
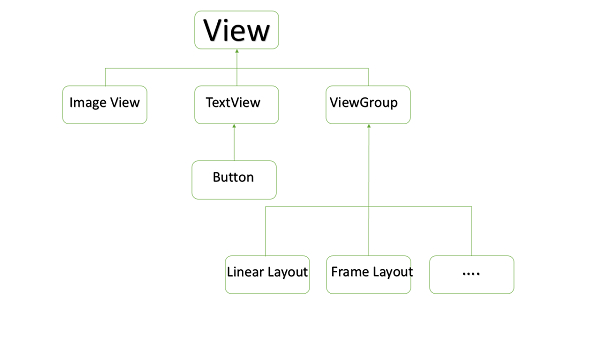
自定义视图层次结构中的自定义组件示例
创建一个简单的自定义组件
| Step | Description |
|---|---|
| 1 | You will use Android studio IDE to create an Android application and name it as myapplication under a package com.example.tutorialspoint7.myapplication as explained in the Hello World Example chapter. |
| 2 | Create an XML res/values/attrs.xml file to define new attributes along with their data type. |
| 3 | Create src/mainactivity.java file and add the code to define your custom component |
| 4 | Modify res/layout/activity_main.xml file and add the code to create Colour compound view instance along with few default attributes and new attributes. |
| 5 | Run the application to launch Android emulator and verify the result of the changes done in the application. |
在res / values文件夹中创建以下名为attrs.xml的属性文件。
将活动使用的布局文件更改为以下内容。
为您的复合视图创建以下名为timeview的java文件。
package com.example.tutorialspoint7.myapplication;
/**
 * Created by TutorialsPoint7 on 9/14/2016.
 */
import java.text.SimpleDateFormat;
import java.util.Calendar;

import android.content.Context;
import android.content.res.TypedArray;

import android.graphics.Color;
import android.util.AttributeSet;
import android.widget.TextView;

public class TimeView extends TextView {
   private String titleText;
   private boolean color;

   public TimeView(Context context) {
      super(context);
      setTimeView();
   }

   public TimeView(Context context, AttributeSet attrs) {
      super(context, attrs);
      // retrieved values correspond to the positions of the attributes
         TypedArray typedArray = context.obtainStyledAttributes(attrs,
            R.styleable.TimeView);
      int count = typedArray.getIndexCount();
      try{

         for (int i = 0; i < count; ++i) {

            int attr = typedArray.getIndex(i);
            // the attr corresponds to the title attribute
            if(attr == R.styleable.TimeView_title) {

               // set the text from the layout
               titleText = typedArray.getString(attr);
               setTimeView();
            } else if(attr == R.styleable.TimeView_setColor) {
               // set the color of the attr "setColor"
               color = typedArray.getBoolean(attr, false);
               decorateText();
            }
         }
      }

      // the recycle() will be executed obligatorily
      finally {
         // for reuse
         typedArray.recycle();
      }
   }

   public TimeView(Context context, AttributeSet attrs, int defStyle) {
      super(context, attrs, defStyle);
      setTimeView();
   }

   private void setTimeView() {
      // has the format hour.minuits am/pm
      SimpleDateFormat dateFormat = new SimpleDateFormat("hh.mm aa");
      String time = dateFormat.format(Calendar.getInstance().getTime());

      if(this.titleText != null )
      setText(this.titleText+" "+time);
      else
         setText(time);
   }

   private void decorateText() {
      // when we set setColor attribute to true in the XML layout
      if(this.color == true){
         // set the characteristics and the color of the shadow
         setShadowLayer(4, 2, 2, Color.rgb(250, 00, 250));
         setBackgroundColor(Color.CYAN);
      } else {
         setBackgroundColor(Color.RED);
      }
   }
}
将您的主要活动Java文件更改为以下代码,然后运行您的应用程序。
package com.example.tutorialspoint7.myapplication;

import android.os.Bundle;
import android.widget.TextView;
import android.app.Activity;

public class MainActivity extends Activity {

   @Override
   protected void onCreate(Bundle savedInstanceState) {
      super.onCreate(savedInstanceState);
      setContentView(R.layout.activity_main);

      TextView simpleText = (TextView) findViewById(R.id.simple);
      simpleText.setText("That is a simple TextView");
   }
}
正在运行的应用程序应类似于以下屏幕截图。
