- Flutter – 自定义底部导航栏(1)
- Flutter – 自定义底部导航栏
- 底部导航栏 (1)
- 底部导航栏 - 任何代码示例
- Android中的底部导航栏(1)
- Android中的底部导航栏
- 底部导航栏依赖 (1)
- 底部导航的依赖项 (1)
- Flutter的底部导航栏小部件
- Flutter的底部导航栏小部件(1)
- 底部导航栏依赖 - 任何代码示例
- 底部导航的依赖项 - 无论代码示例
- 使用 Kotlin 的 Android 底部导航栏(1)
- 使用 Kotlin 的 Android 底部导航栏
- Flutter – 动画导航(1)
- Flutter – 动画导航
- Flutter导航和路由
- Flutter中的路由和导航器
- Flutter导航和路由(1)
- Flutter中的路由和导航器(1)
- android 隐藏和显示底部导航 - Java (1)
- 创建底部导航栏反应原生 - Javascript(1)
- android 隐藏和显示底部导航 - Java 代码示例
- 颤动底部导航栏中心按钮 (1)
- android底部导航隐藏视图-Java(1)
- 创建底部导航栏反应原生 - Javascript代码示例
- 如何使用Bootstrap创建响应式底部导航栏?(1)
- 如何使用Bootstrap创建响应式底部导航栏?
- android底部导航隐藏视图-Java代码示例
📅 最后修改于: 2021-01-02 05:19:53 🧑 作者: Mango
flutter 底部导航栏
底部导航栏在最近几年中变得很流行,可以在不同的UI之间进行导航。许多开发人员使用底部导航,因为现在大多数应用程序都可以使用此小部件在不同屏幕之间导航来使用。
Flutter中的底部导航栏可以包含多个项目,例如文本标签和/或图标。它允许用户在应用程序的顶级视图之间快速导航。如果我们使用更大的屏幕,最好使用侧面导航栏。
在Flutter应用程序中,我们通常将底部导航栏与脚手架小部件一起设置。脚手架小部件提供了一个Scaffold.bottomNavigationBar参数来设置底部导航栏。请注意,仅添加BottomNavigationBar不会显示导航项。需要设置Items的BottomNavigationItems属性,该属性接受BottomNavigationItems小部件列表。
在底部导航栏中添加项目时,请记住以下要点:
- 我们在底部导航中只能显示少量的小部件,可以是2到5。
- 它必须至少有两个底部导航项。否则,我们会得到一个错误。
- 必须具有icon和title属性,并且我们需要为其设置相关的小部件。
BottomNavigationBar小部件的属性
以下是与底部导航栏小部件一起使用的属性:
项目:它定义了要显示在底部导航栏中的列表。它使用参数BottomNavigationBarItem包含下面给出的sup-properties:
const BottomNavigationBarItem({
    @required this.icon,
    this.title,
    Widget activeIcon,
    this.backgroundColor,
  })
currentIndex:确定屏幕上当前活动的底部导航栏项目。
onTap:当我们点击屏幕上的一个项目时调用。
iconSize:用于指定所有底部导航项图标的大小。
fixedColor:用于设置所选项目的颜色。如果我们尚未为图标或标题设置颜色,则会显示它。
类型:它确定底部导航栏的布局和行为。它以两种不同的方式运行:固定和移动。如果为null,则将使用fixed。否则,它将使用平移,当我们单击按钮时可以在其中看到动画的位置。
例:
让我们借助示例了解如何在Flutter应用程序中创建底部导航栏。因此,打开android studio并创建Flutter应用程序。下一个。打开main.dart文件,并使用以下代码删除其代码:
import 'package:flutter/material.dart';

void main() => runApp(MyApp());

/// This Widget is the main application widget.
class MyApp extends StatelessWidget {
  @override
  Widget build(BuildContext context) {
    return MaterialApp(
      home: MyNavigationBar (),
    );
  }
}

class MyNavigationBar extends StatefulWidget {
  MyNavigationBar ({Key key}) : super(key: key);

  @override
  _MyNavigationBarState createState() => _MyNavigationBarState();
}

class _MyNavigationBarState extends State {
  int _selectedIndex = 0;
  static const List _widgetOptions = [
    Text('Home Page', style: TextStyle(fontSize: 35, fontWeight: FontWeight.bold)),
    Text('Search Page', style: TextStyle(fontSize: 35, fontWeight: FontWeight.bold)),
    Text('Profile Page', style: TextStyle(fontSize: 35, fontWeight: FontWeight.bold)),
  ];

  void _onItemTapped(int index) {
    setState(() {
      _selectedIndex = index;
    });
  }

  @override
  Widget build(BuildContext context) {
    return Scaffold(
      appBar: AppBar(
        title: const Text('Flutter BottomNavigationBar Example'),
          backgroundColor: Colors.green
      ),
      body: Center(
        child: _widgetOptions.elementAt(_selectedIndex),
      ),
      bottomNavigationBar: BottomNavigationBar(
        items: const [
          BottomNavigationBarItem(
            icon: Icon(Icons.home),
            title: Text('Home'),
            backgroundColor: Colors.green
          ),
          BottomNavigationBarItem(
            icon: Icon(Icons.search),
            title: Text('Search'),
            backgroundColor: Colors.yellow
          ),
          BottomNavigationBarItem(
            icon: Icon(Icons.person),
            title: Text('Profile'),
            backgroundColor: Colors.blue,
          ),
        ],
        type: BottomNavigationBarType.shifting,
        currentIndex: _selectedIndex,
        selectedItemColor: Colors.black,
        iconSize: 40,
        onTap: _onItemTapped,
        elevation: 5
      ),
    );
  }
}
在上面的代码中,我们在脚手架小部件中使用了BottomNavigationBar。此导航包含三个BottomNavigationBarItem小部件。在这里,我们将currentIndex设置为0,以选择绿色的项目。 onTap()函数用于更改所选项目的索引,然后显示相应的消息。
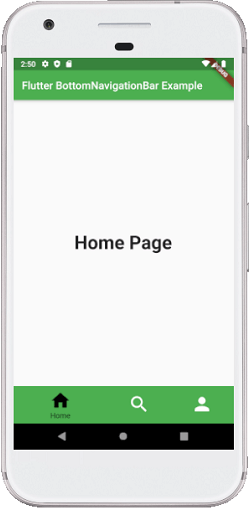
输出:
运行应用程序时,我们应该获得类似于以下屏幕截图的UI:
当我们单击底部导航栏中的搜索图标时,将显示以下屏幕。
