📌 相关文章
- 闪烁LED(1)
- 闪烁LED
- 使用开关盒闪烁多个LED
- 使用开关盒闪烁多个LED(1)
- 闪烁两个LED
- 闪烁两个LED(1)
- Arduino-闪烁LED
- Arduino-闪烁LED(1)
- arduino 中 LED 闪烁的代码 (1)
- 用树莓派闪烁 LED - Python (1)
- 用树莓派闪烁 LED - Python 代码示例
- arduino 中 LED 闪烁的代码 - 任何代码示例
- 使用阵列闪烁各种LED
- 嵌入式系统LED闪烁
- led (1)
- 如何在 arduino uno 中闪烁内置 LED (1)
- led - 任何代码示例
- 闪烁 css (1)
- 如何在 arduino uno 中闪烁内置 LED - 无论代码示例
- 闪烁 css 代码示例
- LED介绍(1)
- LED介绍
- 如何使用 CSS 创建闪烁文本?(1)
- 如何使用 CSS 创建闪烁文本?
- 如何使用 CSS 创建闪烁文本?(1)
- 如何使用 CSS 创建闪烁文本?
- 停止闪烁 - C# (1)
- Arduino LED 代码 (1)
- 输入时闪烁的行是什么 (1)
📜 使用循环闪烁多个LED
📅 最后修改于: 2020-12-27 09:46:01 🧑 作者: Mango
使用回路闪烁多个LED
我们已经讨论了使单个LED和两个LED闪烁的方法。
在这个项目中,我们将讨论使用for循环使三个LED闪烁的过程。三个LED将一个接一个点亮。
让我们开始这个过程。
所需硬件
该项目所需的组件如下:
- 3个红色LED
- 3 x 220欧姆电阻
- Arduino UNO R3开发板
- 跳线
我们可以根据自己的选择使用任何彩色LED。
原理
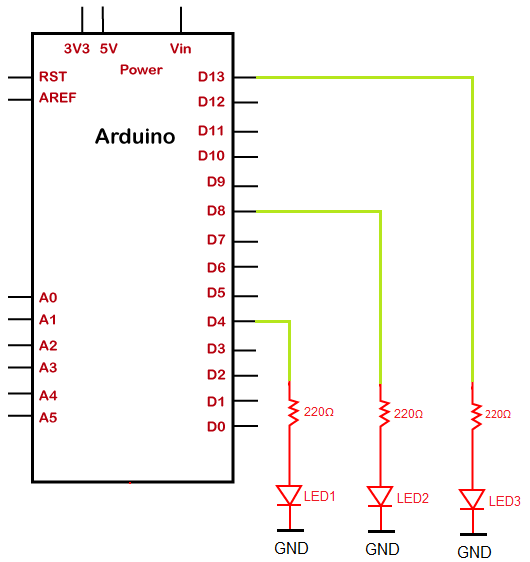
我们将三个LED连接到Arduino板的针脚13、8和4。电阻的极限值应在220到330欧姆之间,以设置通过LED的最佳电流。
所需的电阻足以在不损坏电路板和LED的情况下点亮LED 。我们将分别打开/关闭LED。
项目结构
该结构清楚地显示了UNO板的引脚排列,并且三个电阻串联的LED连接到该板。
如下图所示:
程序
上面的项目的连接在下面讨论:
- 将220欧姆的电阻器与三个LED串联。现在将其连接到Arduino板的插针编号13、8和4。
- 将三个LED的负极端子连接到GND(接地)。
草图
打开Arduino IDE并从下面的代码开始:
/*
  This program blinks LED connection to the pin number 13, 8, and 4
*/
void setup()
{
  pinMode(13, OUTPUT);
  pinMode(8, OUTPUT);
  pinMode(4, OUTPUT);
}
void loop()
{
 // the first LED is made to blink one time
  digitalWrite(13, HIGH);
  delay(1000); // delay time in milliseconds
  digitalWrite(13, LOW);
  delay(1000);
  // the second LED will blink two times
  digitalWrite(8, HIGH);
  delay(500); // the duration is 0.5 seconds
  digitalWrite(8, LOW);
  delay(500);
  digitalWrite(8, HIGH);
  delay(500);
  digitalWrite(8, LOW);
  delay(500);
   // the third LED will blink three times
  for( int i = 0; i < 3; i = i +1 )
  {
  digitalWrite(4, HIGH);
  delay(500);
  digitalWrite(4, LOW);
  delay(500);
    // We can adjust the delay time accordingly
  }
}
连接图
我们将使用模拟器来显示连接,因为连接变得更加清晰和精确。
我们可以使用硬件设备进行相同的连接。
