📌 相关文章
- PyTorch-修道院的可视化(1)
- PyTorch-修道院的可视化
- PyTorch-修道院中的特征提取
- PyTorch-修道院中的特征提取(1)
- PyTorch (1)
- pytorch 1.7 - Python (1)
- pytorch 逆 - Python (1)
- PyTorch简介|什么是PyTorch(1)
- PyTorch简介|什么是PyTorch
- pytorch - Python 代码示例
- pytorch 1.7 - Python 代码示例
- pytorch 逆 - Python 代码示例
- 处理 (1)
- c++ 处理 - C++ (1)
- 在Python中处理时间序列数据(1)
- 在Python中处理时间序列数据
- PyTorch - 任何代码示例
- PyTorch-安装(1)
- PyTorch-安装
- PyTorch-数据集
- PyTorch-数据集(1)
- pytorch - Shell-Bash (1)
- PyTorch安装|如何安装PyTorch
- PyTorch安装|如何安装PyTorch(1)
- PyTorch测试(1)
- PyTorch测试
- 使用 javascript 处理文件(1)
- python pytorch - Shell-Bash (1)
- pytorch - Shell-Bash 代码示例
📜 PyTorch-使用修道院的序列处理
📅 最后修改于: 2020-12-10 05:25:33 🧑 作者: Mango
在本章中,我们提出了一种替代方法,该方法替代地依赖于跨两个序列的单个2D卷积神经网络。我们网络的每一层都根据到目前为止产生的输出序列对源令牌重新编码。因此,在网络中普遍存在类似注意力的属性。
在这里,我们将重点介绍根据数据集中包含的值创建具有特定池的顺序网络。此过程也最好在“图像识别模块”中应用。

以下步骤用于使用PyTorch创建具有修道院的序列处理模型-
第1步
导入必要的模块以使用修道院进行序列处理。
import keras
from keras.datasets import mnist
from keras.models import Sequential
from keras.layers import Dense, Dropout, Flatten
from keras.layers import Conv2D, MaxPooling2D
import numpy as np
第2步
使用以下代码执行必要的操作以按照相应的顺序创建模式-
batch_size = 128
num_classes = 10
epochs = 12
# input image dimensions
img_rows, img_cols = 28, 28
# the data, split between train and test sets
(x_train, y_train), (x_test, y_test) = mnist.load_data()
x_train = x_train.reshape(60000,28,28,1)
x_test = x_test.reshape(10000,28,28,1)
print('x_train shape:', x_train.shape)
print(x_train.shape[0], 'train samples')
print(x_test.shape[0], 'test samples')
y_train = keras.utils.to_categorical(y_train, num_classes)
y_test = keras.utils.to_categorical(y_test, num_classes)
第三步
编译模型并将模型拟合到上述常规神经网络模型中,如下所示-
model.compile(loss =
keras.losses.categorical_crossentropy,
optimizer = keras.optimizers.Adadelta(), metrics =
['accuracy'])
model.fit(x_train, y_train,
batch_size = batch_size, epochs = epochs,
verbose = 1, validation_data = (x_test, y_test))
score = model.evaluate(x_test, y_test, verbose = 0)
print('Test loss:', score[0])
print('Test accuracy:', score[1])
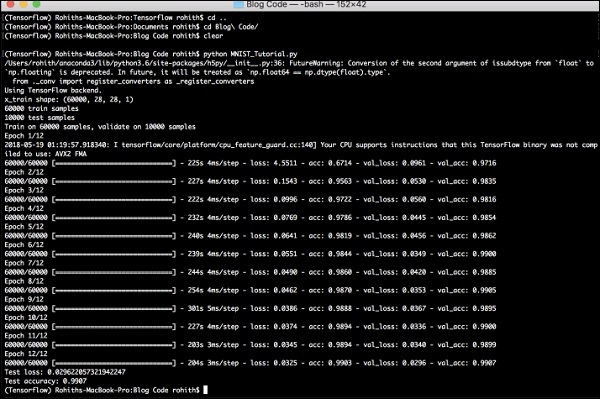
生成的输出如下-