在 Flickr8K 数据集上使用深度学习的图像字幕生成器
为给定图像生成标题是深度学习领域中的一个具有挑战性的问题。在本文中,我们将使用计算机视觉和 NLP 的不同技术来识别图像的上下文,并用像英语这样的自然语言来描述它们。我们将使用 CNN(卷积神经网络)和 LSTM(长短期记忆)单元构建图像字幕生成器的工作模型。
为了训练我们的模型,我使用 Flickr8K 数据集。它由 8000 张独特的图像组成,每张图像将映射到五个不同的句子来描述图像。
第 1 步:导入所需的库
# linear algebra
import numpy as np
# data processing, CSV file I / O (e.g. pd.read_csv)
import pandas as pd
import os
import tensorflow as tf
from keras.preprocessing.sequence import pad_sequences
from keras.preprocessing.text import Tokenizer
from keras.models import Model
from keras.layers import Flatten, Dense, LSTM, Dropout, Embedding, Activation
from keras.layers import concatenate, BatchNormalization, Input
from keras.layers.merge import add
from keras.utils import to_categorical, plot_model
from keras.applications.inception_v3 import InceptionV3, preprocess_input
import matplotlib.pyplot as plt  # for plotting data
import cv2
第 2 步:加载描述
我们文件的格式是图像和标题,由换行符(“\n”)分隔,即,它由图像名称后跟一个空格和 CSV 格式的图像描述组成。在这里,我们需要通过将图像存储在字典中来将图像映射到其描述。
def load_description(text):
    mapping = dict()
    for line in text.split("\n"):
        token = line.split("\t")
        if len(line) < 2:   # remove short descriptions
            continue
        img_id = token[0].split('.')[0] # name of the image
        img_des = token[1]              # description of the image
        if img_id not in mapping:
            mapping[img_id] = list()
        mapping[img_id].append(img_des)
    return mapping

token_path = '/kaggle / input / flickr8k / flickr_data / Flickr_Data / Flickr_TextData / Flickr8k.token.txt'
text = open(token_path, 'r', encoding = 'utf-8').read()
descriptions = load_description(text)
print(descriptions['1000268201_693b08cb0e'])
输出:
['A child in a pink dress is climbing up a set of stairs in an entry way .',

'A girl going into a wooden building .',

'A little girl climbing into a wooden playhouse .',

'A little girl climbing the stairs to her playhouse .',

'A little girl in a pink dress going into a wooden cabin .']
第 3 步:清理文本
NLP 的主要步骤之一是去除噪声,以便机器可以轻松地检测到文本中的模式。噪音将以标签、标点符号和数字等特殊字符的形式出现。如果它们出现在文本中,所有这些对于计算机来说都是难以理解的。所以我们需要删除这些以获得更好的结果。此外,您还可以使用 NLTK 库删除停用词并执行词干提取和词形还原。
def clean_description(desc):
    for key, des_list in desc.items():
        for i in range(len(des_list)):
            caption = des_list[i]
            caption = [ch for ch in caption if ch not in string.punctuation]
            caption = ''.join(caption)
            caption = caption.split(' ')
            caption = [word.lower() for word in caption if len(word)>1 and word.isalpha()]
            caption = ' '.join(caption)
            des_list[i] = caption

clean_description(descriptions)
descriptions['1000268201_693b08cb0e']
第 4 步:生成词汇表
词汇是我们文本语料库中存在的一组独特的单词。在为 NLP 处理原始文本时,一切都是围绕词汇表完成的。
def to_vocab(desc):
    words = set()
    for key in desc.keys():
        for line in desc[key]:
            words.update(line.split())
    return words
vocab = to_vocab(descriptions)
第 5 步:加载图像
在这里,我们需要将训练集中的图像映射到我们的描述变量中存在的相应描述。创建所有训练图像的名称列表,然后创建一个空字典并将图像映射到它们的描述,使用图像名称作为键和描述列表作为其值。在映射描述时,在开头和结尾添加唯一的单词以识别句子的开头和结尾。
import glob
images = '/kaggle / input / flickr8k / flickr_data / Flickr_Data / Images/'
# Create a list of all image names in the directory
img = glob.glob(images + '*.jpg')

train_path = '/kaggle / input / flickr8k / flickr_data / Flickr_Data / Flickr_TextData / Flickr_8k.trainImages.txt'
train_images = open(train_path, 'r', encoding = 'utf-8').read().split("\n")
train_img = []  # list of all images in training set
for im in img:
    if(im[len(images):] in train_images):
        train_img.append(im)

# load descriptions of training set in a dictionary. Name of the image will act as ey
def load_clean_descriptions(des, dataset):
    dataset_des = dict()
    for key, des_list in des.items():
        if key+'.jpg' in dataset:
            if key not in dataset_des:
                dataset_des[key] = list()
            for line in des_list:
                desc = 'startseq ' + line + ' endseq'
                dataset_des[key].append(desc)
    return dataset_des

train_descriptions = load_clean_descriptions(descriptions, train_images)
print(train_descriptions['1000268201_693b08cb0e'])
输出:
['startseq child in pink dress is climbing up set of stairs in an entry way endseq',

'startseq girl going into wooden building endseq',

'startseq little girl climbing into wooden playhouse endseq',

'startseq little girl climbing the stairs to her playhouse endseq',

'startseq little girl in pink dress going into wooden cabin endseq']
第 6 步:从所有图像中提取特征向量
现在我们将图像作为模型的输入,但与人类不同,机器无法通过看到图像来理解图像。所以我们需要将图像转换成编码,以便机器能够理解其中的模式。对于这个任务,我正在使用迁移学习,即我们使用已经在大型数据集上训练过的预训练模型,并从这些模型中提取特征并将它们用于我们的工作。在这里,我使用了 InceptionV3 模型,该模型已在 Imagenet 数据集上进行了训练,该数据集有 1000 个不同的类要分类。我们可以直接从 Keras.applications 模块中导入这个模型。
我们需要移除最后一个分类层以从 InceptionV3 模型中获得 (2048, ) 维特征向量。
from keras.preprocessing.image import load_img, img_to_array
def preprocess_img(img_path):
    # inception v3 excepts img in 299 * 299 * 3
    img = load_img(img_path, target_size = (299, 299))
    x = img_to_array(img)
    # Add one more dimension
    x = np.expand_dims(x, axis = 0)
    x = preprocess_input(x)
    return x

def encode(image):
    image = preprocess_img(image)
    vec = model.predict(image)
    vec = np.reshape(vec, (vec.shape[1]))
    return vec

base_model = InceptionV3(weights = 'imagenet')
model = Model(base_model.input, base_model.layers[-2].output)
# run the encode function on all train images and store the feature vectors in a list
encoding_train = {}
for img in train_img:
    encoding_train[img[len(images):]] = encode(img)
第 7 步:对词汇表进行标记
在这一步中,我们需要对词汇表中存在的所有单词进行标记。或者,我们可以在 Keras 中使用分词器来完成这项任务。
# list of all training captions
all_train_captions = []
for key, val in train_descriptions.items():
    for caption in val:
        all_train_captions.append(caption)

# consider only words which occur atleast 10 times
vocabulary = vocab
threshold = 10 # you can change this value according to your need
word_counts = {}
for cap in all_train_captions:
    for word in cap.split(' '):
        word_counts[word] = word_counts.get(word, 0) + 1

vocab = [word for word in word_counts if word_counts[word] >= threshold]

# word mapping to integers
ixtoword = {}
wordtoix = {}

ix = 1
for word in vocab:
    wordtoix[word] = ix
    ixtoword[ix] = word
    ix += 1

# find the maximum length of a description in a dataset
max_length = max(len(des.split()) for des in all_train_captions)
max_length
第 8 步:手套向量嵌入
GloVe 代表词表示的全局向量。它是斯坦福大学开发的一种无监督学习算法,用于通过聚合来自语料库的全局词-词共现矩阵来生成词嵌入。此外,我们有 8000 张图片,每张图片都有 5 个与之关联的标题。这意味着我们有 30000 个示例用于训练我们的模型。由于有更多示例,您还可以使用数据生成器以批量的形式向我们的模型提供输入,而不是一次性提供所有输入。为简单起见,我在这里不使用它。
此外,我们将使用嵌入矩阵来存储词汇表中单词之间的关系。嵌入矩阵是原始空间到实体将具有有意义关系的实值空间的线性映射。
X1, X2, y = list(), list(), list()
for key, des_list in train_descriptions.items():
    pic = train_features[key + '.jpg']
    for cap in des_list:
        seq = [wordtoix[word] for word in cap.split(' ') if word in wordtoix]
        for i in range(1, len(seq)):
            in_seq, out_seq = seq[:i], seq[i]
            in_seq = pad_sequences([in_seq], maxlen = max_length)[0]
            out_seq = to_categorical([out_seq], num_classes = vocab_size)[0]
            # store
            X1.append(pic)
            X2.append(in_seq)
            y.append(out_seq)

X2 = np.array(X2)
X1 = np.array(X1)
y = np.array(y)

# load glove vectors for embedding layer
embeddings_index = {}
golve_path ='/kaggle / input / glove-global-vectors-for-word-representation / glove.6B.200d.txt'
glove = open(golve_path, 'r', encoding = 'utf-8').read()
for line in glove.split("\n"):
    values = line.split(" ")
    word = values[0]
    indices = np.asarray(values[1: ], dtype = 'float32')
    embeddings_index[word] = indices

emb_dim = 200
emb_matrix = np.zeros((vocab_size, emb_dim))
for word, i in wordtoix.items():
    emb_vec = embeddings_index.get(word)
    if emb_vec is not None:
        emb_matrix[i] = emb_vec
emb_matrix.shape
第 9 步:定义模型
为了定义我们模型的结构,我们将使用功能 API 中的 Keras 模型。它分为三个主要步骤:
- 处理来自文本的序列
- 从图像中提取特征向量
- 通过连接上述两层来解码输出
# define the model
ip1 = Input(shape = (2048, ))
fe1 = Dropout(0.2)(ip1)
fe2 = Dense(256, activation = 'relu')(fe1)
ip2 = Input(shape = (max_length, ))
se1 = Embedding(vocab_size, emb_dim, mask_zero = True)(ip2)
se2 = Dropout(0.2)(se1)
se3 = LSTM(256)(se2)
decoder1 = add([fe2, se3])
decoder2 = Dense(256, activation = 'relu')(decoder1)
outputs = Dense(vocab_size, activation = 'softmax')(decoder2)
model = Model(inputs = [ip1, ip2], outputs = outputs)
输出:

字幕生成器深度学习模型
第 10 步:训练模型
为了训练我们的模型,我使用 Adam 的优化器和损失函数作为分类交叉熵。我正在为模型训练 50 个 epoch,这足以预测输出。如果您有更多的计算能力(GPU 的数量),您可以通过减少批量大小和增加时期数来训练它。
model.layers[2].set_weights([emb_matrix])
model.layers[2].trainable = False
model.compile(loss = 'categorical_crossentropy', optimizer = 'adam')
model.fit([X1, X2], y, epochs = 50, batch_size = 256)
# you can increase the number of epochs for better results
输出:
Epoch 1/1

292328/292328 [==============================] - 55s 189us/step - loss: 3.8895

Epoch 1/1

292328/292328 [==============================] - 55s 187us/step - loss: 3.1549

Epoch 1/1

292328/292328 [==============================] - 54s 186us/step - loss: 2.9185

Epoch 1/1

292328/292328 [==============================] - 54s 186us/step - loss: 2.7652

Epoch 1/1

292328/292328 [=================>.........] - ETA: 15s - loss: 2.6496
第 11 步:预测输出
def greedy_search(pic):
    start = 'startseq'
    for i in range(max_length):
        seq = [wordtoix[word] for word in start.split() if word in wordtoix]
        seq = pad_sequences([seq], maxlen = max_length)
        yhat = model.predict([pic, seq])
        yhat = np.argmax(yhat)
        word = ixtoword[yhat]
        start += ' ' + word
        if word == 'endseq':
            break
    final = start.split()
    final = final[1:-1]
    final = ' '.join(final)
    return final
输出:
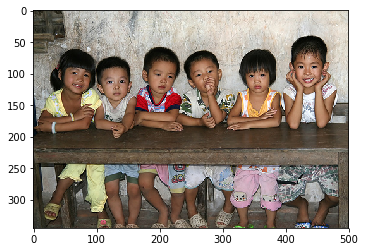
预测输出:四个女孩坐在木地板上
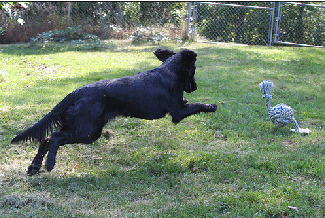
预测输出:黑狗在草丛中奔跑
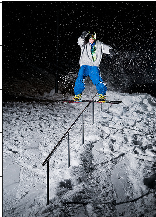
预测输出:人在坡道上玩滑板