- JUnit-测试框架(1)
- JUnit-测试框架
- Espresso测试框架-可访问性
- Espresso测试框架-可访问性(1)
- Espresso测试框架-简介
- Espresso测试框架-简介(1)
- Espresso测试框架-体系结构
- Espresso测试框架-体系结构(1)
- Espresso测试框架-目的
- Espresso测试框架-目的(1)
- Espresso测试框架-WebView
- Espresso测试框架-WebView(1)
- JUnit-概述(1)
- JUnit-概述
- Espresso测试框架-查看操作
- Espresso测试框架-查看操作(1)
- Espresso测试框架-测试记录器(1)
- Espresso测试框架-测试记录器
- Espresso测试框架-视图匹配器(1)
- Espresso测试框架-视图匹配器
- Espresso测试框架-设置说明(1)
- Espresso测试框架-设置说明
- Espresso测试框架-UI性能(1)
- Espresso测试框架-UI性能
- Espresso测试框架-查看断言
- Espresso测试框架-查看断言(1)
- Espresso测试框架-AdapterView(1)
- Espresso测试框架-AdapterView
- 移动测试-框架概述(1)
📅 最后修改于: 2020-12-06 09:32:20 🧑 作者: Mango
在这一章中,让我们了解JUnit的基础知识, JUnit是Java社区开发的流行的单元测试框架,在其上构建了espresso测试框架。
JUnit是用于对Java应用程序进行单元测试的事实上的标准。即使它在单元测试中很流行,它也为仪器测试提供了完整的支持和提供。 Espresso测试库扩展了必要的JUnit类,以支持基于Android的工具测试。
编写一个简单的单元测试
让我们创建一个Java类Computation (Computation.java)并编写简单的数学运算Summation和Multiplication 。然后,我们将使用JUnit编写测试用例,并通过运行测试用例进行检查。
-
启动Android Studio。
-
打开在上一章中创建的HelloWorldApp 。
-
在app / src / main / java / com / tutorialspoint / espressosamples / helloworldapp /中创建文件Computation.java ,并编写以下两个函数-Sum和Multiply ,
package com.tutorialspoint.espressosamples.helloworldapp;
public class Computation {
   public Computation() {}
   public int Sum(int a, int b) {
      return a + b;
   }
   public int Multiply(int a, int b) {
      return a * b;
   }
}
-
在app / src / test / java / com / tutorialspoint / espressosamples / helloworldapp中创建一个文件ComputationUnitTest.java,并编写单元测试用例以测试Sum和Multiply功能,如下所示
package com.tutorialspoint.espressosamples.helloworldapp;
import org.junit.Test;
import static org.junit.Assert.assertEquals;
public class ComputationUnitTest {
   @Test
   public void sum_isCorrect() {
      Computation computation = new Computation();
      assertEquals(4, computation.Sum(2,2));
   }
   @Test
   public void multiply_isCorrect() {
      Computation computation = new Computation();
      assertEquals(4, computation.Multiply(2,2));
   }
}
在这里,我们使用了两个新术语– @Test和assertEquals 。通常,JUnit使用Java注释来标识类中的测试用例以及有关如何执行测试用例的信息。 @Test是这样的Java注释之一,它指定特定的函数为junit测试用例。的assertEquals是断言的函数,第一个参数(预期值),第二个参数(计算值)是相等的和相同。 JUnit为不同的测试场景提供了许多断言方法。
-
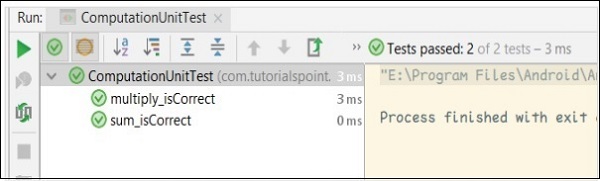
现在,通过右键单击类并调用运行“ComputationUnitTest”选项,在前面的章节解释运行ComputationUnitTest在Android工作室。这将运行单元测试用例并报告成功。
计算单元测试的结果如下所示-
注解
JUnit框架广泛使用注释。一些重要的注释如下-
-
@测试
-
@之前
-
@后
-
@课前
-
@下课以后
-
@规则
@Test批注
@Test是JUnit框架中非常重要的注释。 @Test用于区分普通方法和测试用例方法。用@Test注释修饰方法后,该特定方法将被视为Test用例,并将由JUnit Runner运行。 JUnit Runner是一个特殊的类,用于查找和运行java类中可用的JUnit测试用例。目前,我们正在使用Android Studio的内置选项来运行单元测试(后者会运行JUnit Runner )。示例代码如下,
package com.tutorialspoint.espressosamples.helloworldapp;
import org.junit.Test;
import static org.junit.Assert.assertEquals;

public class ComputationUnitTest {
   @Test
   public void multiply_isCorrect() {
      Computation computation = new Computation();
      assertEquals(4, computation.Multiply(2,2));
   }
}
@之前
@Before批注用于引用方法,在运行特定测试类中可用的任何测试方法之前,必须先调用该方法。例如我们的样品中,计算对象可以在单独的方法来创建并与@Before注释,这样它会既sum_isCorrect和multiply_isCorrect测试用例之前运行。完整的代码如下,
package com.tutorialspoint.espressosamples.helloworldapp;
import org.junit.Before;
import org.junit.Test;
import static org.junit.Assert.assertEquals;

public class ComputationUnitTest {
   Computation computation = null;
   @Before
   public void CreateComputationObject() {
      this.computation = new Computation();
   }
   @Test
   public void sum_isCorrect() {
      assertEquals(4, this.computation.Sum(2,2));
   }
   @Test
   public void multiply_isCorrect() {
      assertEquals(4, this.computation.Multiply(2,2));
   }
}
@后
@After与@Before相似,但是在每个测试用例运行之后,将调用或执行以@After注释的方法。示例代码如下,
package com.tutorialspoint.espressosamples.helloworldapp;
import org.junit.After;
import org.junit.Before;
import org.junit.Test;
import static org.junit.Assert.assertEquals;

public class ComputationUnitTest {
   Computation computation = null;
   @Before
   public void CreateComputationObject() {
      this.computation = new Computation();
   }
   @After
   public void DestroyComputationObject() {
      this.computation = null;
   }
   @Test
   public void sum_isCorrect() {
      assertEquals(4, this.computation.Sum(2,2));
   }
   @Test
   public void multiply_isCorrect() {
      assertEquals(4, this.computation.Multiply(2,2));
   }
}
@课前
@BeforeClass与@Before相似,但是在运行特定类中的所有测试用例之前,用@BeforeClass注释的方法仅被调用或执行一次。创建资源密集型对象(如数据库连接对象)很有用。这将减少执行测试用例集合的时间。该方法必须是静态的才能正常工作。在我们的示例中,我们可以在运行下面指定的所有测试用例之前创建一次计算对象,
package com.tutorialspoint.espressosamples.helloworldapp;
import org.junit.BeforeClass;
import org.junit.Test;
import static org.junit.Assert.assertEquals;

public class ComputationUnitTest {
   private static Computation computation = null;
   @BeforeClass
   public static void CreateComputationObject() {
      computation = new Computation();
   }
   @Test
   public void sum_isCorrect() {
      assertEquals(4, computation.Sum(2,2));
   }
   @Test
   public void multiply_isCorrect() {
      assertEquals(4, computation.Multiply(2,2));
   }
}
@下课以后
@AfterClass与@BeforeClass相似,但是在运行特定类中的所有测试用例之后,用@AfterClass注释的方法仅被调用或执行一次。此方法还必须是静态的才能正常工作。示例代码如下-
package com.tutorialspoint.espressosamples.helloworldapp;
import org.junit.AfterClass;
import org.junit.BeforeClass;
import org.junit.Test;
import static org.junit.Assert.assertEquals;

public class ComputationUnitTest {
   private static Computation computation = null;
   @BeforeClass
   public static void CreateComputationObject() {
      computation = new Computation();
   }
   @AfterClass
   public static void DestroyComputationObject() {
      computation = null;
   }
   @Test
   public void sum_isCorrect() {
      assertEquals(4, computation.Sum(2,2));
   }
   @Test
   public void multiply_isCorrect() {
      assertEquals(4, computation.Multiply(2,2));
   }
}
@规则
@Rule注释是JUnit的亮点之一。它用于向测试用例添加行为。我们只能注释类型TestRule的字段。它实际上提供了@Before和@After注释提供的功能集,但以一种有效且可重用的方式。例如,在测试案例期间,我们可能需要一个临时文件夹来存储一些数据。通常,我们需要在运行测试用例之前创建一个临时文件夹(使用@Before或@BeforeClass批注),并在运行测试用例之后销毁它(使用@After或@AfterClass批注)。相反,我们可以使用JUnit框架提供的TemporaryFolder (类型为TestRule )类为所有测试用例创建一个临时文件夹,并且该临时文件夹将在运行测试用例时删除。我们需要创建一个类型为TemporaryFolder的新变量,并需要使用@Rule进行注释,如下所示,
package com.tutorialspoint.espressosamples.helloworldapp;

import org.junit.AfterClass;
import org.junit.BeforeClass;
import org.junit.Rule;
import org.junit.Test;
import org.junit.rules.TemporaryFolder;
import java.io.File;
import java.io.IOException;
import static junit.framework.TestCase.assertTrue;
import static org.junit.Assert.assertEquals;

public class ComputationUnitTest {
   private static Computation computation = null;
   @Rule
   public TemporaryFolder folder = new TemporaryFolder();
   @Test
   public void file_isCreated() throws IOException {
      folder.newFolder("MyTestFolder");
      File testFile = folder.newFile("MyTestFile.txt");
      assertTrue(testFile.exists());
   }
   @BeforeClass
   public static void CreateComputationObject() {
      computation = new Computation();
   }
   @AfterClass
   public static void DestroyComputationObject() {
      computation = null;
   }
   @Test
   public void sum_isCorrect() {
      assertEquals(4, computation.Sum(2,2));
   }
   @Test
   public void multiply_isCorrect() {
      assertEquals(4, computation.Multiply(2,2));
   }
}
执行顺序
在JUnit中,使用不同注释进行注释的方法将按特定顺序执行,如下所示,
-
@课前
-
@规则
-
@之前
-
@测试
-
@后
-
@下课以后
断言
断言是一种检查测试用例的期望值是否与测试用例结果的实际值匹配的方法。 JUnit为不同的场景提供断言;以下是一些重要的断言-
-
fail() -明确使测试用例失败。
-
assertTrue(boolean test_condition) -检查test_condition是否为true
-
assertFalse(boolean test_condition) -检查test_condition是否为false
-
assertEquals(expected,actual) -检查两个值是否相等
-
assertNull(object) -检查对象是否为空
-
assertNotNull(object) -检查对象不为空
-
assertSame(预期的,实际的) -检查两者都引用相同的对象。
-
assertNotSame(预期的,实际的) -检查两者均引用不同的对象。