- CICS-伪编程
- CICS-伪编程(1)
- CICS-面试问题(1)
- CICS-面试问题
- CICS教程
- CICS教程(1)
- 讨论CICS(1)
- 讨论CICS
- CICS-环境(1)
- CICS-环境
- CICS-状态代码(1)
- CICS-状态代码
- CICS-概述
- CICS-概述(1)
- CICS-接口块(1)
- CICS-接口块
- CICS-文件处理(1)
- CICS-文件处理
- CICS-核心(1)
- CICS-核心
- CICS-错误处理(1)
- CICS-错误处理
- CICS-交易(1)
- CICS-交易
- CICS-辅助键
- CICS-辅助键(1)
- CICS-有用的资源
- CICS-有用的资源(1)
- CICS-控制操作(1)
📅 最后修改于: 2020-11-22 16:33:51 🧑 作者: Mango
BMS接收用户输入的数据,然后将其格式化为符号地图区域。应用程序只能访问符号映射中存在的数据。应用程序处理数据,并将输出发送到符号映射。 BMS将把符号数据的输出与物理图合并。
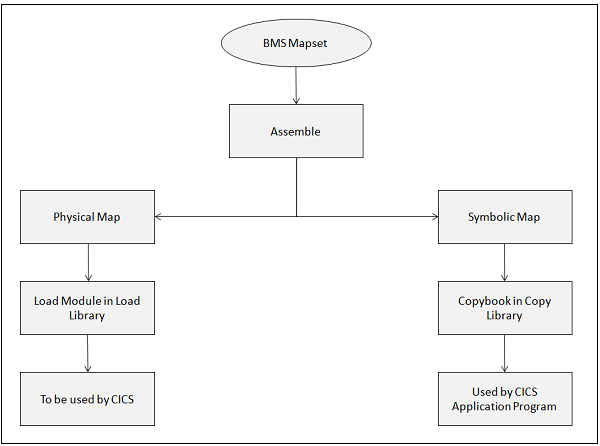
实物图
物理地图是加载库中的加载模块,其中包含有关应如何显示地图的信息。
-
它包含有关地图中所有字段的属性及其位置的详细信息。
-
它包含给定终端的地图显示格式。
-
它使用BMS宏进行编码。它是单独组装的,并链接编辑到CICS库中。
符号图
符号映射是库中的一本复制书。 CICS应用程序使用复制书来从终端发送和接收数据。
-
它包含所有复制到程序的WORKINGSTORAGE部分的变量数据。
-
它具有所有命名字段。应用程序程序员使用这些字段读取数据并将其写入映射。
船长和塞场
对于未受保护的命名字段,在地图中,如果我们将长度指定为10,则意味着name字段可以使用长度不能超过10的值。但是,当您使用CICS显示此地图并开始在在屏幕上,我们可以输入10个以上的字符,即直到屏幕末尾,我们甚至可以在下一行中输入。为了防止这种情况,我们使用“跳过”字段或“塞子”字段。跳过字段通常是长度为1的未命名字段,在命名字段之后指定。
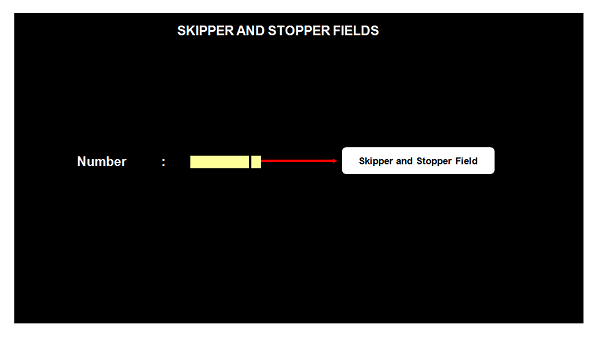
船长领域
如果我们在指定的未保护字段之后放置一个跳过字段,则在输入值时,一旦达到指定的长度,光标将自动定位到下一个未保护字段。以下示例显示如何添加船长字段-
NUMBER  DFHMDF POS = (01,01), X
   LENGTH = 5, X
   ATTRB = (UNPROT,IC)
      DFHMDF POS = (01,07), X
      LENGTH = 1, X
      ATTRB = (ASKIP)
塞子场
如果我们在指定的不受保护的字段之后放置一个终止符字段,则在输入值时,一旦达到指定的长度,光标将停止其定位。以下示例显示如何添加一个塞子字段-
NUMBER  DFHMDF POS = (01,01), X
   LENGTH = 5, X
    ATTRB = (UNPROT,IC)
       DFHMDF POS = (01,07), X
      LENGTH = 1, X
      ATTRB = (PROT)
属性字节
任何字段的属性字节都存储有关字段物理属性的信息。下图和表格说明了每个位的含义。
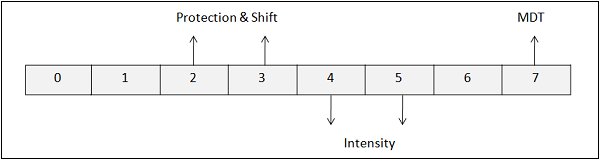
| Bit Position | Description | Bit Settings |
|---|---|---|
| 0 & 1 | Determined by contents of bit 2 to 7 | |
| 2 & 3 | Protection & Shift | 00 – Unprotected Alphanumeric 01 – Unprotected Numeric 10 – Protected Stop 11 – Protected Skip |
| 4 & 5 | Intensity | 00 – Normal 01 – Normal 10 – Bright 11 – No-display ( Dark ) |
| 6 | Must be Zero Always | |
| 7 | Modified Data Tag | 0 – Field has not been modified 1 – Field has been modified |
修改后的数据标签
修改数据标签(MDT)是属性字节中的最后一位。
-
MDT是仅保留一位的标志。它指定是否将该值传输到系统。
-
更改字段值时,其默认值为1。
-
如果MDT为0,则无法传输数据;如果MDT为1,则可以传输数据。
发送地图
send map命令将格式化的输出写入终端。它用于将地图从应用程序发送到终端。以下代码段显示了如何将地图发送到终端-
EXEC CICS SEND
   MAP('map-name')
   MAPSET('mapset-name')
   [FROM(data-area)]
   [LENGTH(data_value)]
   [DATAONLY]
   [MAPONLY]
   [CURSOR]
   [ERASE/ERASEAUP]
   [FREEKB]
   [FRSET]
END-EXEC
下表列出了send map命令中使用的参数及其含义。
| Sr.No | Parameter & Description |
|---|---|
| 1 |
Map-name It is the name of the map which we want to send. It is mandatory. |
| 2 |
Mapset-name It is the name of the map set that contains the mapname. The mapset name is needed unless it is the same as the map name. |
| 3 |
FROM It is used if we have decided to use a different DSECT name, we must use the option FROM (dsect-name) along with SEND MAP command. |
| 4 |
MAPONLY It means that no data from your program is to be merged into the map and only the information in the map is transmitted. |
| 5 |
DATAONLY It is the logical opposite of MAPONLY. We use it to modify the variable data in a display that has already been created. Only the data from your program is sent to the screen. The constants in the map are not sent. |
| 6 |
ERASE It causes the entire screen to be erased before what we are sending is shown. |
| 7 |
ERASEUP It causes only unprotected fields to be erased. |
| 8 |
FRSET Flag Reset turns off the modified data tag in the attribute byte for all the fields on the screen before what you are sending is placed there. |
| 9 |
CURSOR It can be used to position the cursor on the terminal screen. Cursor can be set by moving -1 to the L part of the field and then sending the map. |
| 10 |
ALARM It causes the audible alarm to be sounded. |
| 11 |
FREEKB. The keyboard is unlocked if we specify FREEKB in either the map or the SEND command. |
| 12 |
It allows the output of a SEND command to be printed on a printer. |
| 13 |
FORMFEED It causes the printer to restore the paper to the top of the next page before the output is printed. |
接收地图
当我们想从终端接收输入时,我们使用RECEIVE MAP命令。 MAP和MAPSET参数与SEND MAP命令具有完全相同的含义。以下代码段显示了如何接收地图-
EXEC CICS RECEIVE
   MAP('map-name')
   MAPSET('mapset-name')
   [INTO(data-area)]
   [FROM(data-area)]
   [LENGTH(data_value)]
END-EXEC
Mapset执行
以下步骤是开发和执行映射集所必需的-
-
步骤1-打开一个TSO会话。
-
步骤2-创建一个新的PDS。
-
步骤3-根据要求在新成员编码映射集。
-
步骤4-使用CICS管理员提供的JCL组装映射集。
-
步骤5-打开CICS会话。
-
步骤6-使用命令安装程序-
CEMT SET PROG(mapset-name)新增
-
步骤7-键入以下命令以将地图发送到终端-
CECI发送MAP(地图名称)MAPSET(地图名称)擦除FREEKB